In early June, I signed up for two test knits, including this pattern. These are the first patterns I’ve ever test knit. I wanted to know more about the process of creating a pattern, and thought this would be a fun way to learn a little more about that. I really enjoyed both of the projects, and the test knitting process. I’ve signed up for another test knit and am swatching for it now.
This particular pattern was an interesting challenge. I’m not a huge fan of seed stitch. I knit English style (throw the yarn with my right hand). When I have to switch between knit and purl a lot — and with seed stitch you are switching on every new stitch — it slows me down since I have to reposition the yarn.
Cables slow me down too. I don’t use a cable needle anymore. Instead, I pinch the base of the stitches that form the cable, slide them all off the needle, put them back on the left hand needle in the correct order, then work the stitches according to the cable directions. This is obviously slower than working across the row, but it is quicker than using a cable needle.
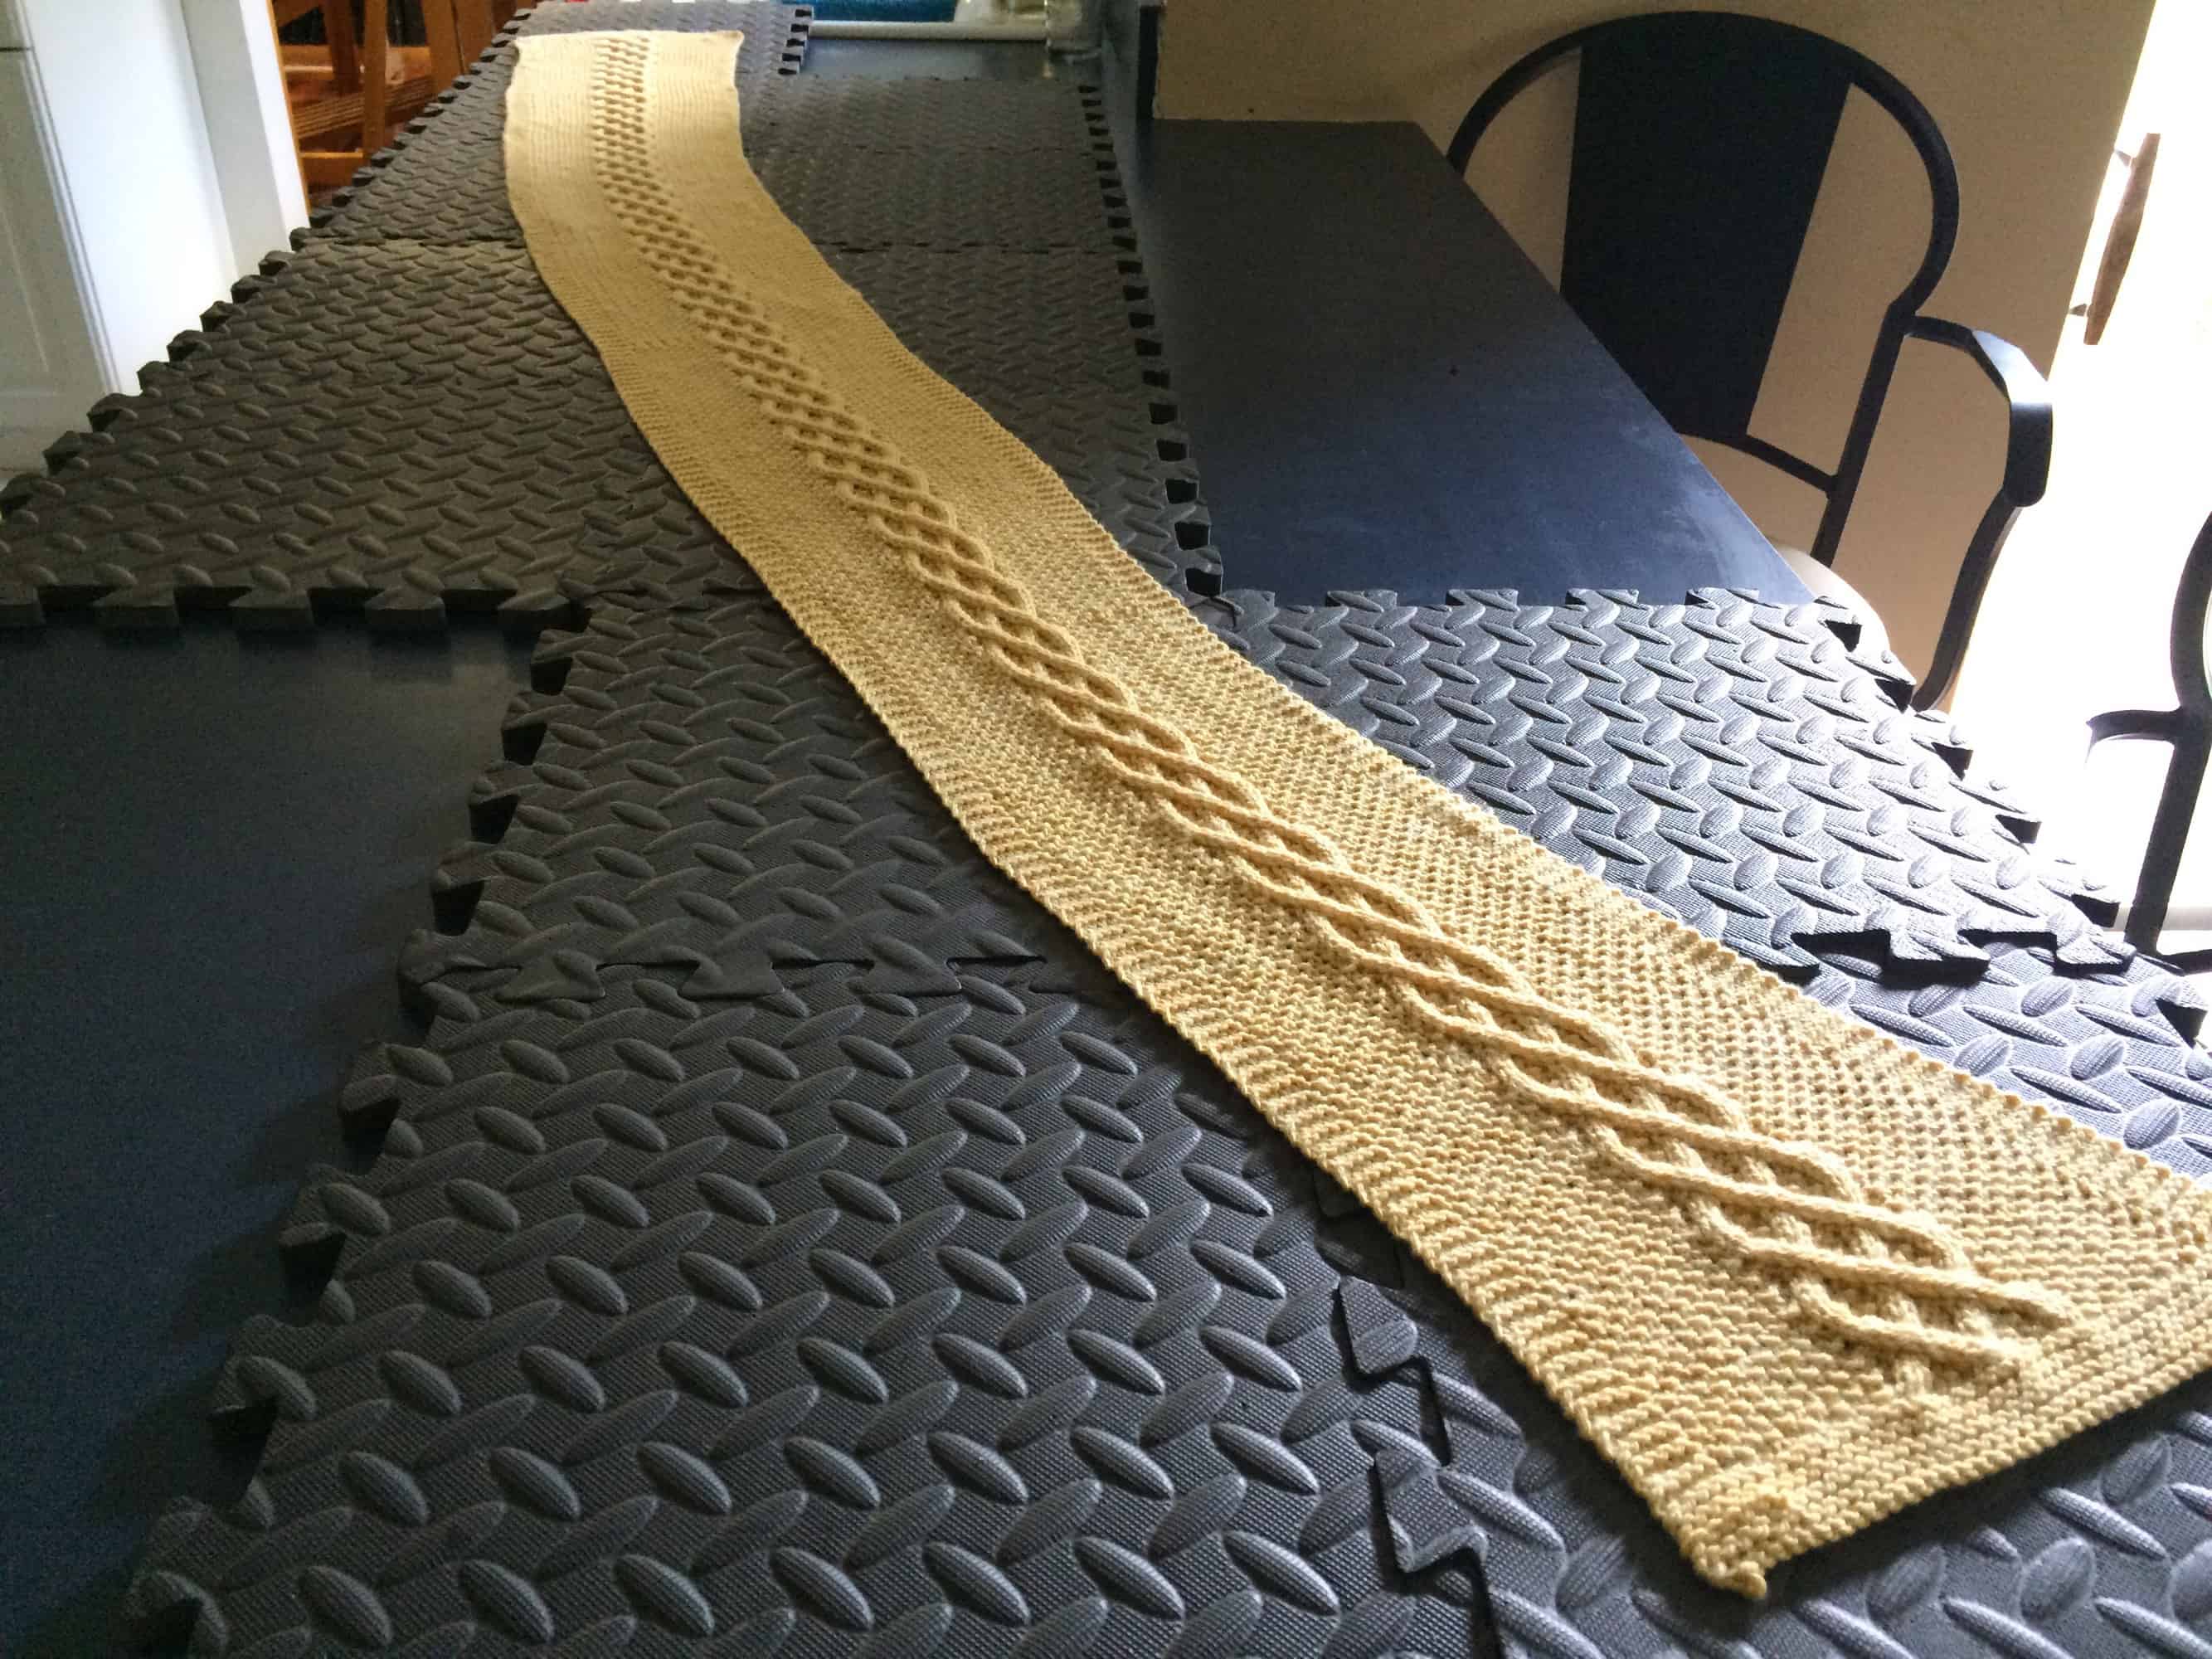
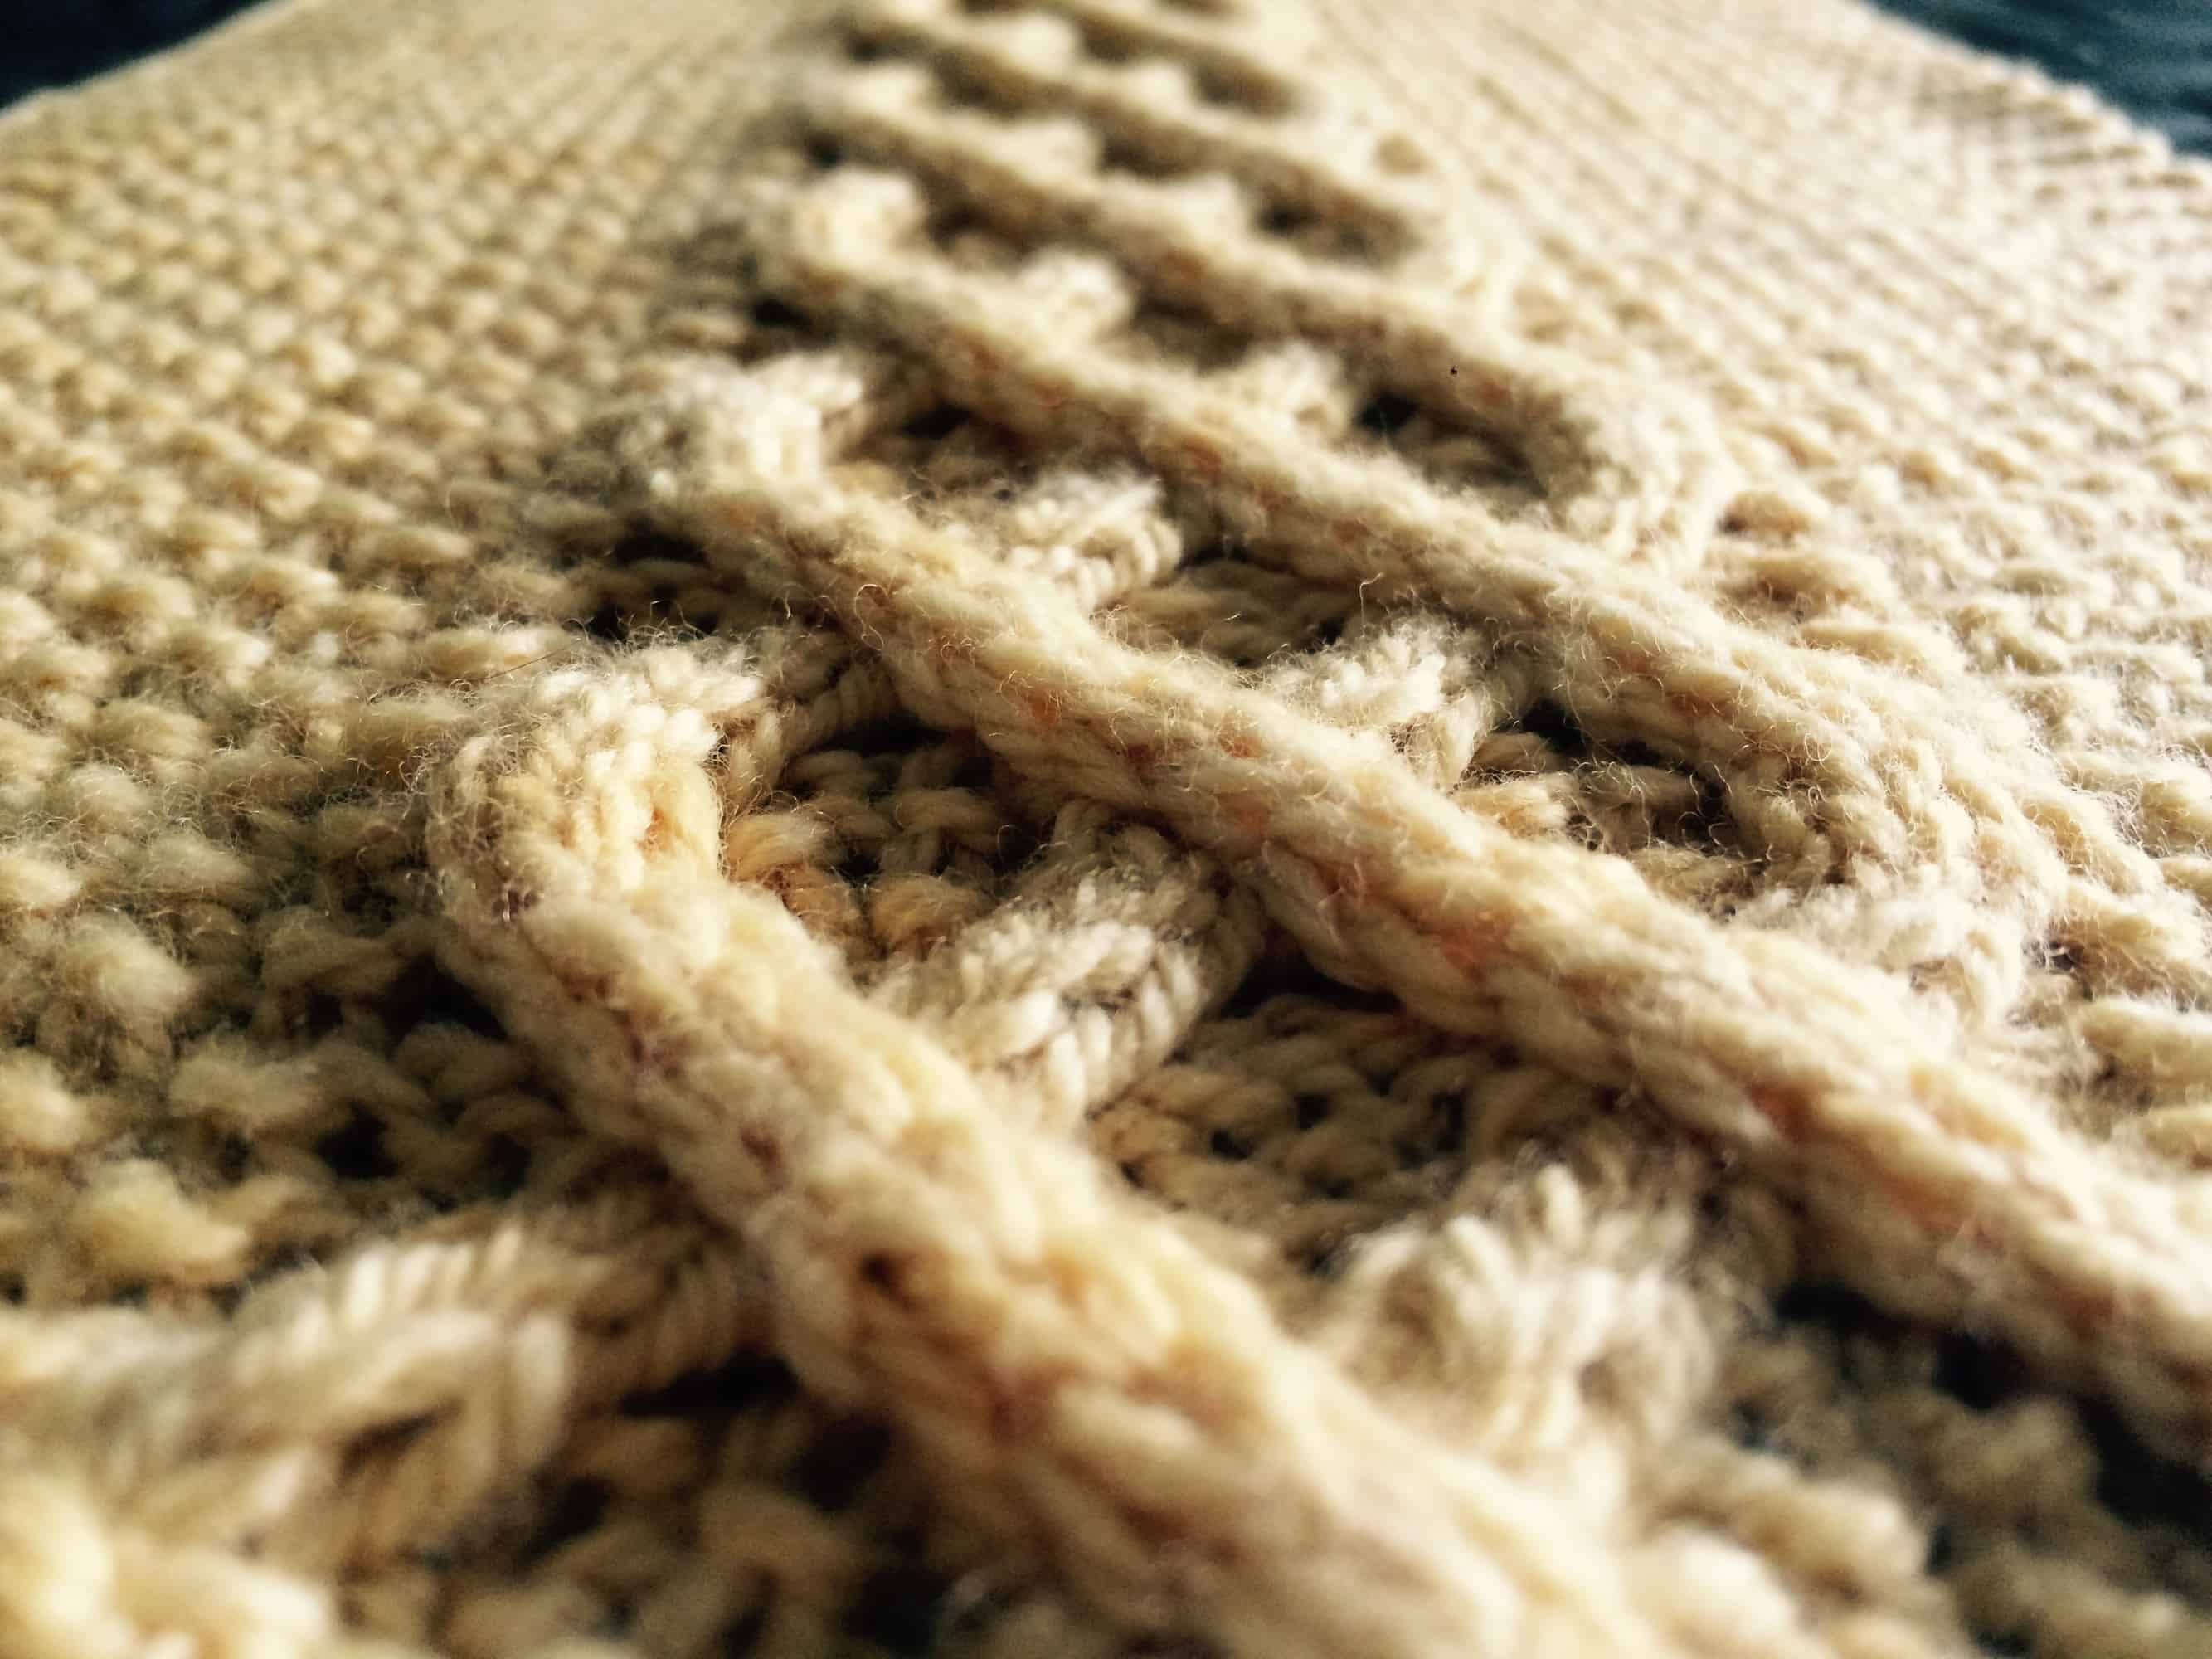
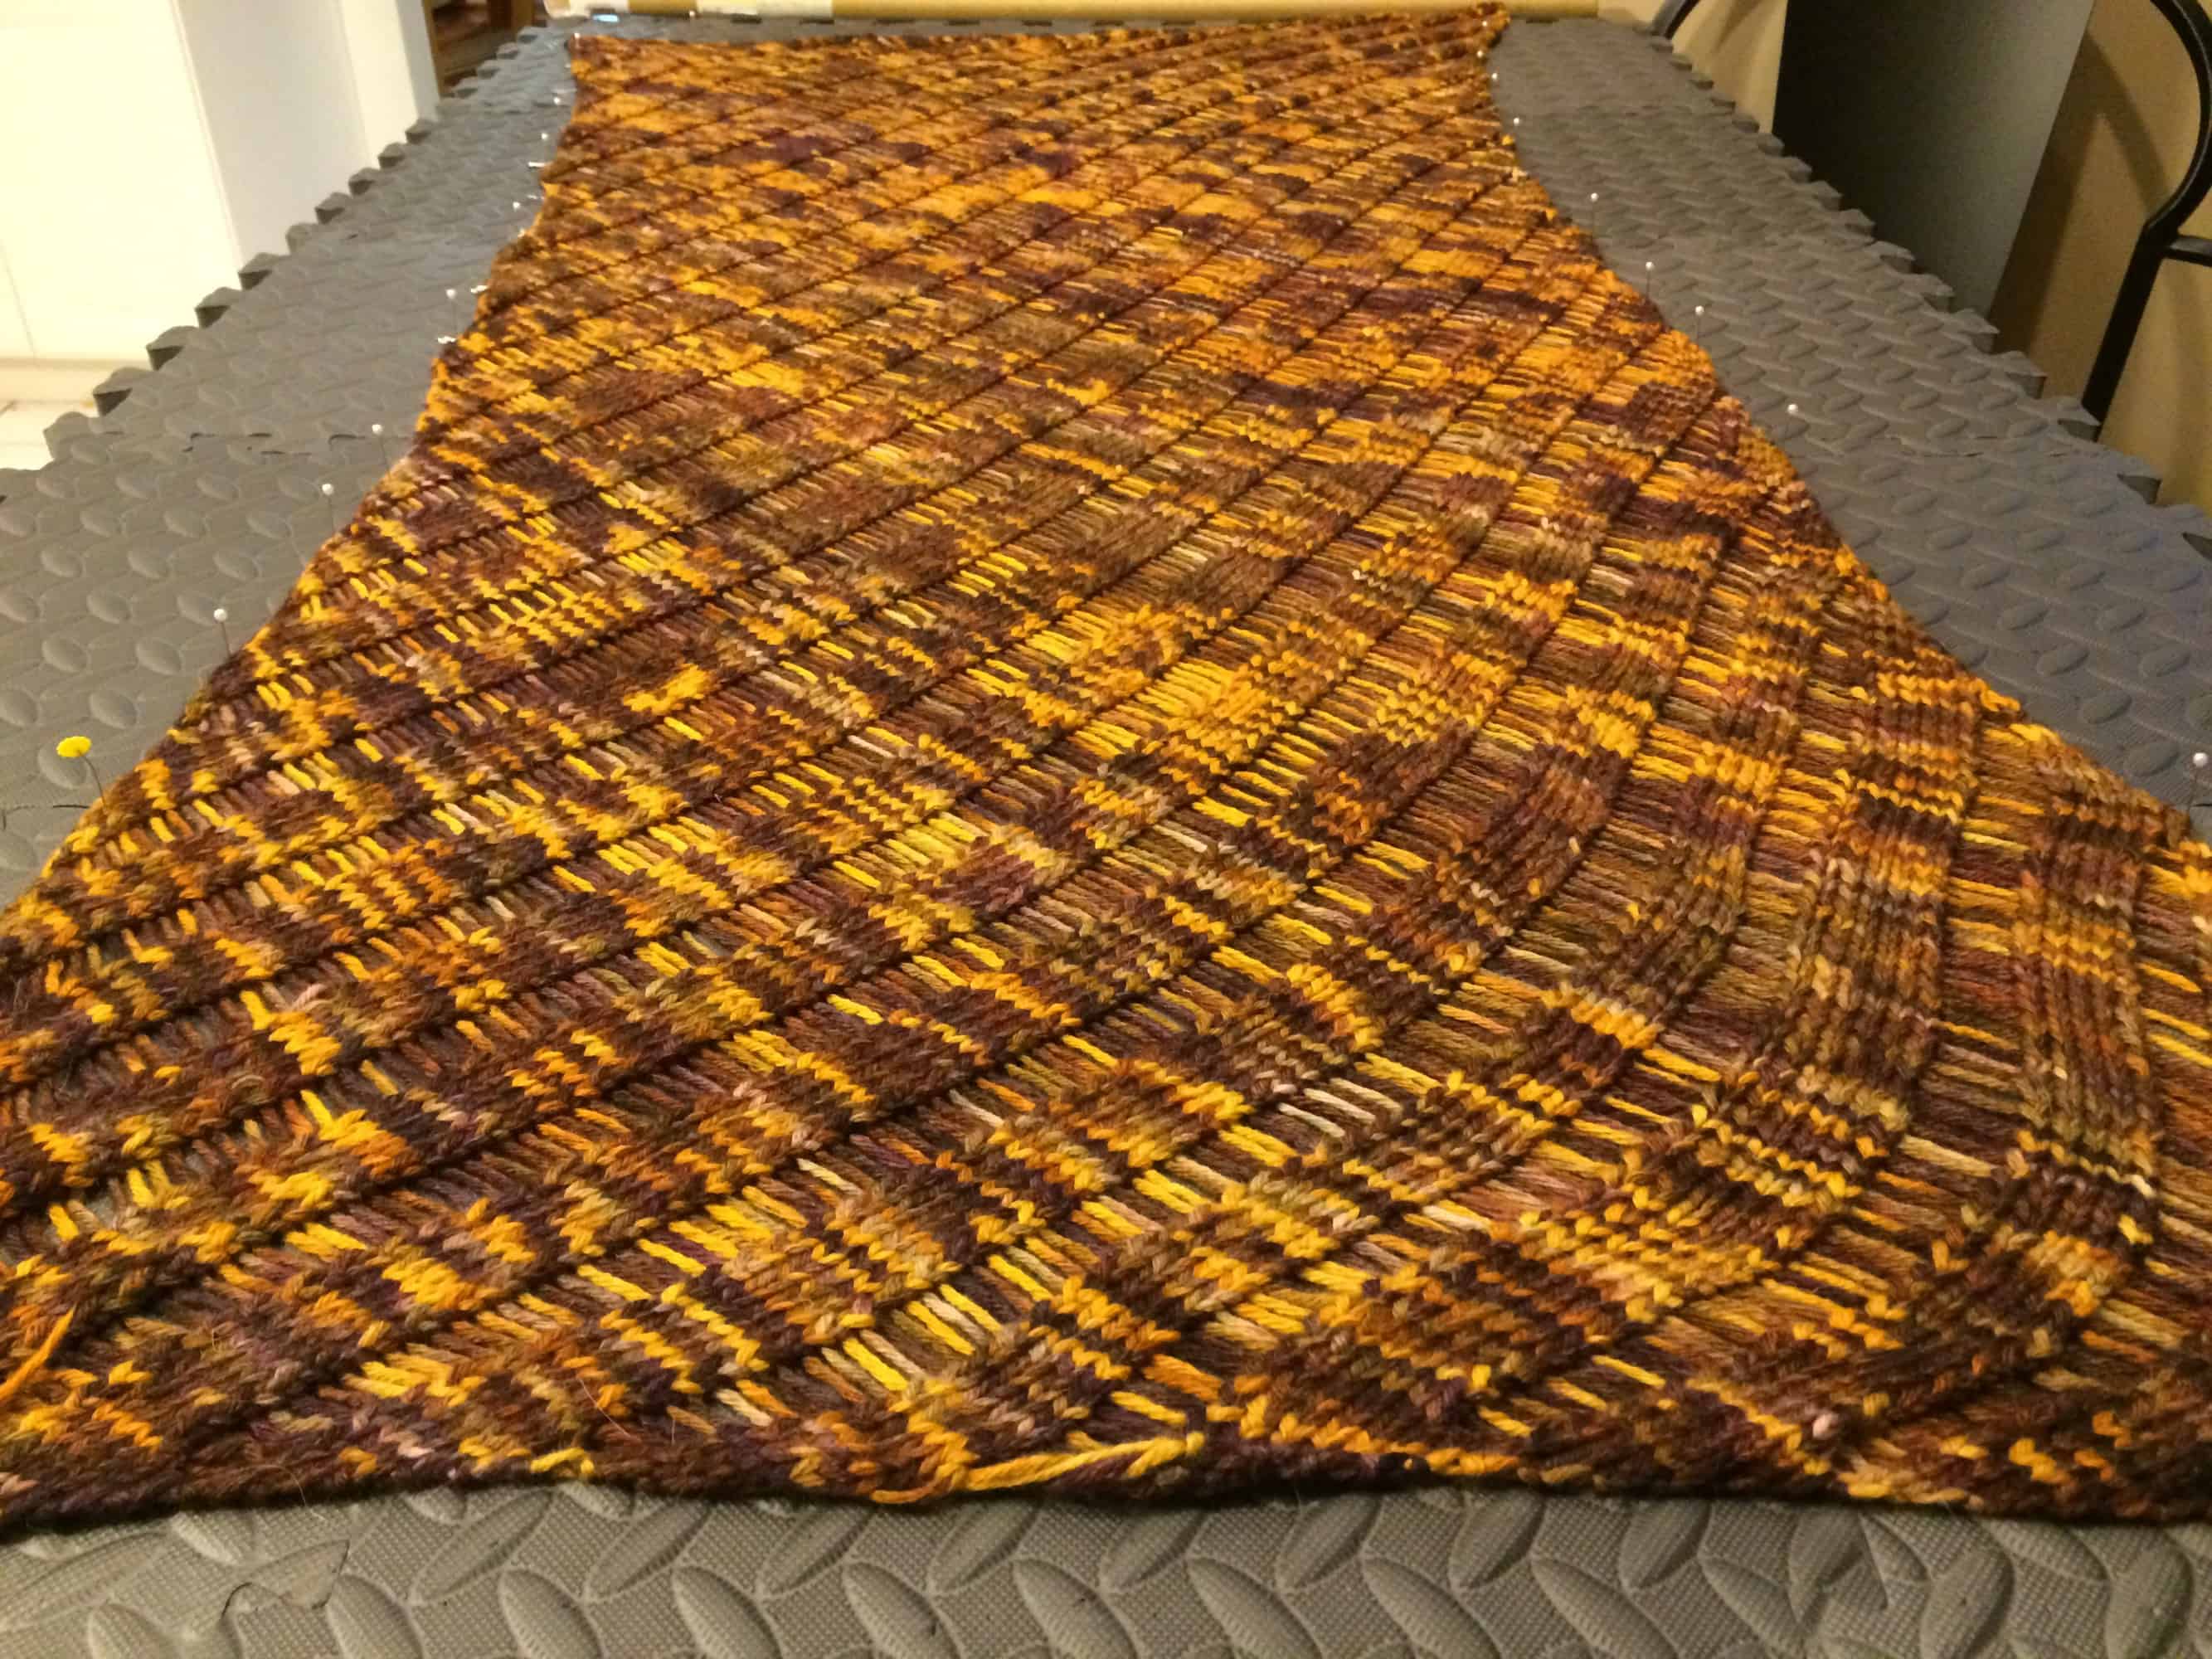
In this scarf, the cable is asymmetrical. In addition, it is partly worked on a seed stitch ground not reverse stockinette, like most cables. If you look closely at the inner part of the cables in the picture below, you might be able to see that the central diamond shape has the traditional reverse stockinette, but the outer diamonds are seed stitch.
In order to form these varying grounds, the pattern uses 5 different cable stitches. Some are 4 stitch cables and some are 3 stitch cables. Some of the cable stitches involve purling in the cable. The complexity of the cables and the combination of cables and seed stitch make this project intermediate difficulty.
The pattern provides both written and charted directions. While I always use the charts in lace patterns, I always use the written directions for cables. There’s nothing wrong with the charts in this pattern. I did compare the written and charted directions to see if they matched and they did. It’s just that I find the chart symbols for cables confusing. I have to focus on them carefully to distinguish the number of stitches involved and which stitches are held to the front. I find the written short hand for cables easier to look at and understand. Since this particular pattern does have so many different cable stitches in it, I highlighted each one in a different color, both in the abbreviation section at the beginning of the pattern and in the written instructions. By the time I was 1/3 of the way through the scarf, I could knit without referring back to the abbreviations.
I hope I’m not making this pattern sound so hard that you don’t want to try it, because it was really fun and interesting to knit. The pattern is a 10 row repeat and, despite the combined challenge of seed stitch and advanced cables, it only took me about 1/2 an hour to knit through one repeat. The entire scarf consists of 42 repeats and took 23-25 hours (including the borders, cast on, bind off, blocking) to create.
This is the first time I’ve used the Swans Island yarn. This yarn is custom spun in New England, in one of the four mills in the United States to earn a Global Organic Textile Standards Certification. It is hand-dyed using natural dye processes. It is super soft organic merino and an absolute dream to knit. The yarn is tightly plied and did not split at all. This particular color was such a good match for this scarf; the softly tonal yellows really make the scarf look like tracks in the sand, as the name of the pattern suggests. I used every inch of two skeins of yarn. I just knit the repeat until I was running out of yarn, then did the border. I underestimated how much yarn I needed for the border, so on my first try I had to rip out 5 rows of border and 6 rows of the last pattern repeat, then redo the border. The second time, I had the perfect yardage to finish the border, bind off, and weave in the end.
I truly loved every minute of knitting this scarf. The pattern was well-written (I didn’t find any errors at all, not even a typo) and the yarn was spectacular. When I bound off, I was ready to cast on for another one. That’s not something I usually say when I finish a scarf!
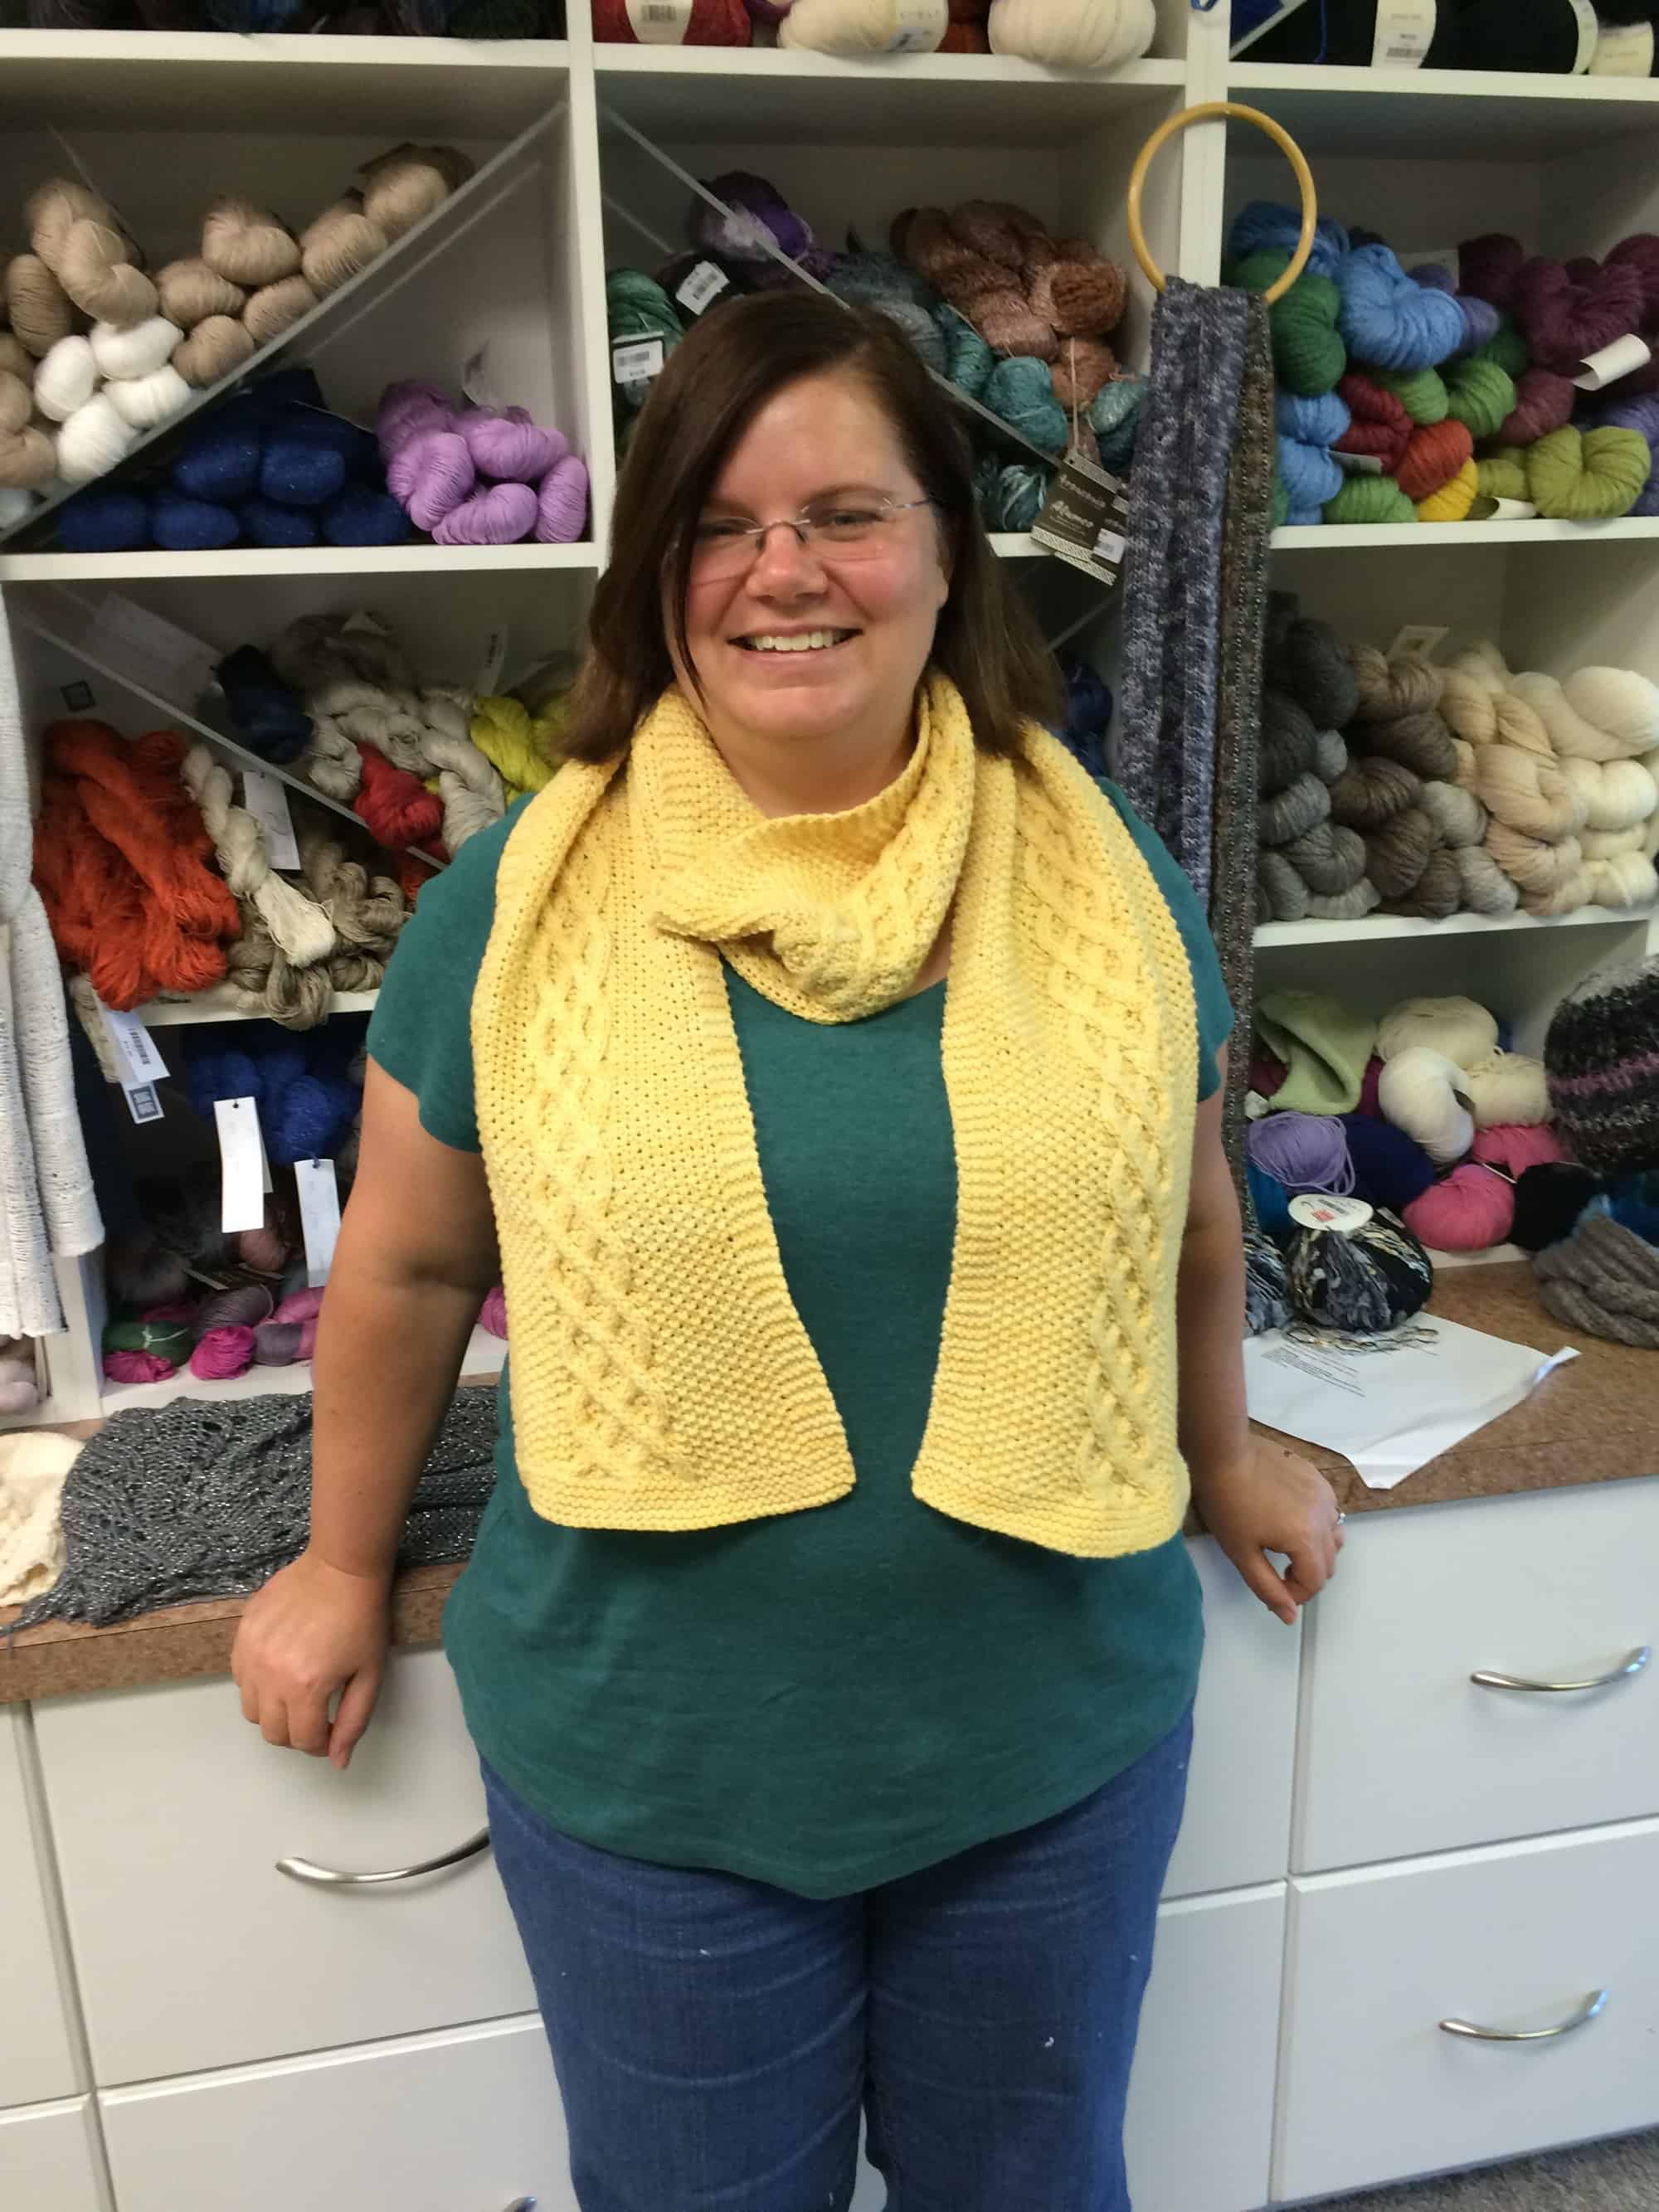
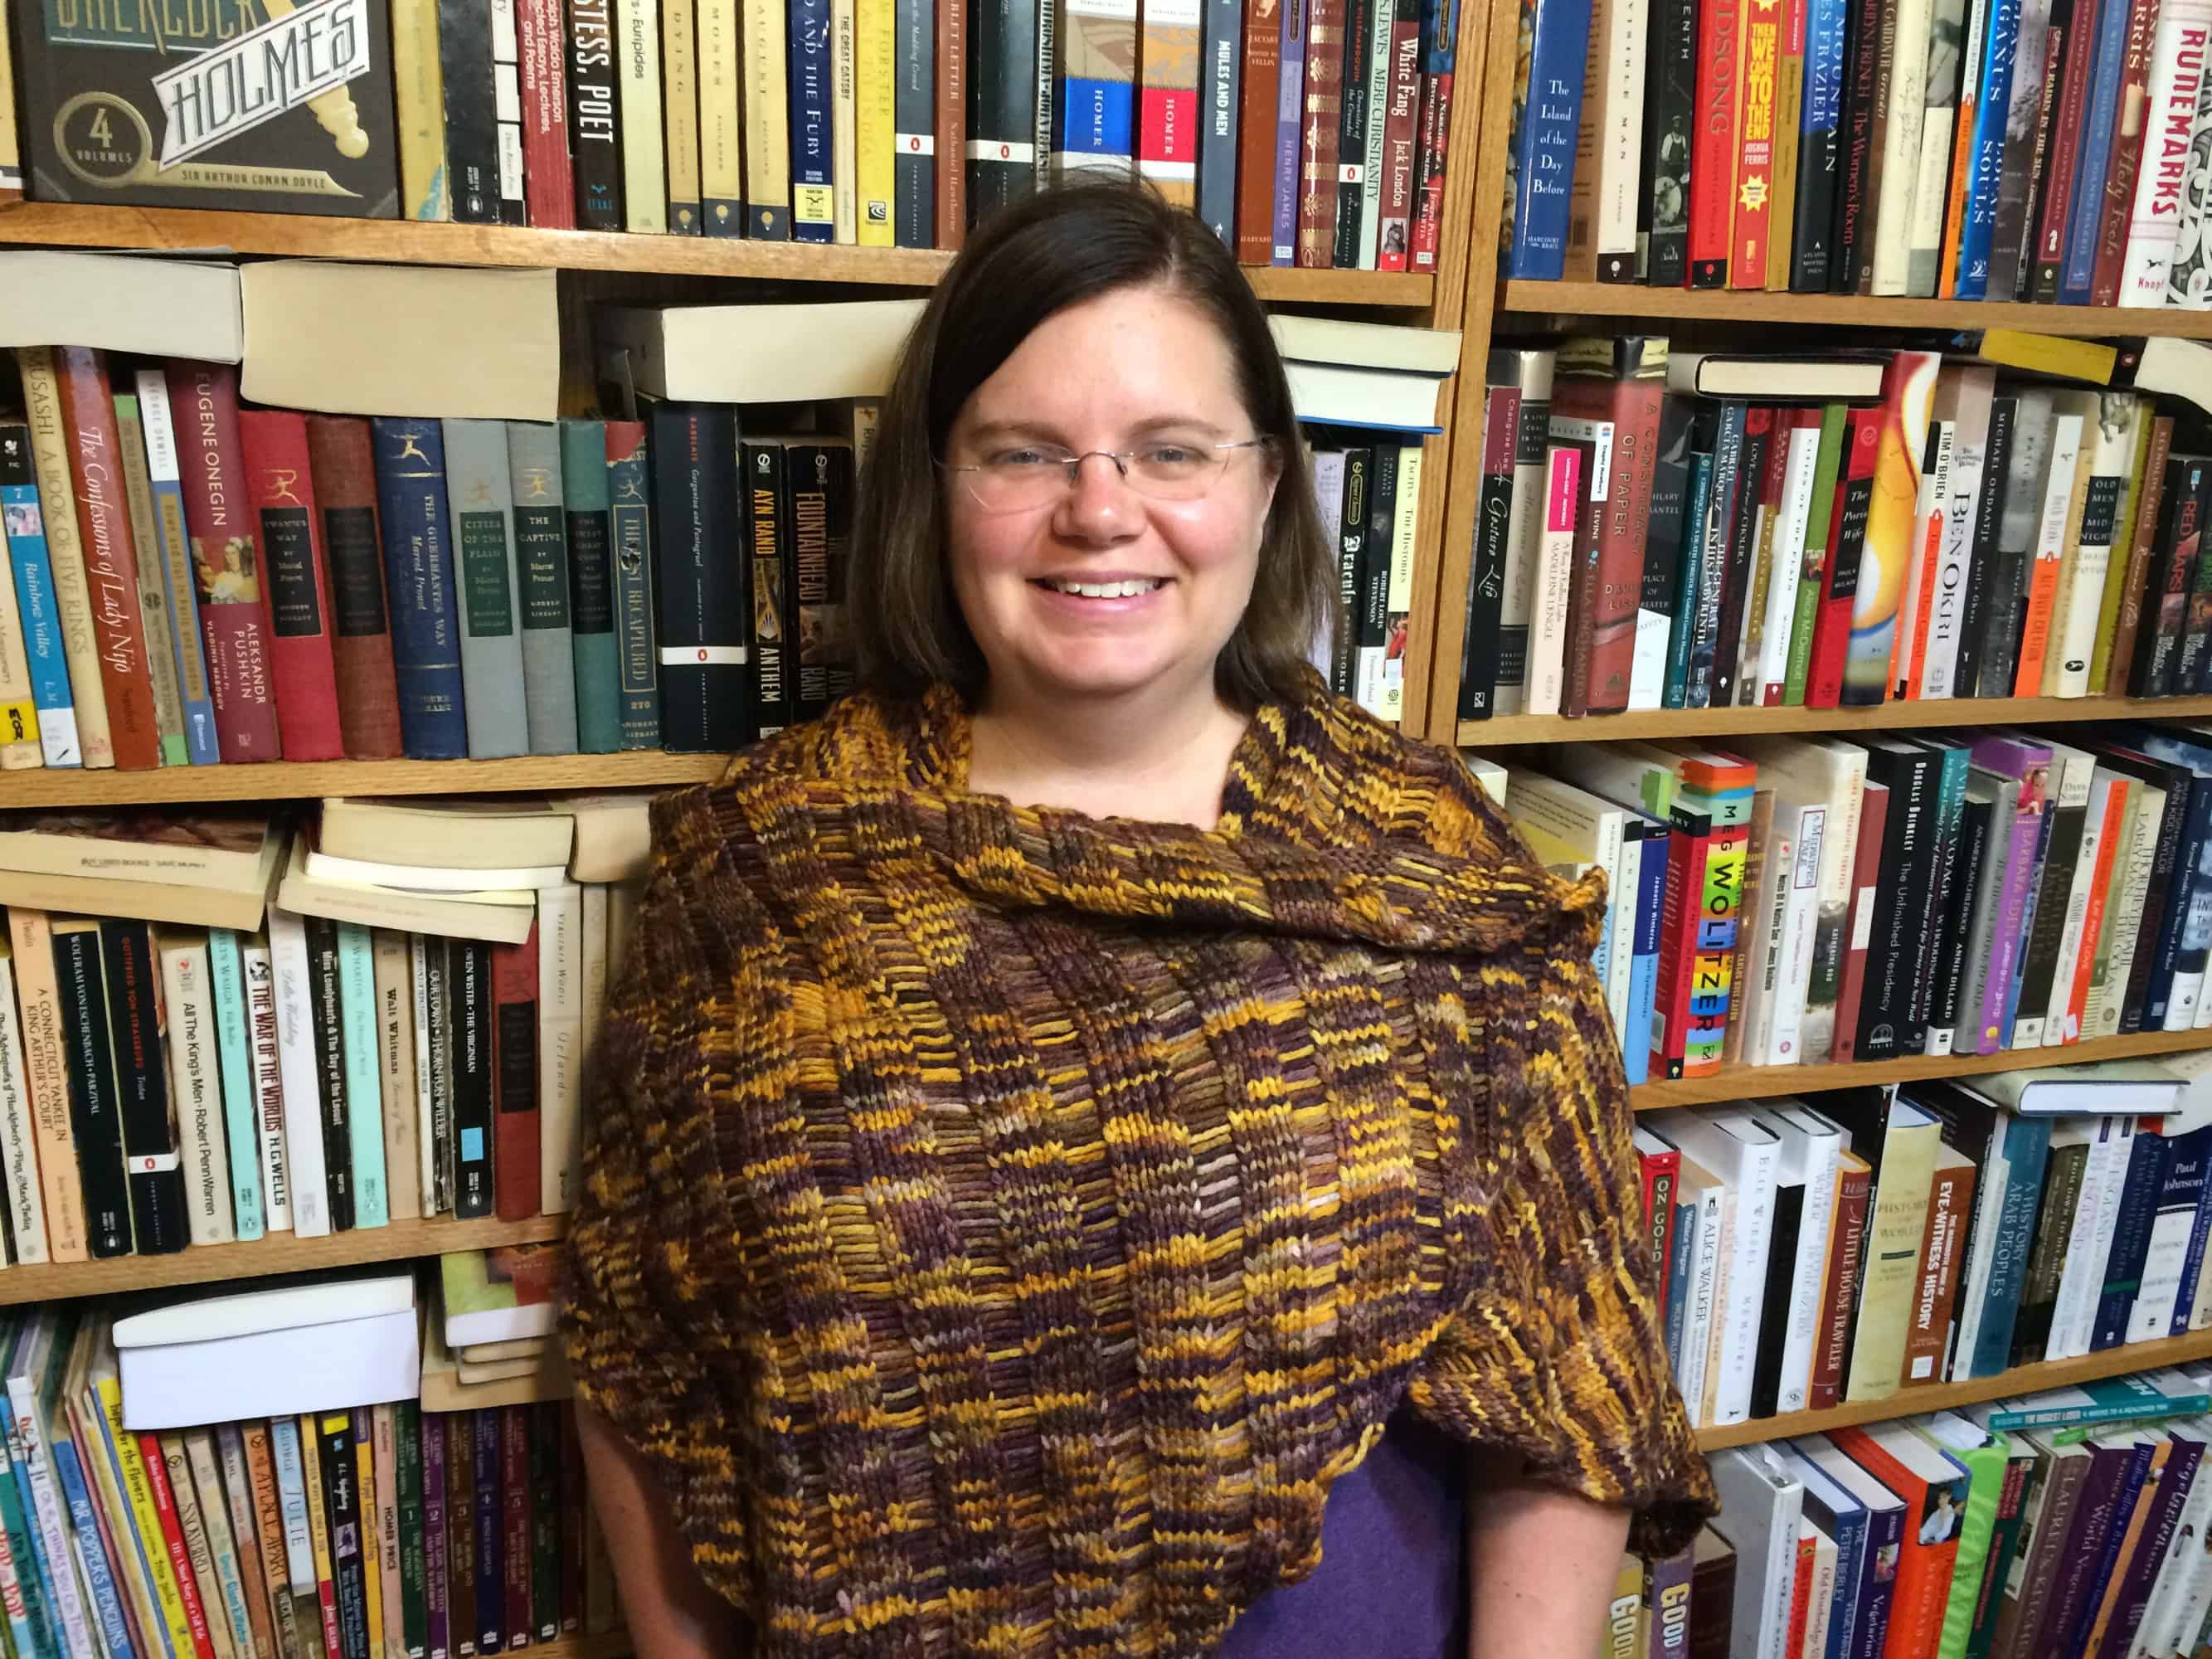
While I was a knit night at my local LYS, Susan took this picture of me wearing the scarf.
I finished the Emergency Scarf on June 1, but I haven’t blogged about it yet. I didn’t write a separate post about it; I didn’t include it in my FO Friday post. I wanted to write something a little different for this project, and I wasn’t sure how to do it. I’m still not sure what I’m going to write, but now that two weeks have passed, I think I’m ready to try.
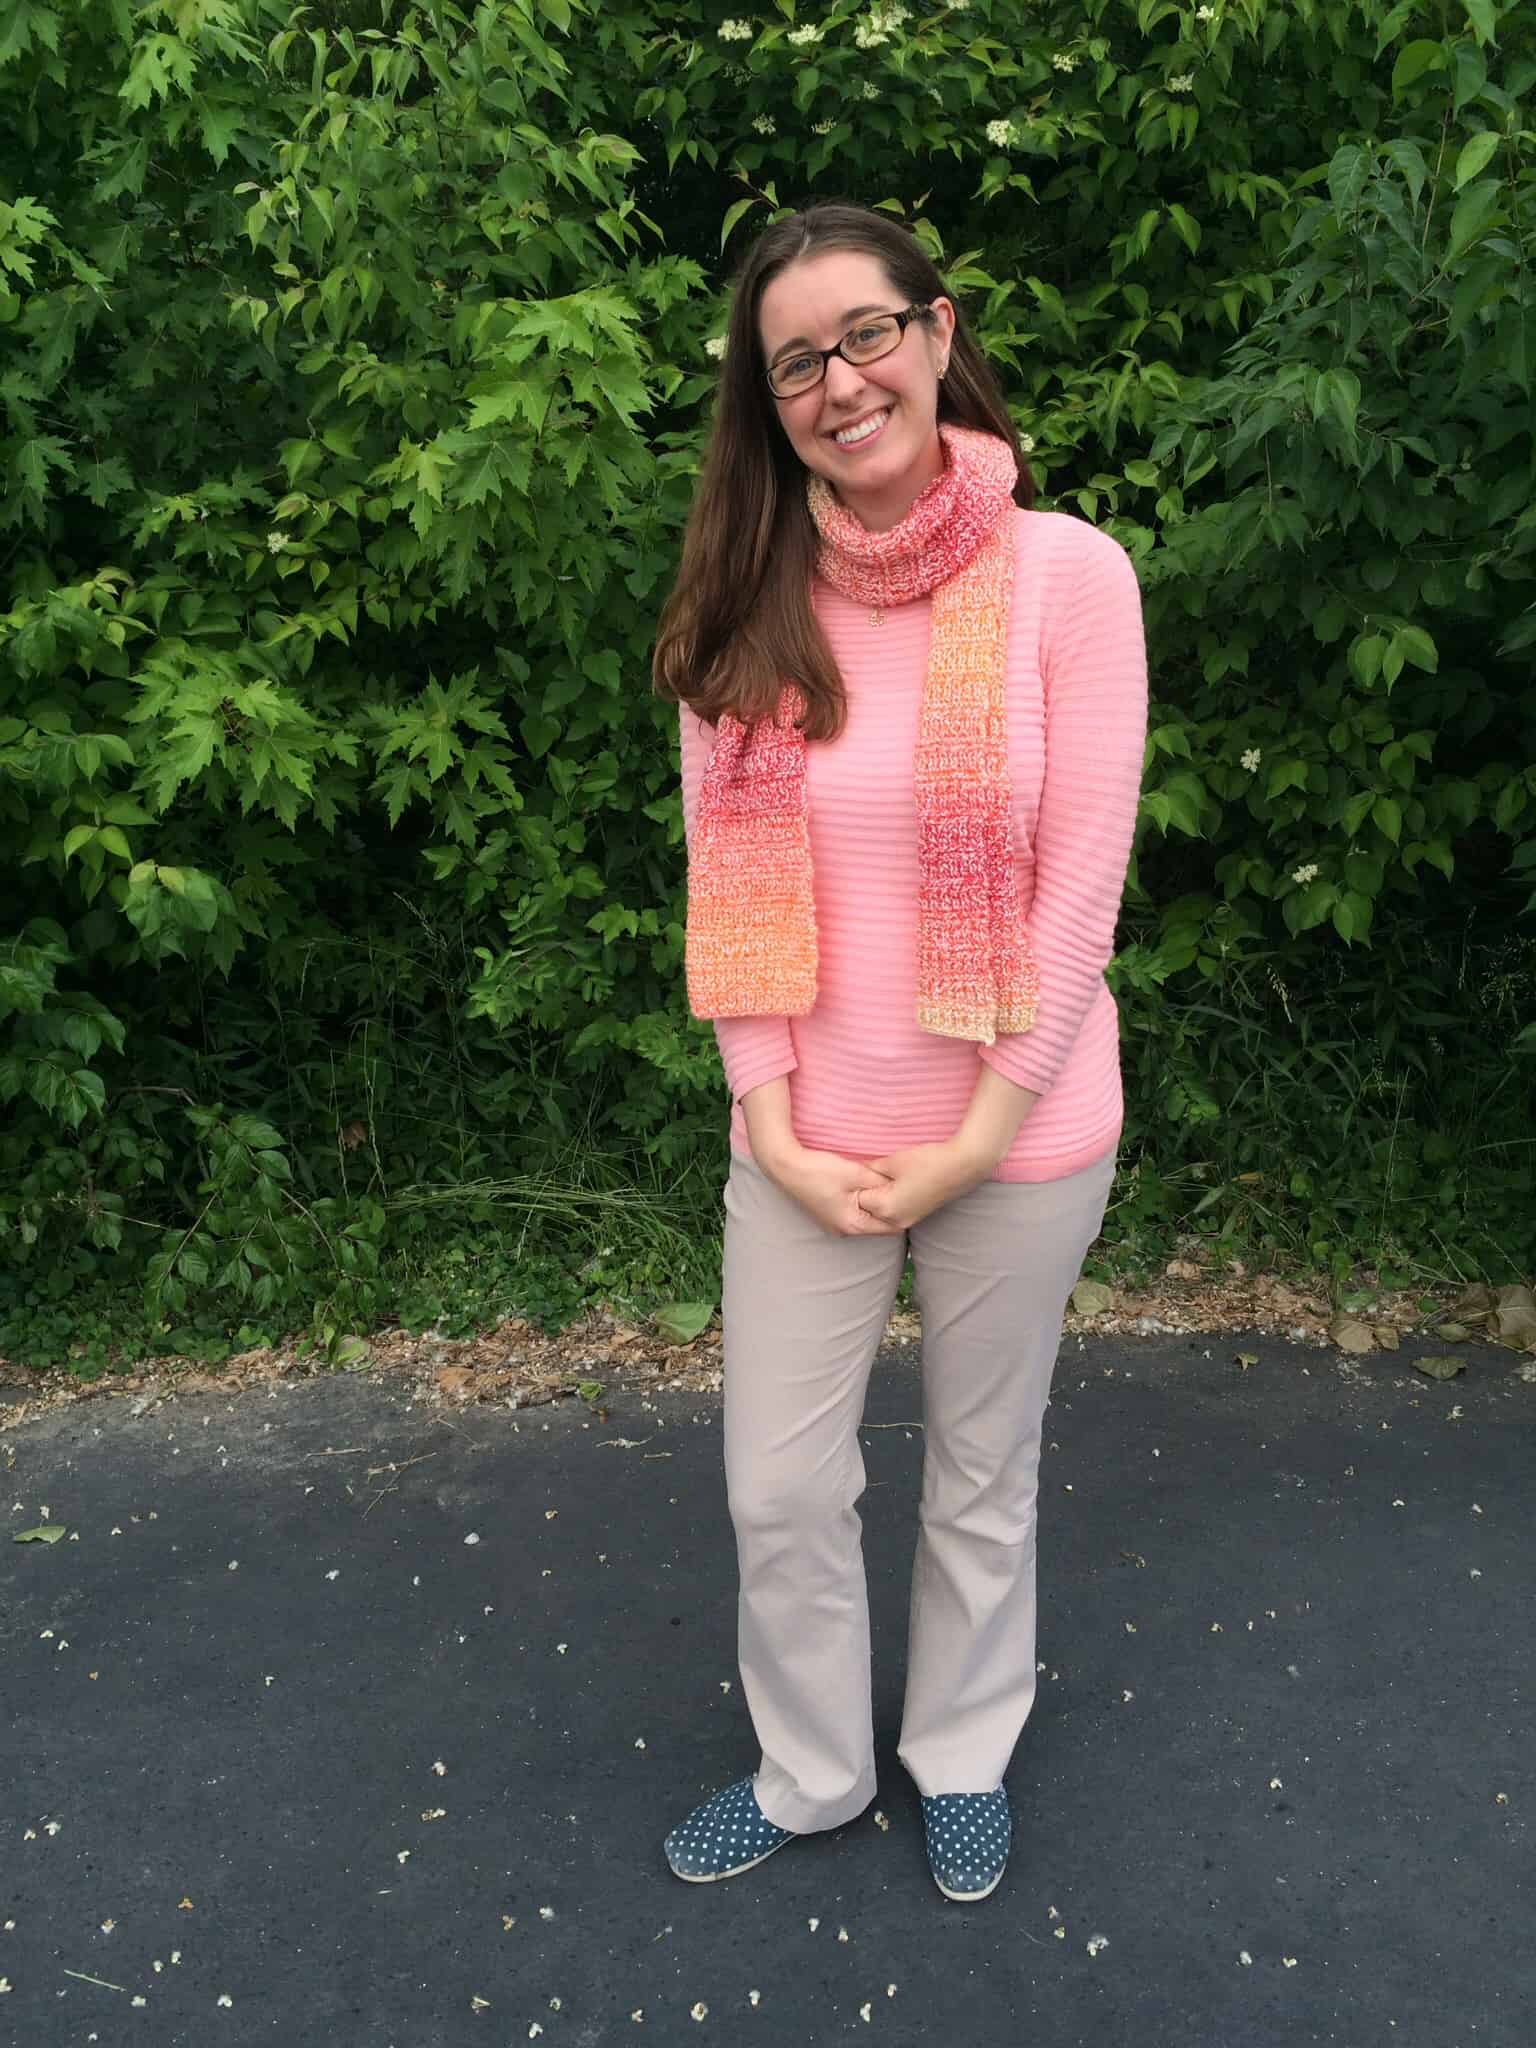
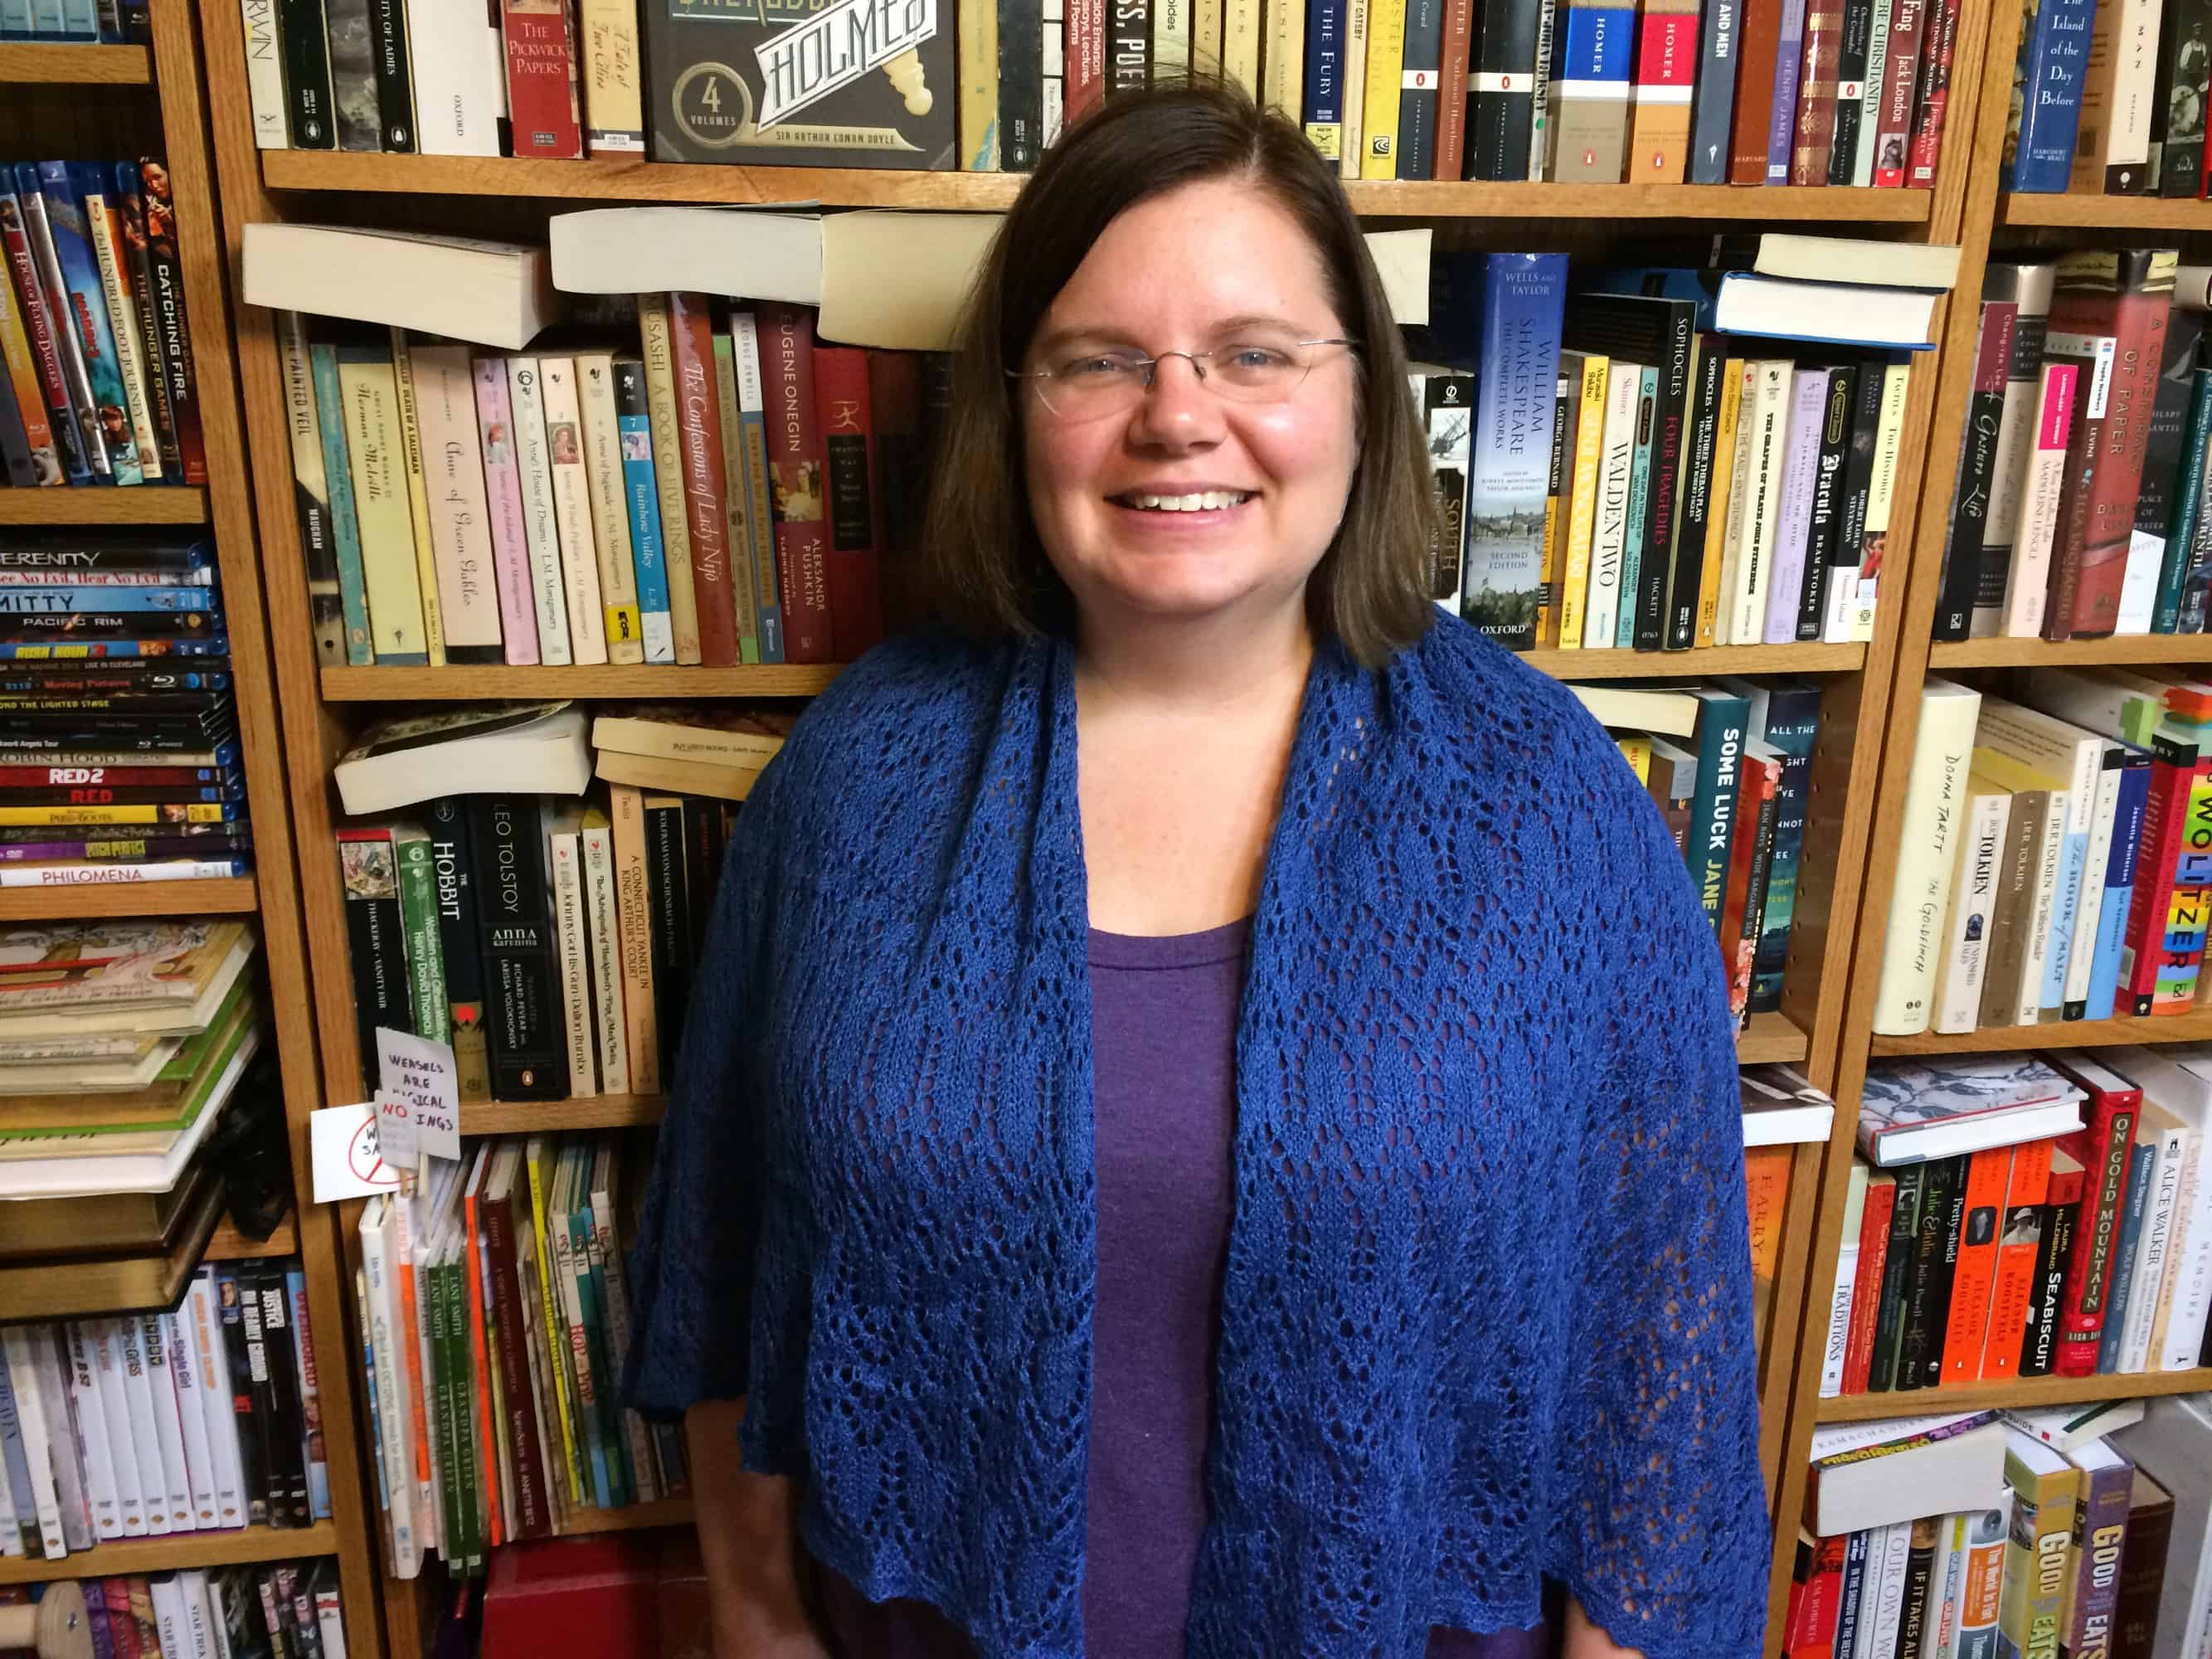
Stacy modeled this scarf for me, since it perfectly matched her outfit!
About this Project
Once upon a time, all the way back in 1996, a pretty little tortoiseshell kitten was born. She had a brother in her litter. He was black and white. They had a rough beginning, but then someone found them and took them into a house as foster kittens. When they were about 8 weeks old, their foster mama put them in a carrier and brought them to a different house. A man and a woman at the new house petted them and snuggled them. Then the tortoiseshell kitten and her brother went in a carrier again and went to yet another home, where the new man and woman lived.
The adoptive mama called the tortoiseshell kitten Pepper, because she looked like freshly ground pepper. She called Pepper’s black and white brother Puck, because he was a mischievous little sprite. These were not the names the foster mama called them, but Pepper and Puck soon forgot that they used to be called Elvis and Priscilla. Pepper liked her new mama. To be honest, Pepper just liked people. Everyone who came into the house was a new friend. She ran up to everyone and greeted them with a loud meow. Most people petted her, and that was nice.
Pepper and Puck moved with their new mama and papa to another place a few months later. Mama stayed in that house for a while, but the papa moved out. A while later, Pepper made friends with a visitor to the house. He didn’t just pet her; he let her climb on him and sleep with her head on his shoulder. This was how Pepper told mama that he was a nice guy. Pepper was happy when he became her new papa. He petted her a lot.
A year passed, and mama and the new papa moved a long way. Pepper and Puck rode in the car with mama and papa for hours and hours. The car was scary, and Pepper was happy when she could sleep on papa’s lap, even if he was driving. The new place was nice. Pepper and Puck always lived inside before. The new place had a screened in patio. Pepper could see outside, and catch little lizards that snuck onto the patio.
Pepper and Puck moved with mama and papa three more times after that. Tiger joined their family after the first of those moves, and Pepper wasn’t happy about Tiger. Even when he was little, he thought he was the boss of everyone. Pepper was really the boss! She reminded Tiger of this as often as she could.
Mama and papa didn’t move again. Pepper got to live in one place for a long, long time. This house had a whole fenced in yard and on really good days, mama or papa would let Pepper out in the yard. She liked to sleep in the grass, chase lizards, and eat grass. Sometimes she tried to slip through the fence and see if the grass was better over there, but mama or papa always picked her up and brought her back to her own yard.
Mama made Pepper nice beds to sleep on. Pepper was especially happy with the bed on top of the refrigerator. She could see everything that happened in the kitchen and dining room. Tiger didn’t usually try to come on top of the refrigerator, so she could stay away from him.
Pepper got older, as happens to everyone. Her hips didn’t work as well and it was hard for her to jump up to the counter to get to the refrigerator. Mama and papa put a chair near the counter so it was easier for Pepper. Eventually, Pepper couldn’t jump on the chair. Mama and papa moved her bed to a table in the living room. When Pepper couldn’t jump on the table, they put a chair, and then a step beside the chair.
After a while, Pepper got sick. She didn’t know what was wrong, but she went to the vet an awful lot. Everyone at the vet was nice to her. Pepper talked to all of them, and they pet her and cuddled her. She liked the massages she got. Her hips felt a little better after the massages.
One night, Pepper did not feel well at all. Mama looked worried. Eventually, mama brought Pepper to the other vet, the one that is open at night. Mama brought her knitting with her. Mama often had knitting. Pepper liked the knitting. The balls of yarn were a soft place to sleep.
After that visit to the vet, Pepper started sleeping in mama’s office at night. Pepper liked being away from Tiger. She liked having her own litter box, food dish, and water. But Pepper didn’t like being in only one room. When morning came, she was ready to get out of mama’s office and wander around the rest of the house.
Pepper saw mama knit the scarf, and it seemed like it was done. It was still sitting on Mama’s desk though. Pepper heard mama say that the end needed to be woven in. The scarf sat on the desk for a long time. Pepper never did see the end get woven in.
Pepper’s eye was bothering her, so she went to the vet again. Mama kept putting drops in Pepper’s eye, and Pepper didn’t like that. She wished mama would stop with the drops. Then Pepper started feeling worse, not because of her eye, but because of the other sickness. The one she’d had for a long time. She stopped eating. Mama seemed worried. Mama put food on her finger and tried to get Pepper to eat it. Pepper sniffed the food and licked her lips. It smelled good, but she didn’t want to eat.
Mama brought Pepper to the vet again. The vet looked worried too. The vet took tests. Then the vet put warm things all around Pepper. That was nice, because Pepper felt cold.
Pepper didn’t know it, but mama was at home worrying about Pepper. Mama made chocolate chip cookies and ate too many of them. She wove in the end on the Emergency scarf that had sat on her desk for so long.
Later that day, mama and papa came to see Pepper at the vet. Mama brought the new bed she’d made last week, the one that was Pepper’s new favorite bed. Mama and papa pet her and cuddled her. It was nice to see them, and Pepper purred as she went to sleep for the last time.
FO stands for Finished Object. Since I started blogging, I’ve been posting WIP Wednesdays and posting individual posts for finished objects when I finish one. Many craft bloggers write FO Friday posts, so readers know when to expect posts for finished objects. The FO Friday posts I’ve seen aren’t usually as detailed as the posts I’ve written for my finished objects and they almost always include multiple items.
I have so many blog posts planned that I thought I’d go with FO Friday posts for a while. I’m going to include multiple projects in a single post, but include many of the details that I’ve included in individual post. The “About the Project” section will be shorter. If I have a pattern I want to discuss in greater detail, I’ll write a separate post about it rather than including it in the FO Friday post. I’d like to hear your thoughts on FO Friday posts versus a post per project. Which format do you prefer?
Knitty published the Clapotis pattern in 2004. It seems like everyone’s knit it — Ravelry has more than 22,000 project pages for this pattern. I’ve had it on my list of things to knit forever, but never gotten around to it. It’s not a difficult pattern to knit, but as many have noted the middle section seems to go on and on and on. The pattern has three sections: increase section, knit straight, decrease section. The “Knit Straight” section is a 12 row repeat and you are supposed to knit it 13 times. I only knit it 8 times. I tried to knit it 9 times, but ran out of yarn before finishing the decrease section and bind off. In order to knit the entire 13 repeats the pattern prescribes, I would have needed at least one more ball of yarn. The yarn I used is discontinued and the company is out of business. No one on Ravelry had the same yarn in their stash, so I couldn’t try to trade or buy another skein. I didn’t want to rip out the entire project, and it looked like it would be big enough, so I forged ahead. I ripped out the entire completed decrease section (more than 3/4 done) and the 9th straight section repeat so that I could reknit the decrease section and bind off.
Super Secret Shawl
Official Stats
Date Started: April 7, 2015
Date Finished: June 1, 2015
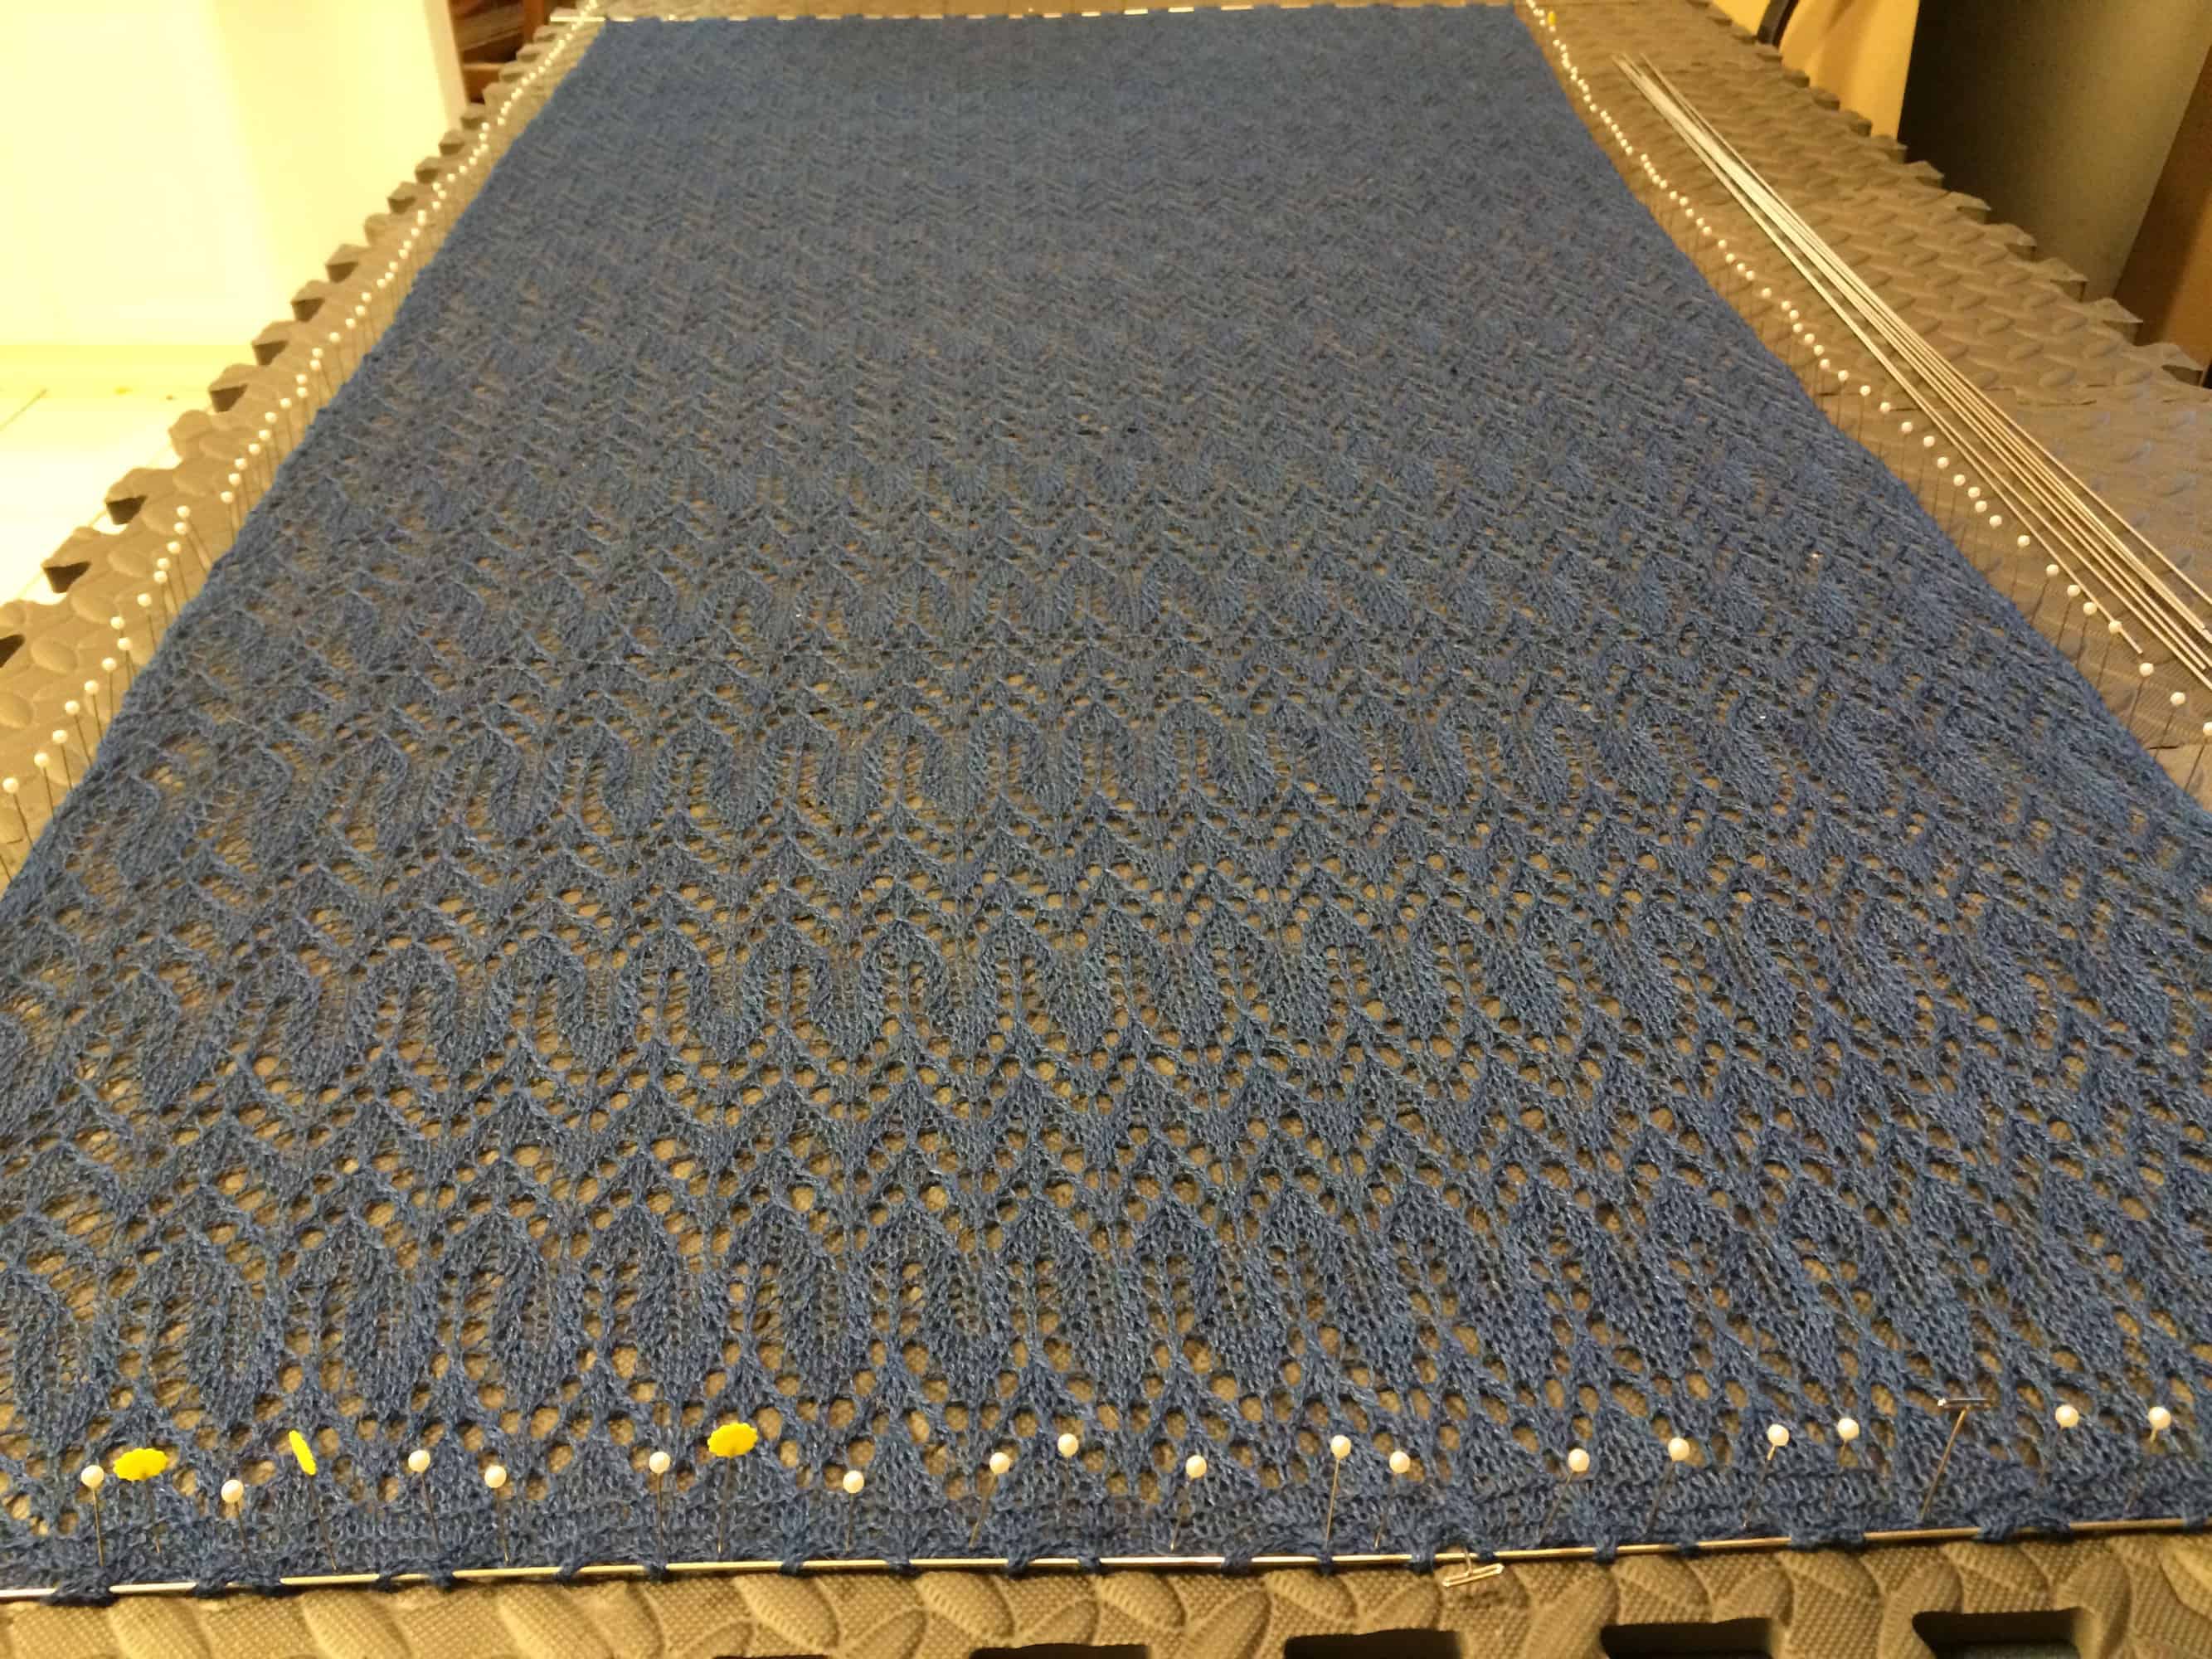
Pattern: Self-designed
Yarn: 880 yards Knit Picks Gloss Lace in Winter Night
This is my first attempt at designing anything. It’s straightforward — a single stitch pattern and a rectangular shawl. My single biggest snafu was estimating yardage. I measured and weighed the swatch to calculate the yardage I used to knit it. I used that information to calculate final dimensions and yardage for the shawl. These calculations were off by a significant margin. I probably needed another skein of yarn to get the dimensions I wanted. I cannibalized my swatch to get a couple extra inches. I will be doing some research on yardage calculation and trying again!
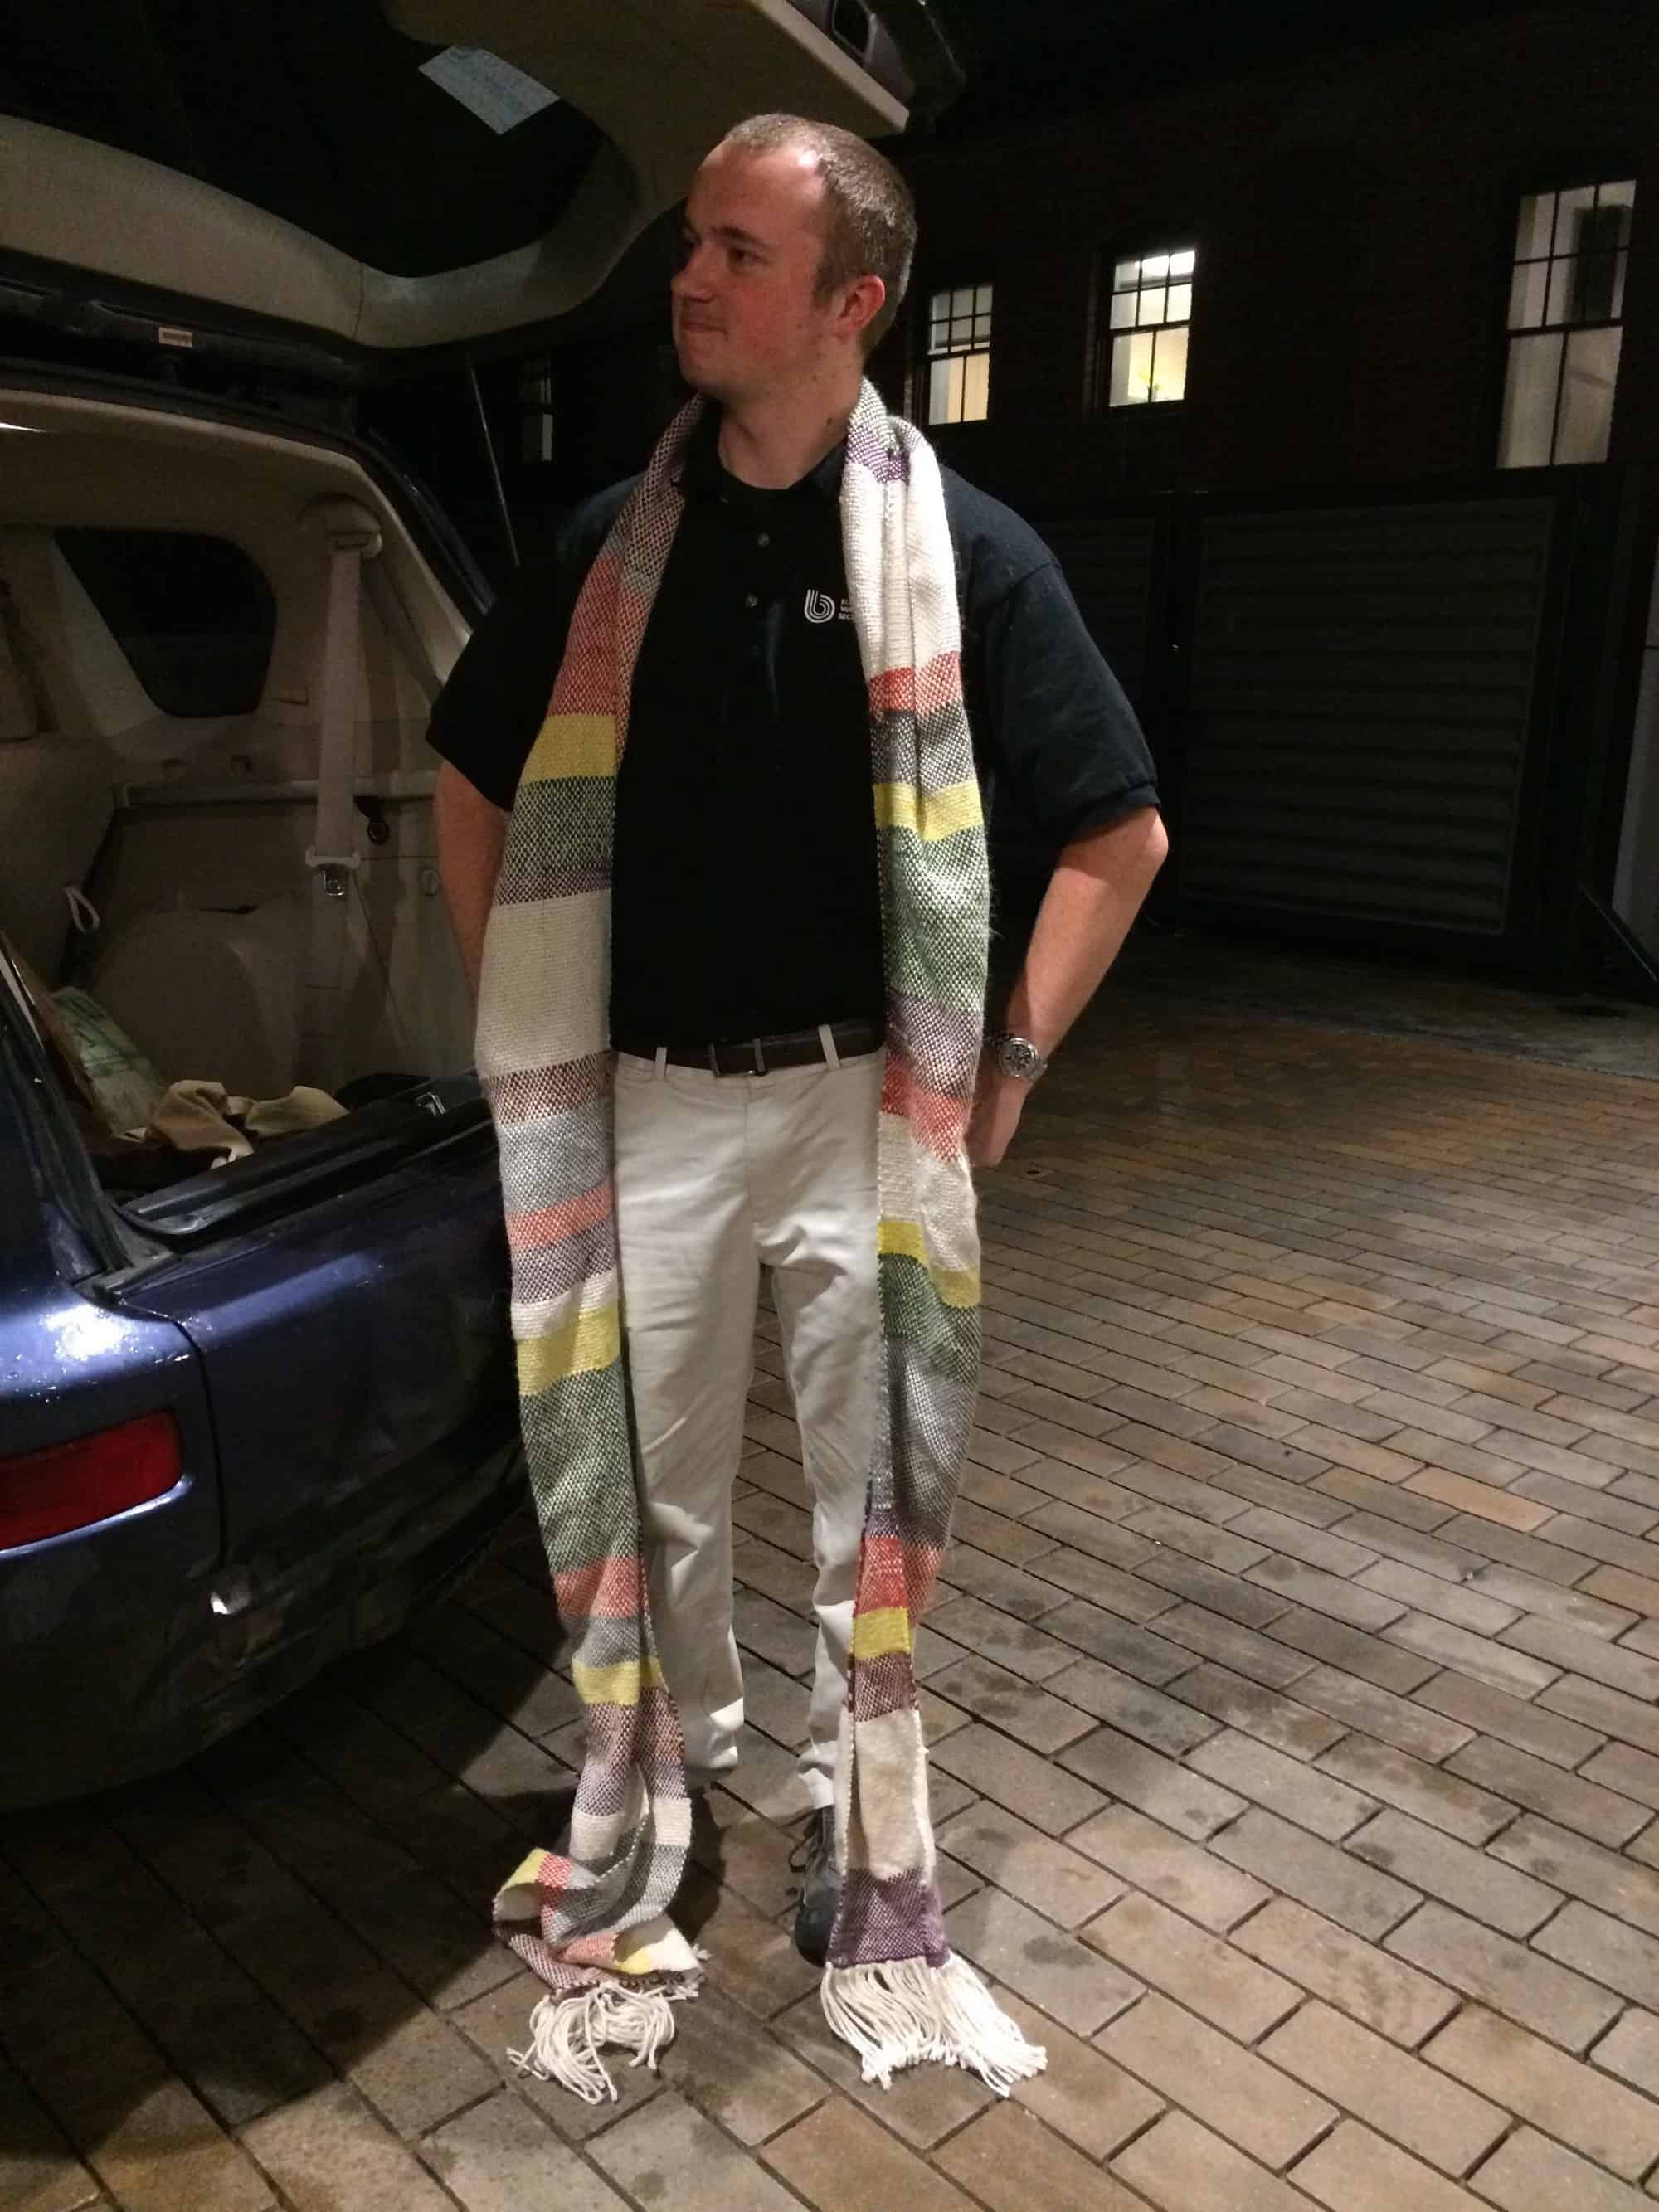
I finished the Doctor Who Scarf while I was in Vermont last week, and presented it to my cousin as a graduation gift. He loved it! Here’s all the info about the scarf.
Official Stats
Draft: Plain Weave
Loom: 15″ Cricket Rigid Heddle Loom
Reed: 8
Warp Stats
Yarn: 369 yards llama yarn, gifted to me by Stacy, produced at a local-to-her farm
Loom waste: 42 yards
Total Warp Ends: 96
Ends Per Inch (EPI): 8
Warp Length: 16 feet (no, that’s not a typo!)
Weft Stats
Yarn:
52 yards Berroco Vintage, colorway 5180 (purple)
63 yards llama yarn (camel)
24 yards Peace Fleece worsted in Sheplova Mushroom (bronze)
36 yards Peace Fleece worsted in Khrushchev Corn (yellow)
70 yards Peace Fleece worsted in Sakhalin Salmon (rust)
69 yards Lion Brand Amazing in Olympia (gray)
44 yards Peace Fleece worsted in Shaba (?) (green)
Picks Per Inch (PPI): 7-8
Width in the Reed: 12″
Dimensions Before Finishing: 164″ x 11.5″ (not including fringe)
Finished Dimensions: 153″ x 10.5″ (not including fringe)
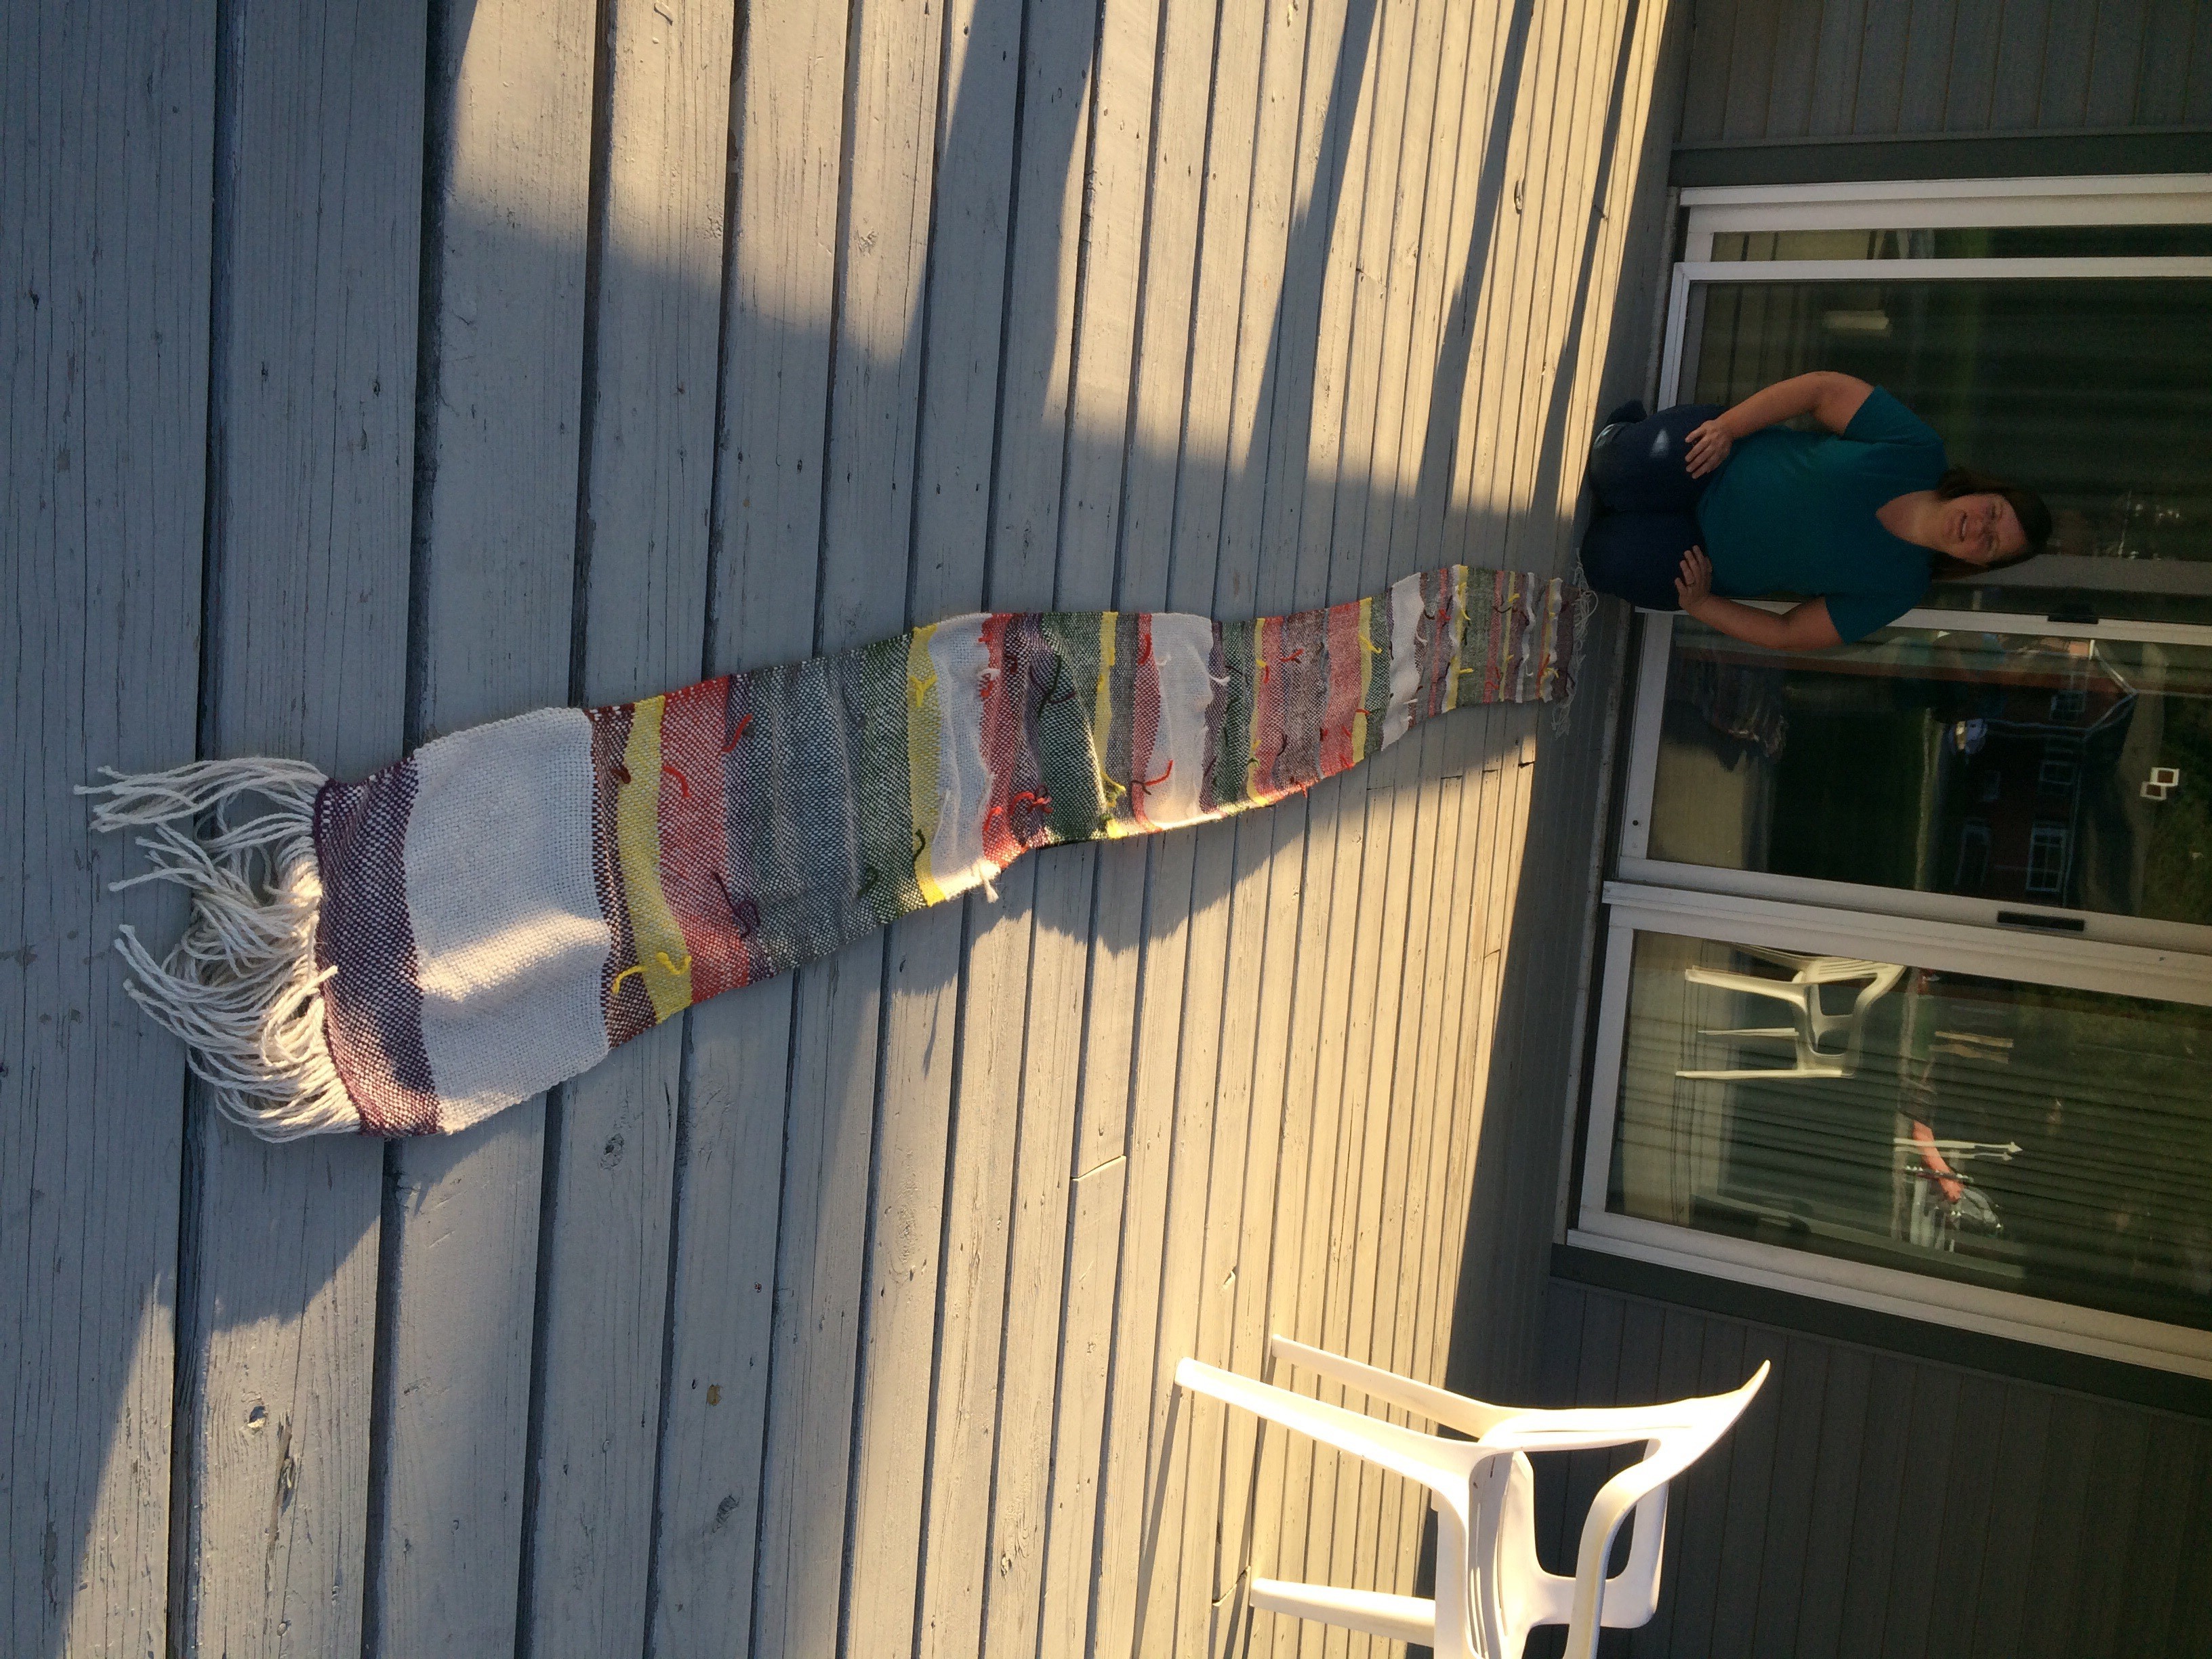
Made for: My cousin Cooper, as a college graduation present
My cousin loves Doctor Who (and many other things geeky), so I decided to make him a Doctor Who scarf as a graduation present. If you aren’t familiar with this particular bit of geekery, Doctor Who is a science fiction television show produced by the BBC. It’s been around since 1963, though it was off the air between 1989 and 2005 (If you’d like an overview of the show, check out the Wikipedia entry). The title character is a time traveling alien who regenerates rather than dying. So far, 13 different actors have portrayed the Doctor (I’m counting John Hurt as the War Doctor, for those of you yelling that it’s only 12).
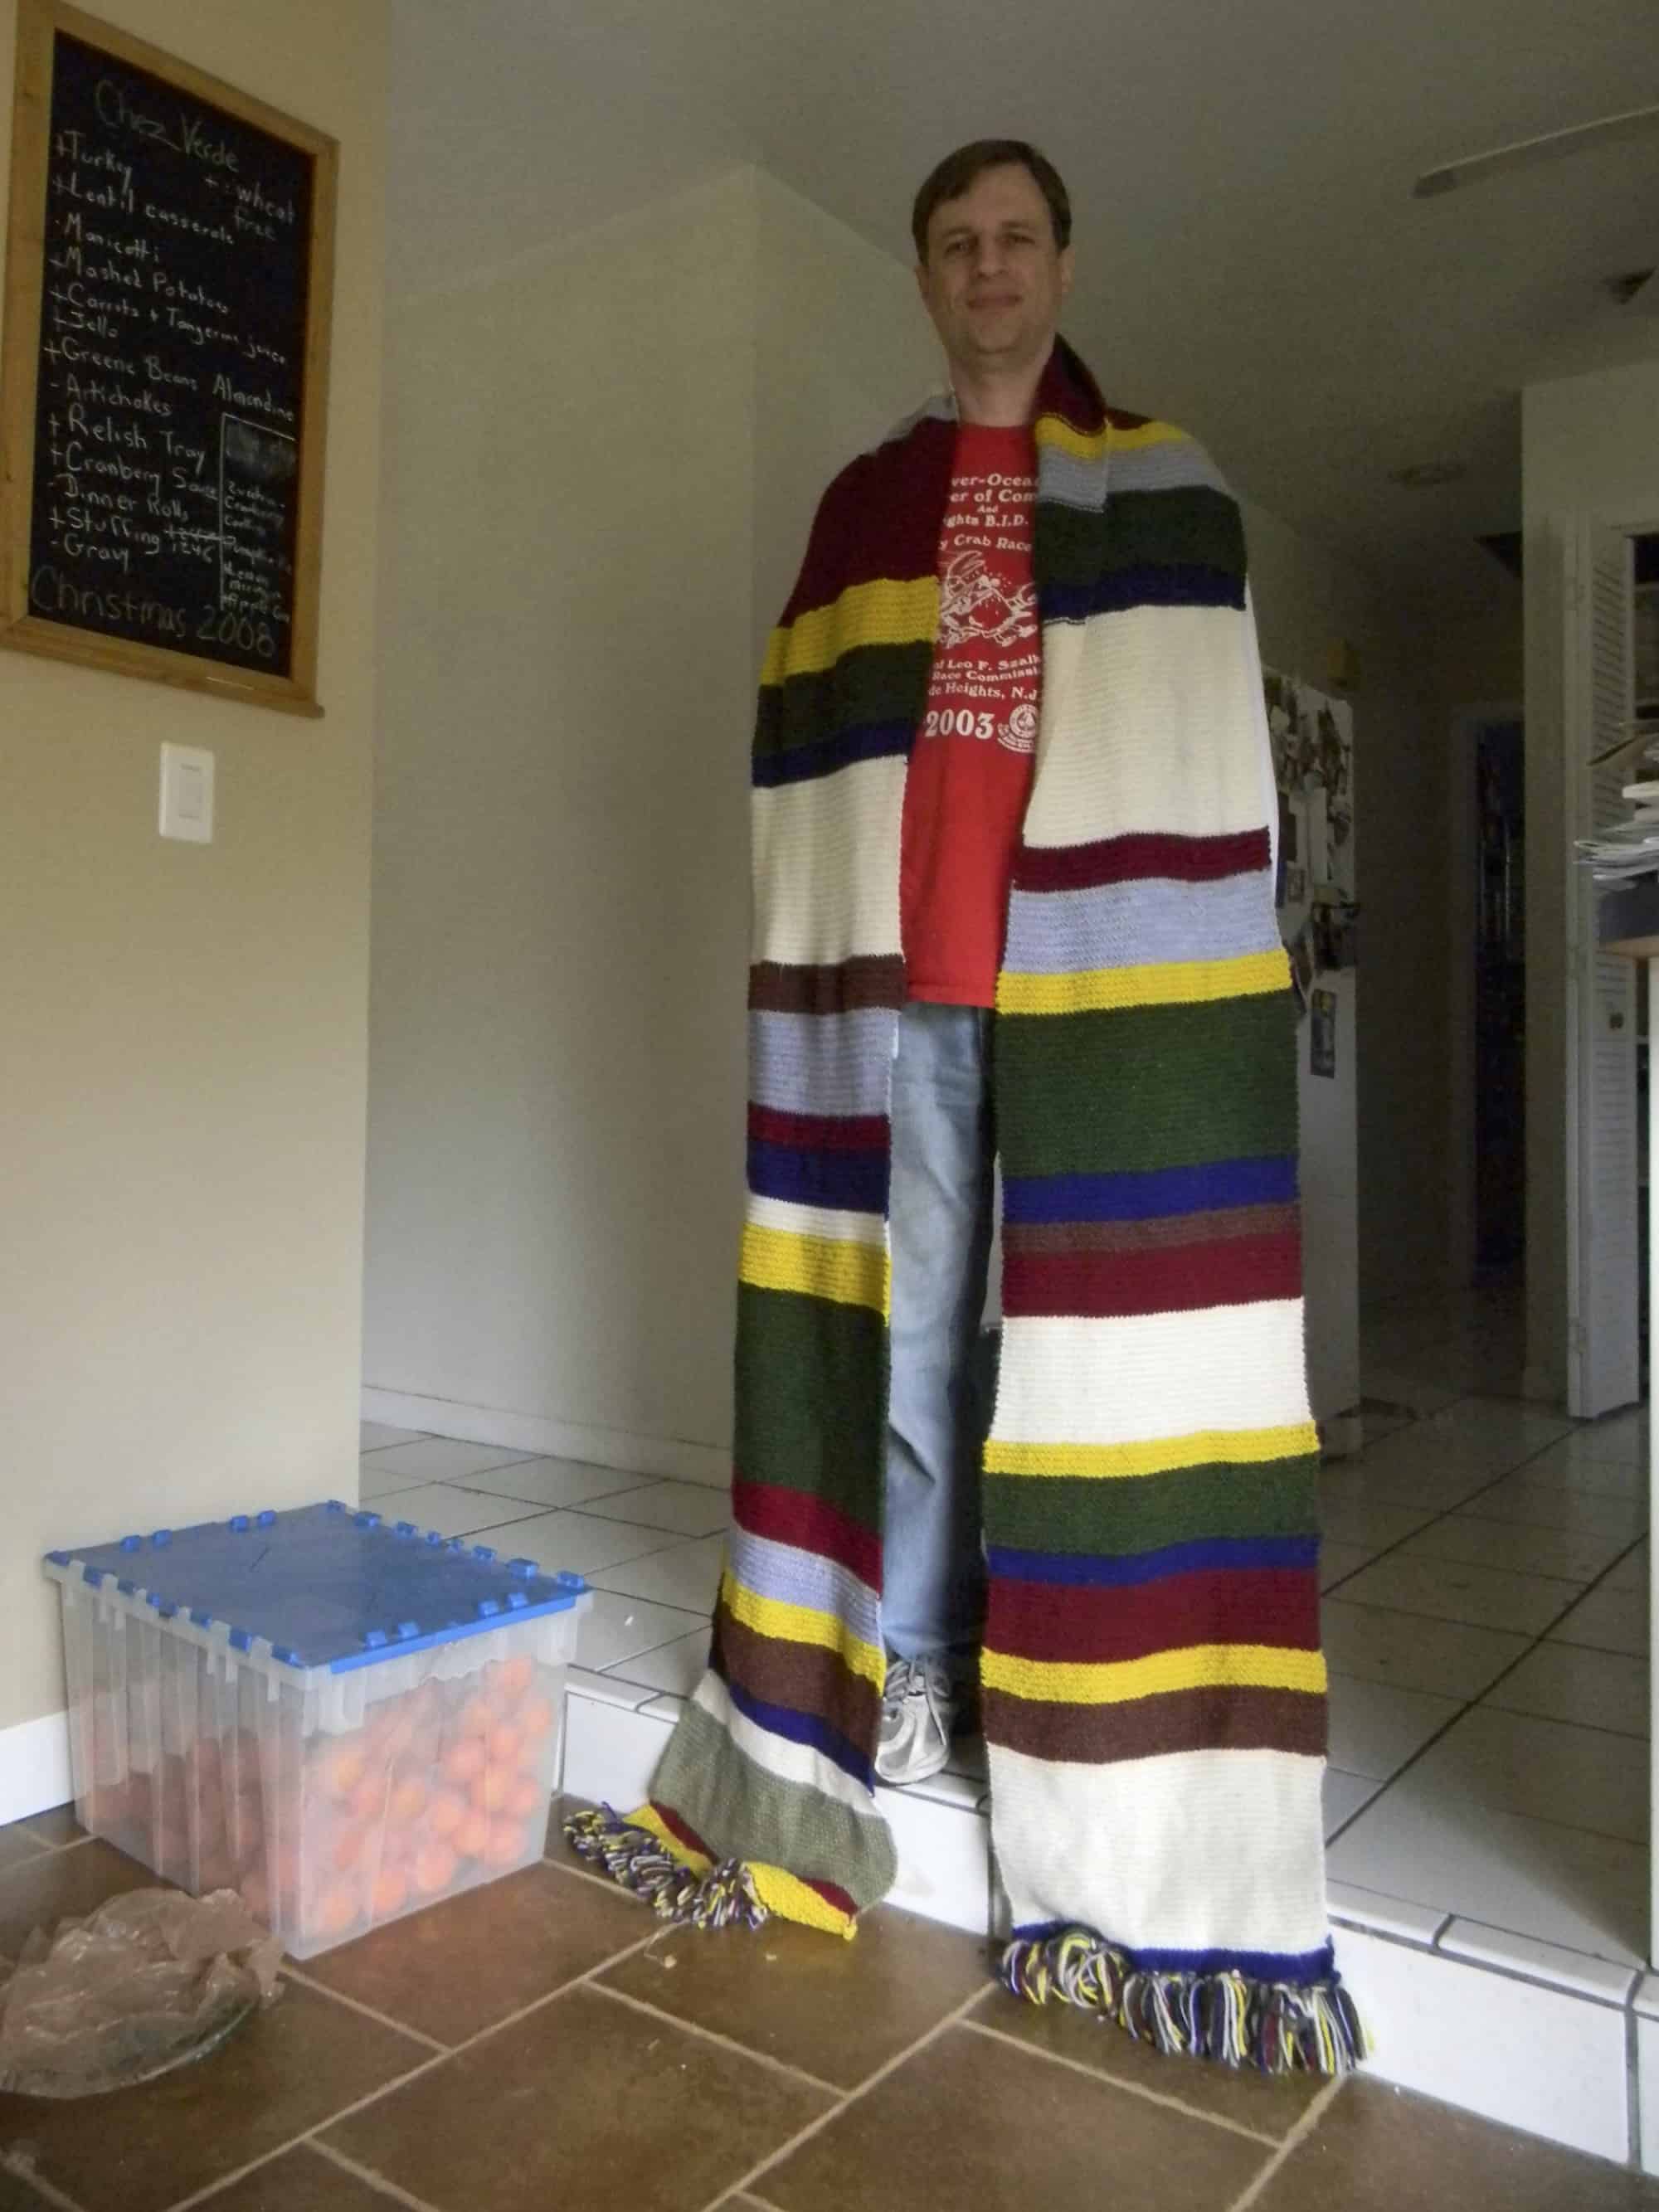
Each iteration of the Doctor has a different personality and costuming. The Fourth Doctor, portrayed by actor Tom Baker, wore a very long multi-colored scarf. According to legend, the scarf came about because a costume designer picked up some wool and handed it over to a knitter, asking her to knit a scarf. She used up all the wool she was given, creating a very long scarf. While this wasn’t the original intention of the costume designer, he liked it and the BBC went ahead with it. Over the various seasons that Tom Baker was on the show, different versions of the scarf were created, including a stunt scarf. Many people — including me — have knit replicas of that scarf, and there’s a website recounting the various iterations of the scarf and options for knitting it yourself.
I knit this scarf for my husband back in 2010. I’d rather poke my eyes out with my knitting needles than knit this much garter stitch again.
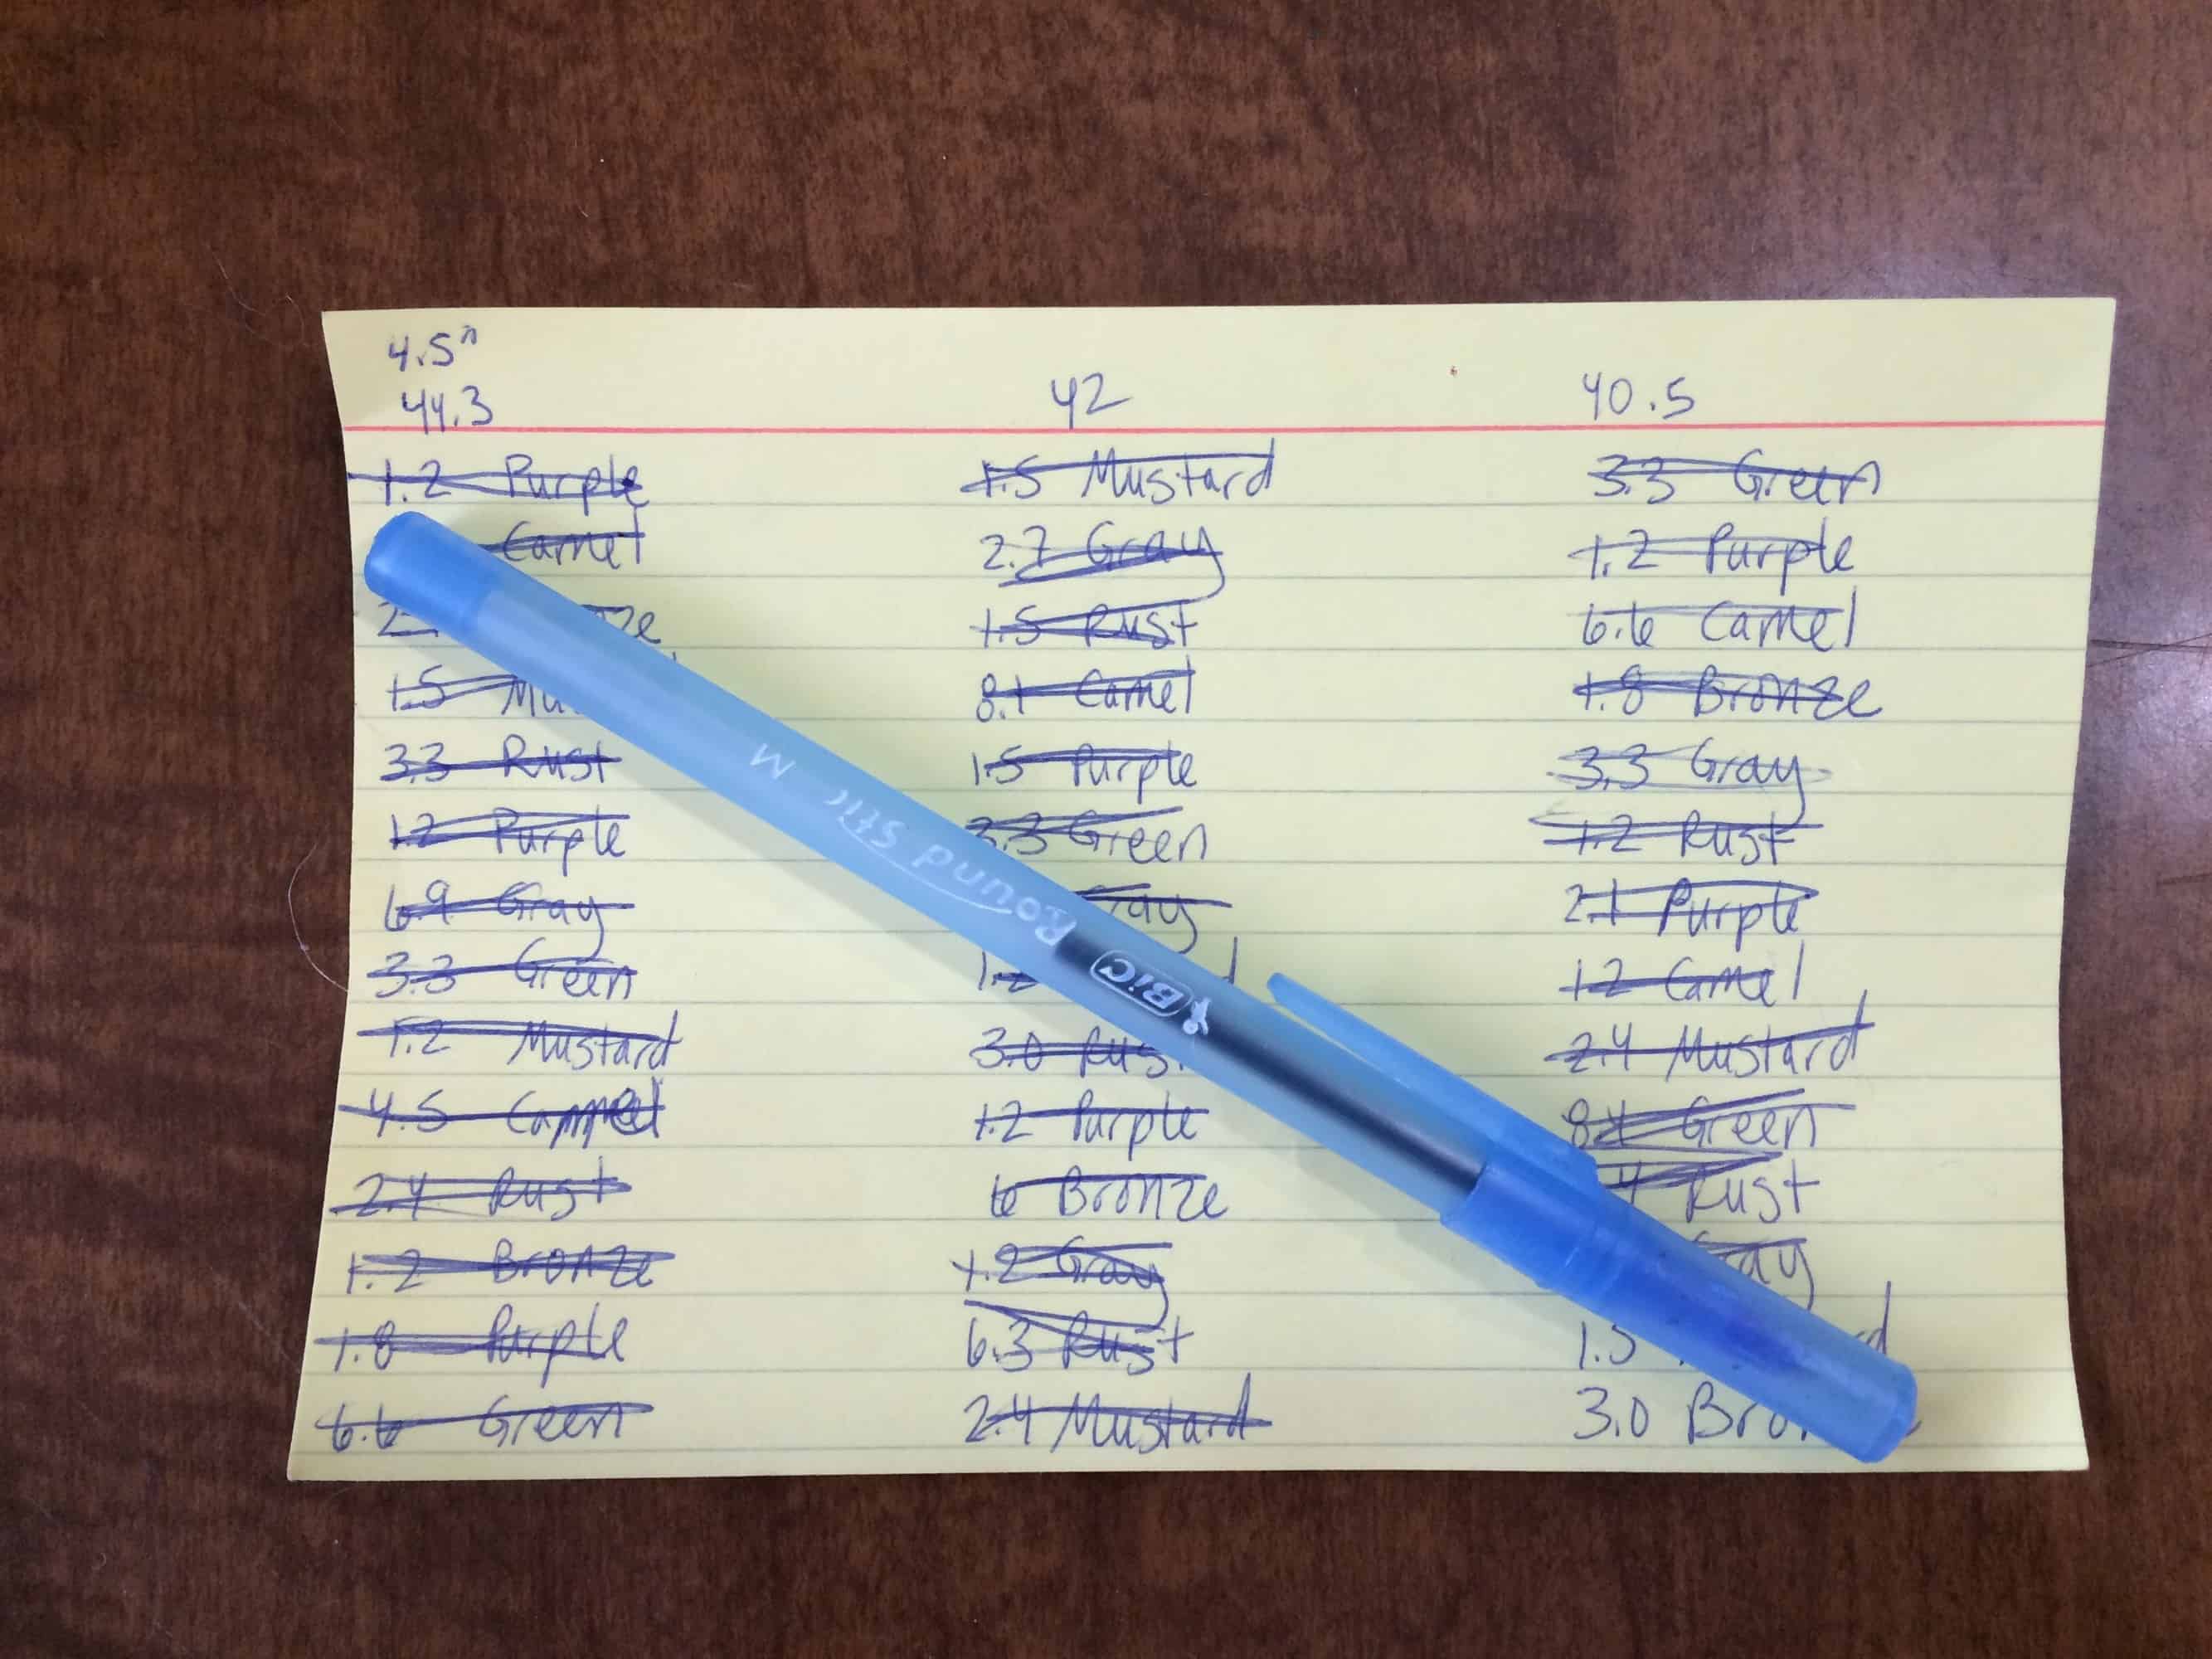
Since I didn’t want to knit that much garter stitch again, I decided to try weaving the scarf instead. I looked on Ravelry and found woven Dr. Who scarves by the following Ravelers: Jason, Serenova, Littleredmitten, jeen, jeen again, jeen a third time, jeen a fourth time to use up the leftovers from the first three, quiltnknitgirl, rosalynk, and MountainAsh. Only Jeen has detailed project information. Some of the others included the yarn and yardage used, but no detailed project notes. Therefore, I used the knitting patterns at Doctor Who Scarf and created a spreadsheet to figure out the weaving.
When making a Doctor Who scarf, you can decide to be true to the literal representation of the scarf, the spirit of the scarf, or both. A literal representation of the scarf means picking a season, getting yarn that is as close as possible to the colors used in the scarf in that season, and knitting stripes that are exactly the width of the ones on the scarf. The spirit of the scarf is going with what you have on hand and making something unexpected.
I knew I wasn’t going for a straight literal representation of the scarf because that would mean knitting it. I also wanted to use as much stash yarn as possible, rather than buying yarn. I tried to get as close as possible to the colors in the scarf as my stash would allow, but I wasn’t going to stress about minor color variations (I ended up buying purple yarn because I had nothing in my stash that was close, but everything else came from stash). On the other hand, I did want to pick a season and replicate the color order and stripe lengths of that season’s scarf. The Doctor Who Scarf website has a side-by-side comparison of the scarves for seasons 12 to 14, with the total length, stripe length, and total width of the scarf marked. I decided to go with a season 12 scarf because it is the longest of all of them.
Unlike knitting, weaving shrinks when taking off the loom and wet finished. In order to adjust for this, I added 20% to the length of each stripe, hoping that by doing so, I would get close to the correct stripe size after finishing. The scarf only shrunk by a total of 11″, which is about 7% of the pre-finishing length, so I probably could have added only 10% to the length when weaving. Unfortunately, I forgot to measure the length of stripes after finishing, so I don’t have the data to do an actual comparison. Since I used 3 different brands of yarn in the weft, I assume the different yarns shrank at different rates, but don’t know for sure.
This is the first project in which I did calculations to determine the yardage I needed for weft. I used a spreadsheet formula to add the length of all stripes of each color. I then multiplied that length by 88 (8 picks per inch * 11 inches wide in the finished scarf) and divided by 36 to get an estimated yardage for each color. This calculation was not particularly accurate.
Total Weft Length
Estimated Weft Yardage
Actual Weft Yardage
Purple
18.30
44.73
52
Camel
32.40
79.20
63
Bronze
19.20
46.93
23
Mustard
13.80
33.73
36
Rust
22.50
55.00
70
Grey
23.70
57.93
69
Greenish Brown
24.90
60.87
44
154.80
378.40
357
There’s a number of possible reasons my initial calculations were inaccurate. One is that I did not accurately measure the length of each color as I wove. Or perhaps I missed weaving a stripe in one color. I don’t think this is the case — I had a 4×6 card with a list of stripes and I crossed them off as I wove — but it’s possible.
I wasn’t always getting 8 picks per inch as I wove, partly due to tension challenges (more on that in a minute) and partly because of the different types of yarn. Since I used stash yarns, and some of the yarns were partial balls, I may not have had an accurate weight for the partial skeins before I started the project. I didn’t weigh each one; I relied on the weight listed in Ravelry, assuming that I had accurately listed information on my earlier projects.
The Trouble with Tassels
In the television show, the tassels are made from one strand of each of the seven colors in the scarf. When weaving, the fringe is usually the warp, and the warp for this project is only one color. I considered a number of options for finishing the scarf. I could:
Dye individual strands of fringe to match the stripes
Cut off the fringe, sew a hem, make tassels, and sew them to the edge of the scarf
Needlefelt 1″ or so on each end, rather than hemming, then sew the tassels to the needlefelted edge
Leave the warp as the fringe, leaning towards the spirit of the scarf not an accurate representation
I planned to sew a hem, but I ended up leaving the warp as fringe because I ran out of time — the scarf took nearly 15 hours to dry and by the time it was dry I had to pack it. I don’t think needlefelting would have worked on this project, because I don’t think the llama yarn I used for warp would felt. I tried wet-felting a join between two skeins and it didn’t work.
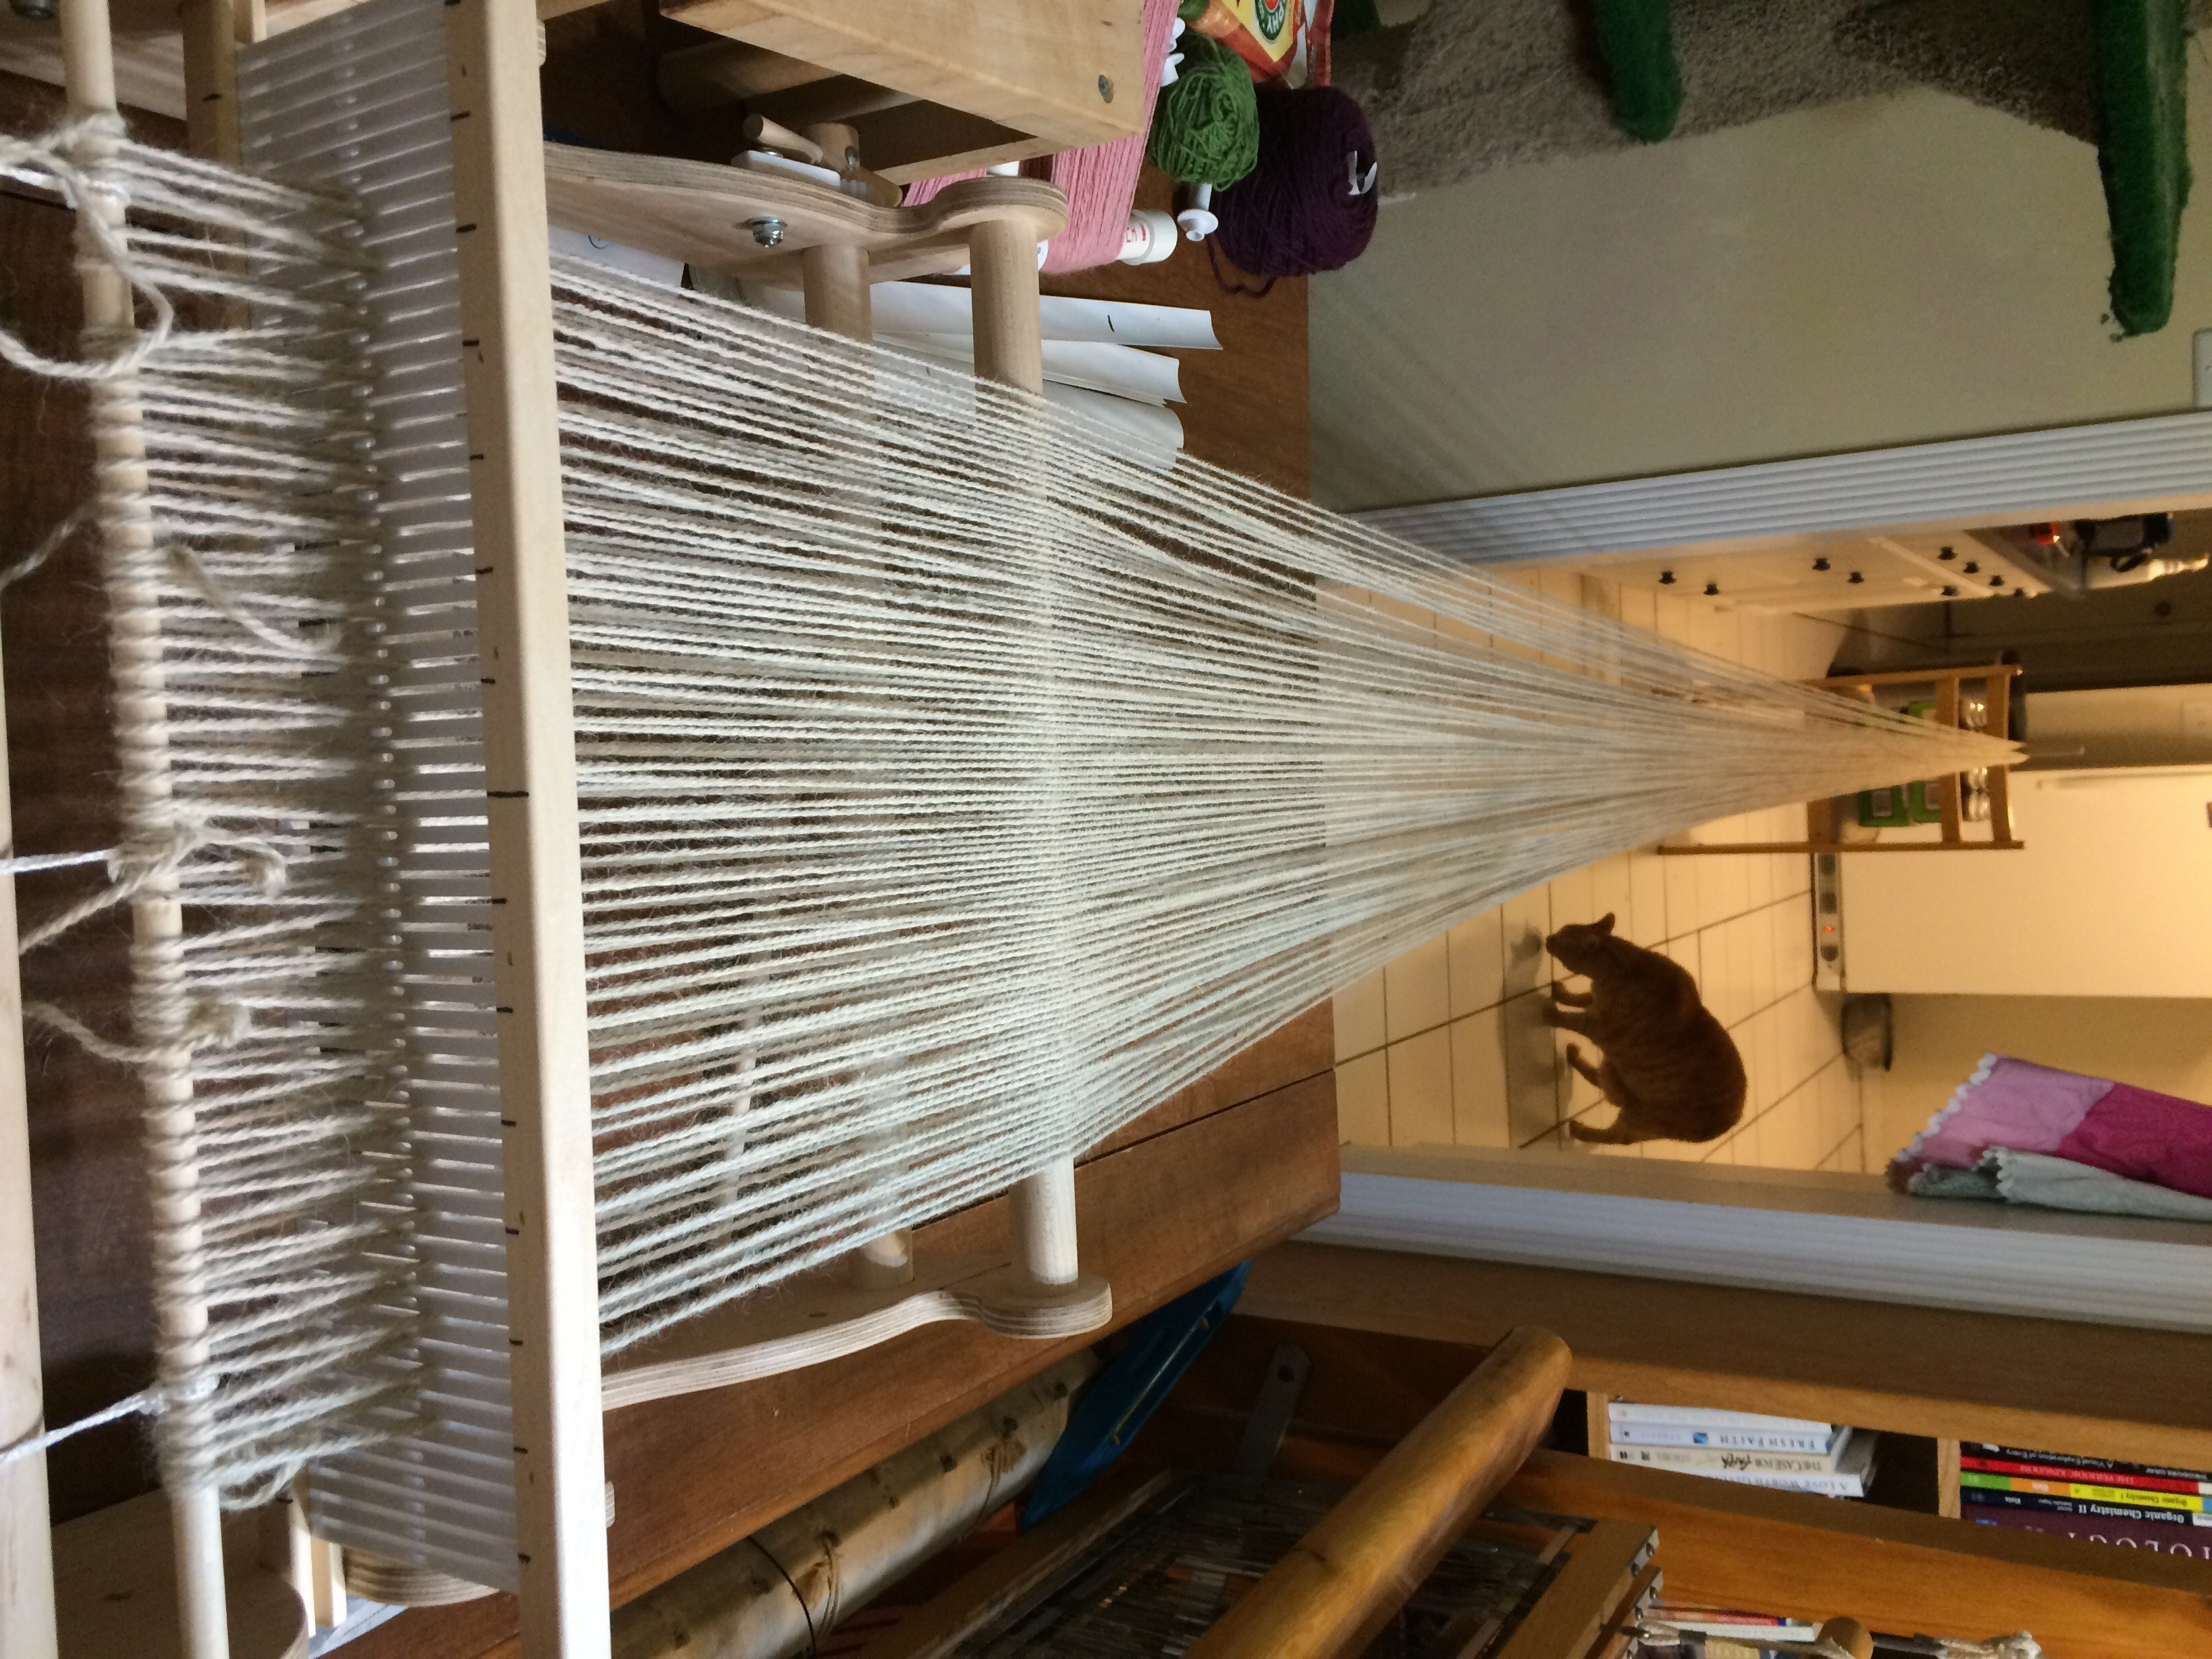
Warped Warp
As soon as I started tying on the warp, I knew that this warp was going to be problematic. This yarn was very stretchy. The long warp meant that the warp was sagging between the loom and the warping peg, resulting in different lengths for each strand of warp.
Then disaster struck — I had one more strand of yarn to bring through the heddle when the warping peg hopped onto the floor. My entire warp was on the floor, and the loop at the end was in disarray. Rather than rewarping the entire project, I gathered up the end, shook the warp to even it out as much as possible, then wound it onto the loom. I stopped regularly to yank the warp and shake out any tangles. When the warp was mostly wound on, I cut above the loop so that the warp would be even. Since I had to cut so much off to even up the end, my warp was a little too short for my planned project. I had to skip the last two stripes.
The llama yarn wasn’t the best warp. It was strong, but it was very stretchy and hairy. The stretchiness, combined with the long length of this warp, led to variations in tension as I wove. The hairiness of the warp meant that it shed as I moved the heddle back and forth, leaving debris all over my floor and table.
Learning Experiences
This was the first project I wove using a boat shuttle. I have the 9″ Mini Schacht Shuttle (The Woolery, affiliate link), which I received as a Christmas gift. I wanted that shuttle specifically for this project. Seven colors, and long stretches of a single color make it impossible to carry yarn up the selvedge. The price of the boat shuttle plus a couple dozen 4″ bobbins (The Woolery, affiliate link) is a bit more than buying extra stick shuttles, but the boat shuttle is more flexible.
It took me a little while to get used to the boat shuttle. I discovered that it worked better when the tension was higher. When the tension was too loose, the boat shuttle tended to slip between the warp strands and fall to the floor. I also learned that the boat shuttle worked better when I threw it right side up. The bobbin does not sit directly in the middle of the shuttle; it is a bit closer to the top than the bottom. If I put the shuttle through with the top side down, the wider parts of the bobbin tended to catch on the warp strands. The shuttle has “Schacht” printed on the side of it. It is right side up when that printing is right side up.
This is the first project I’ve done where I cut the yarn for color changes rather than carrying colors up the selvedge. Therefore, it is the first project where I had to manage ends. On other projects, I carried the ends along the bottom of the work. I started doing that with this project and ran into a problem. As I wound, the cloth beam caught the ends and pulled them vertically. If you look carefully at the purple stripe in the foreground of the picture on the deck, you can see some wonkiness to the selvedge. This is the result of the end getting caught in the cloth beam and pulling. After I figure out what was happening, I brought my ends to the top of the work and cut them short before winding them around the cloth beam.
This project was just about the maximum size the 15″ Cricket loom can handle. By the time I finished, the cloth beam was full. I might have been able to get one more turn of the cloth beam — just enough to finish those extra two stripes — but it would have been close. The yarns I used for this project were heavy worsted weight. Thinner yarns would make a thinner cloth, so theoretically the loom should be able to handle a longer warp if I used fingering- or lace-weight yarn.
Conclusion
Weaving a Doctor Who Scarf is a lot more fun than knitting one. I tied on the warp on Saturday and cut the finished project off the loom on Wednesday. The project took something like 16 hours of hands on time, including the extra time it took to fix the warp after the warping peg abandoned its duties. While I don’t want to knit a Doctor Who Scarf ever again, I wouldn’t hesitate to weave one!
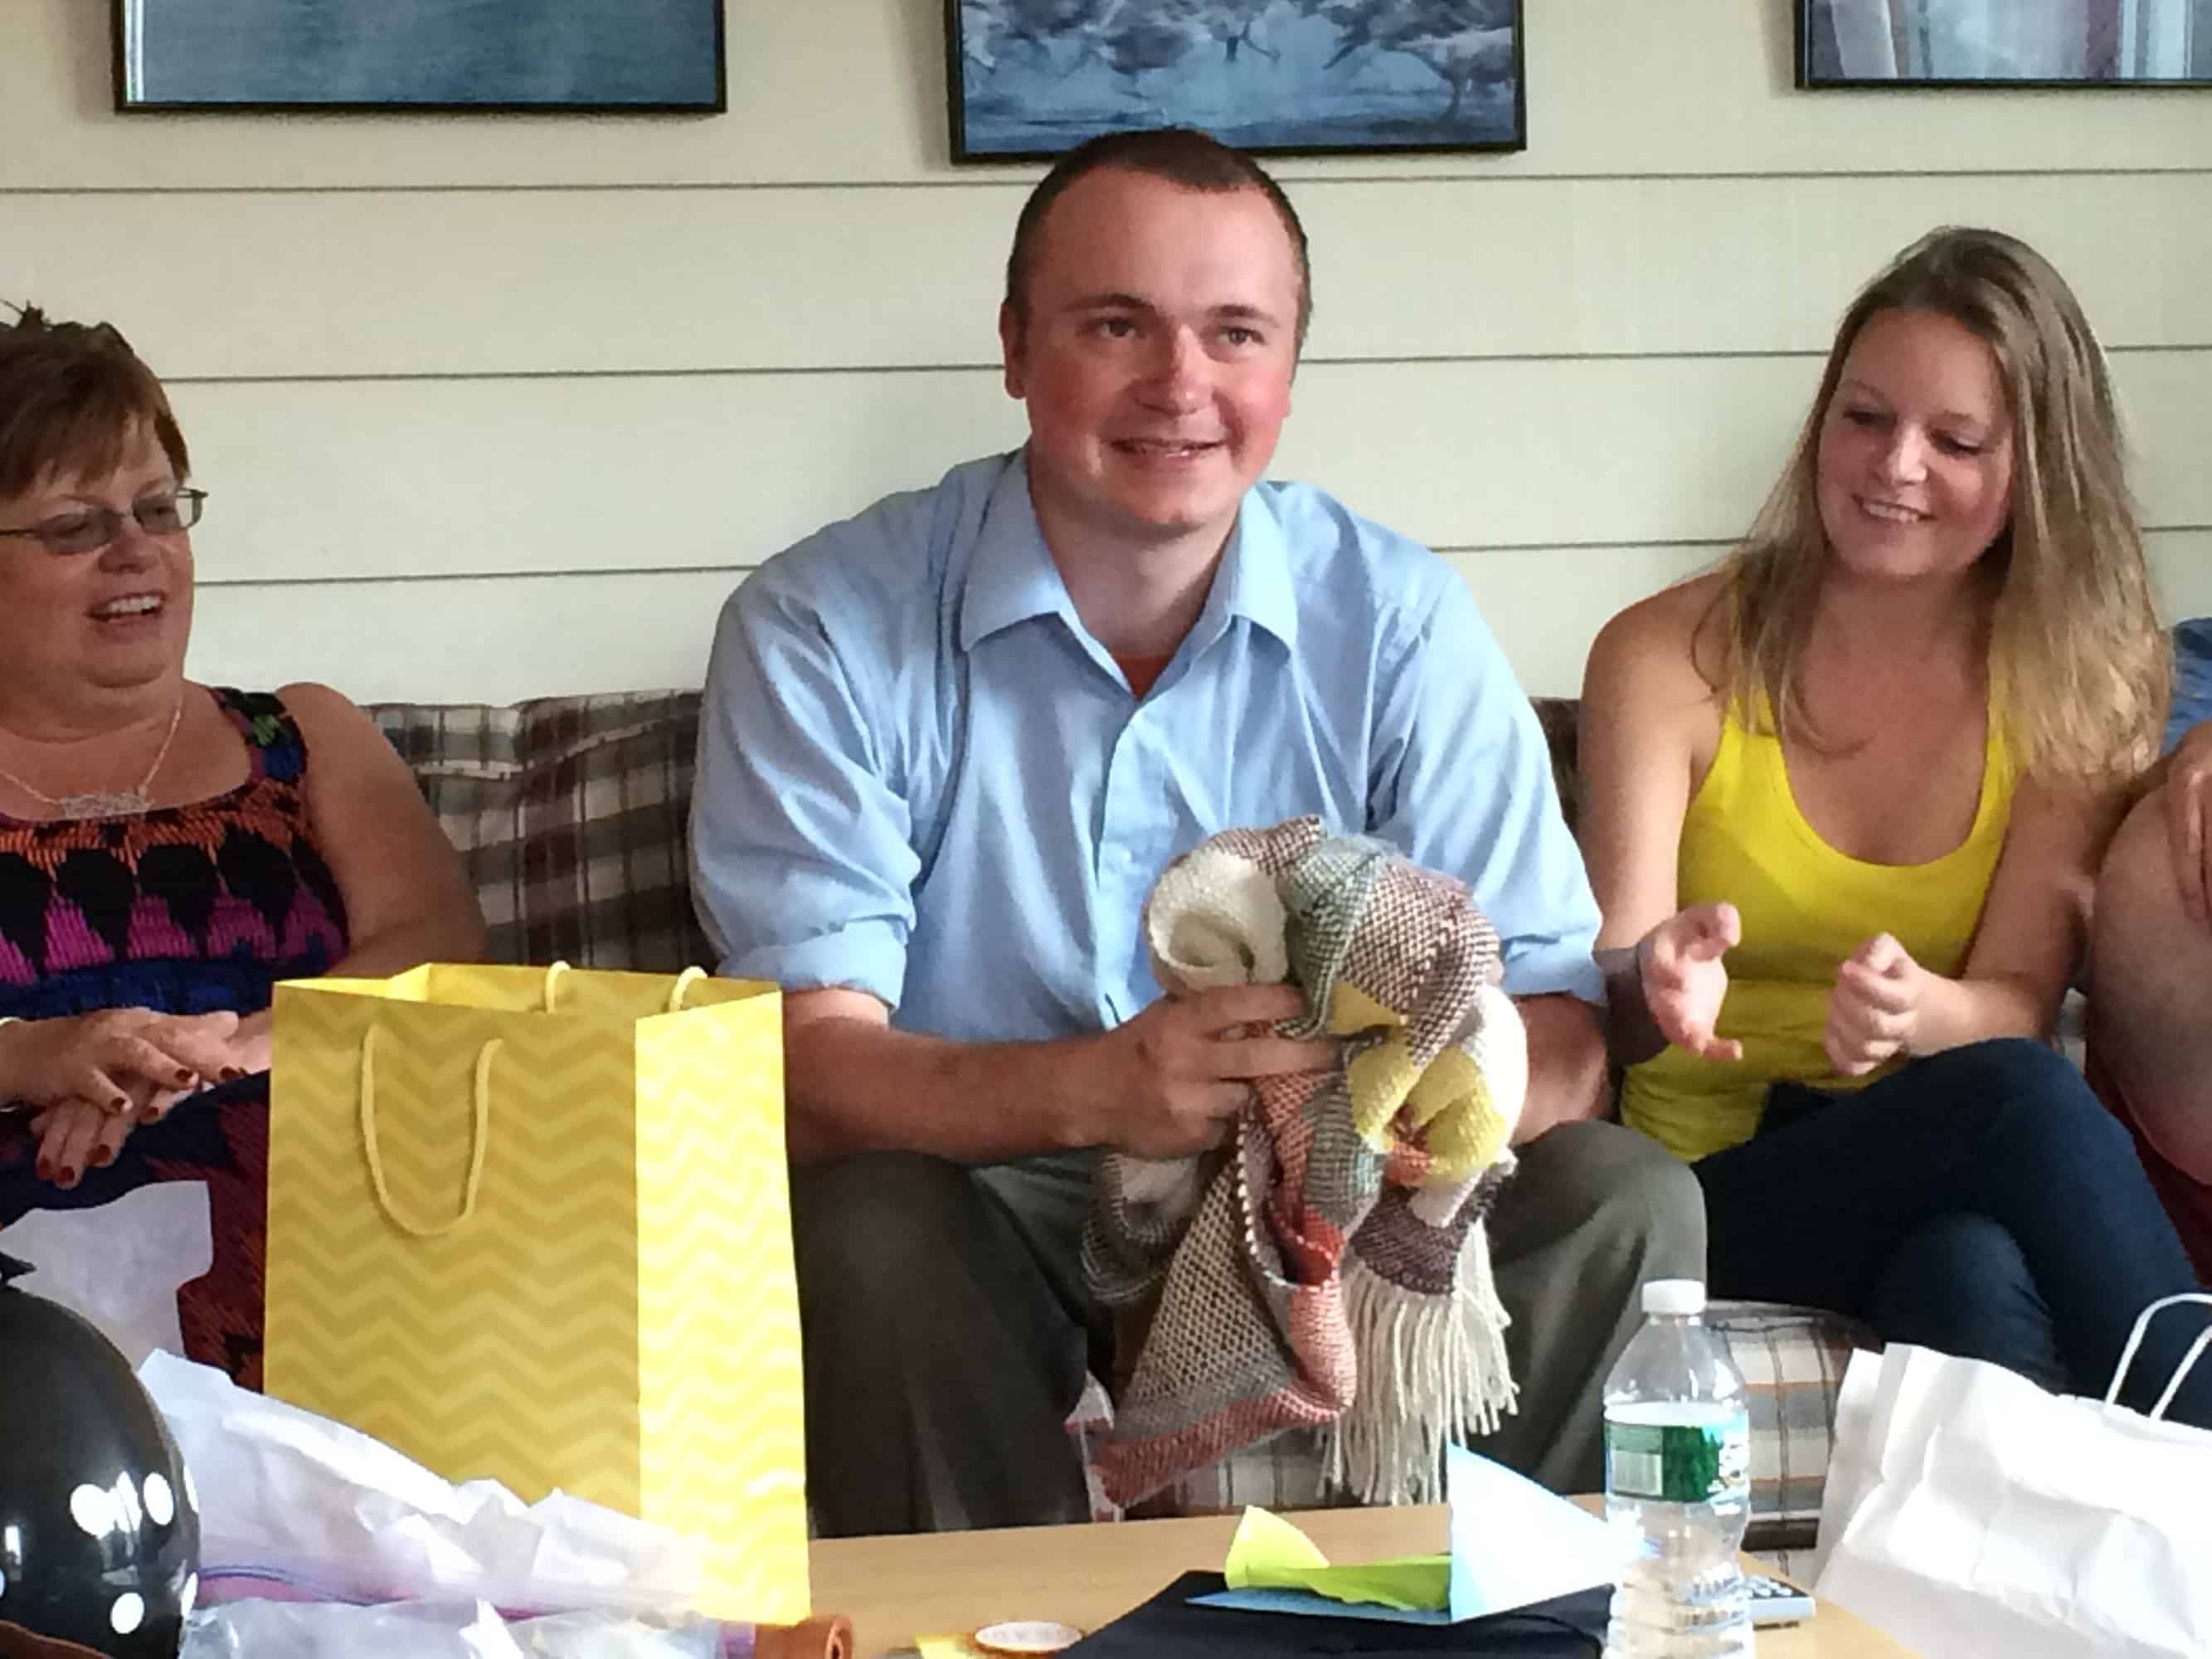
Cooper opening the scarf while my mother (l) and cousin (Cooper’s sister) (r) watch.
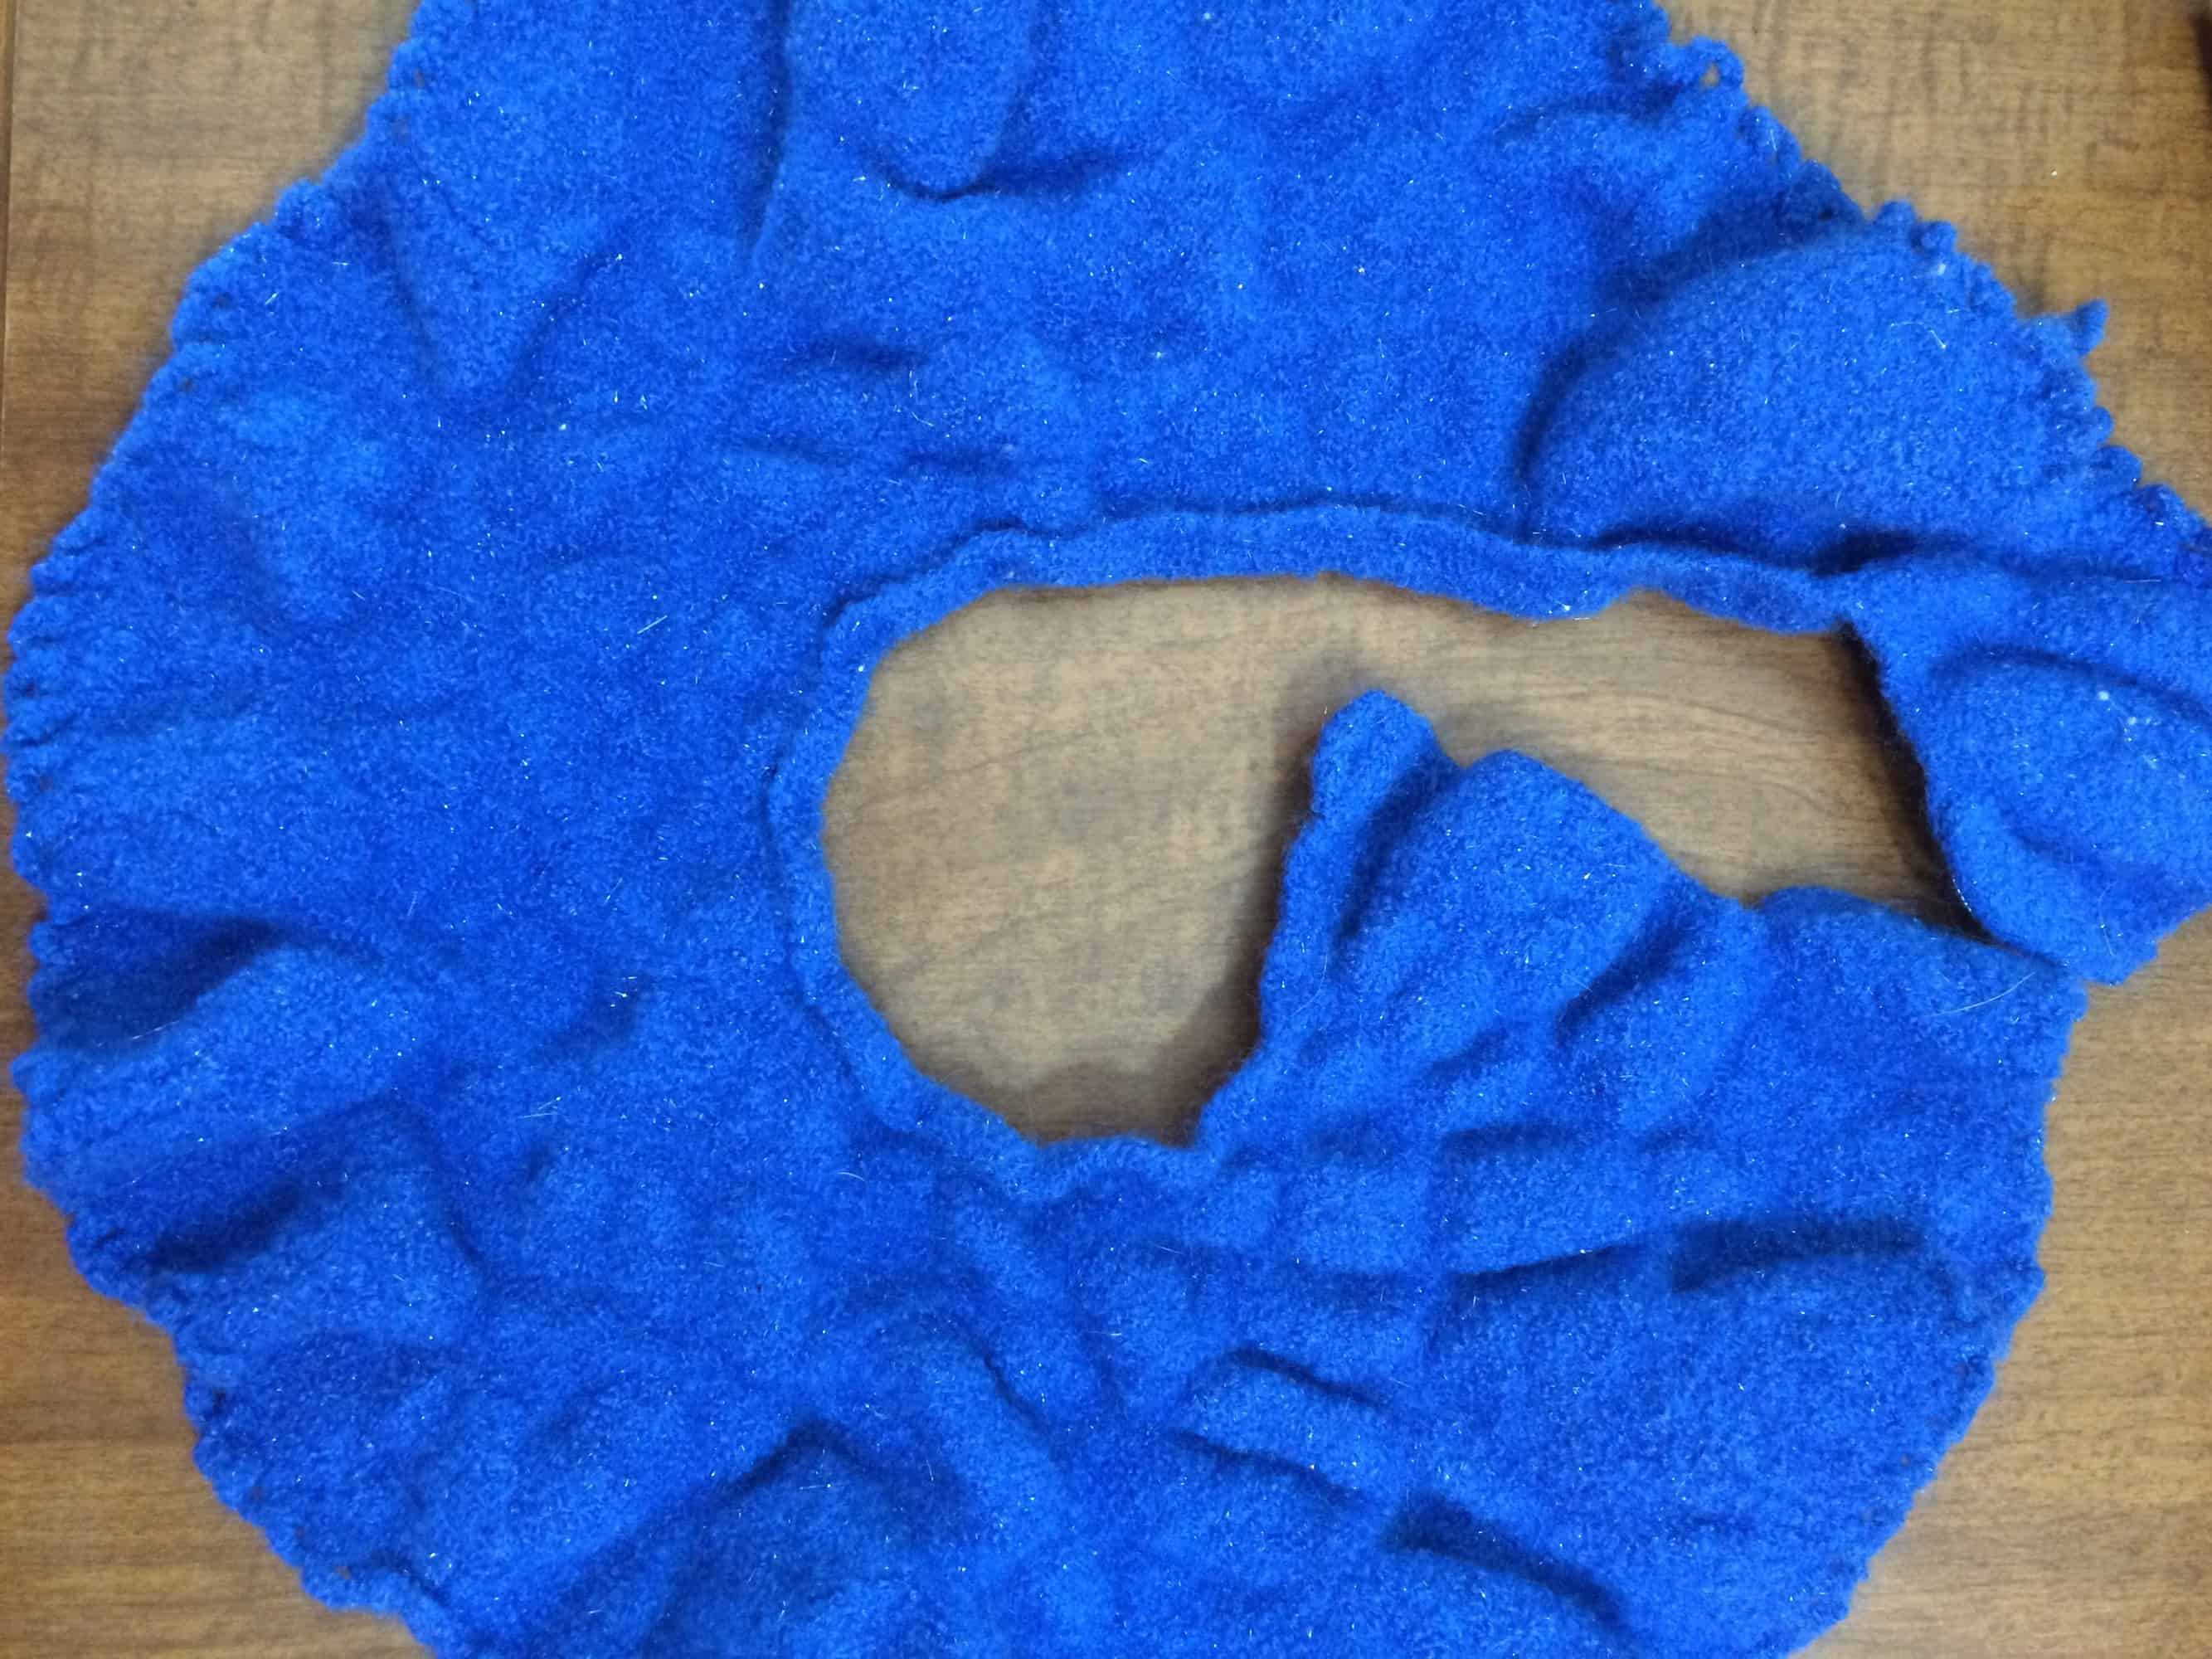
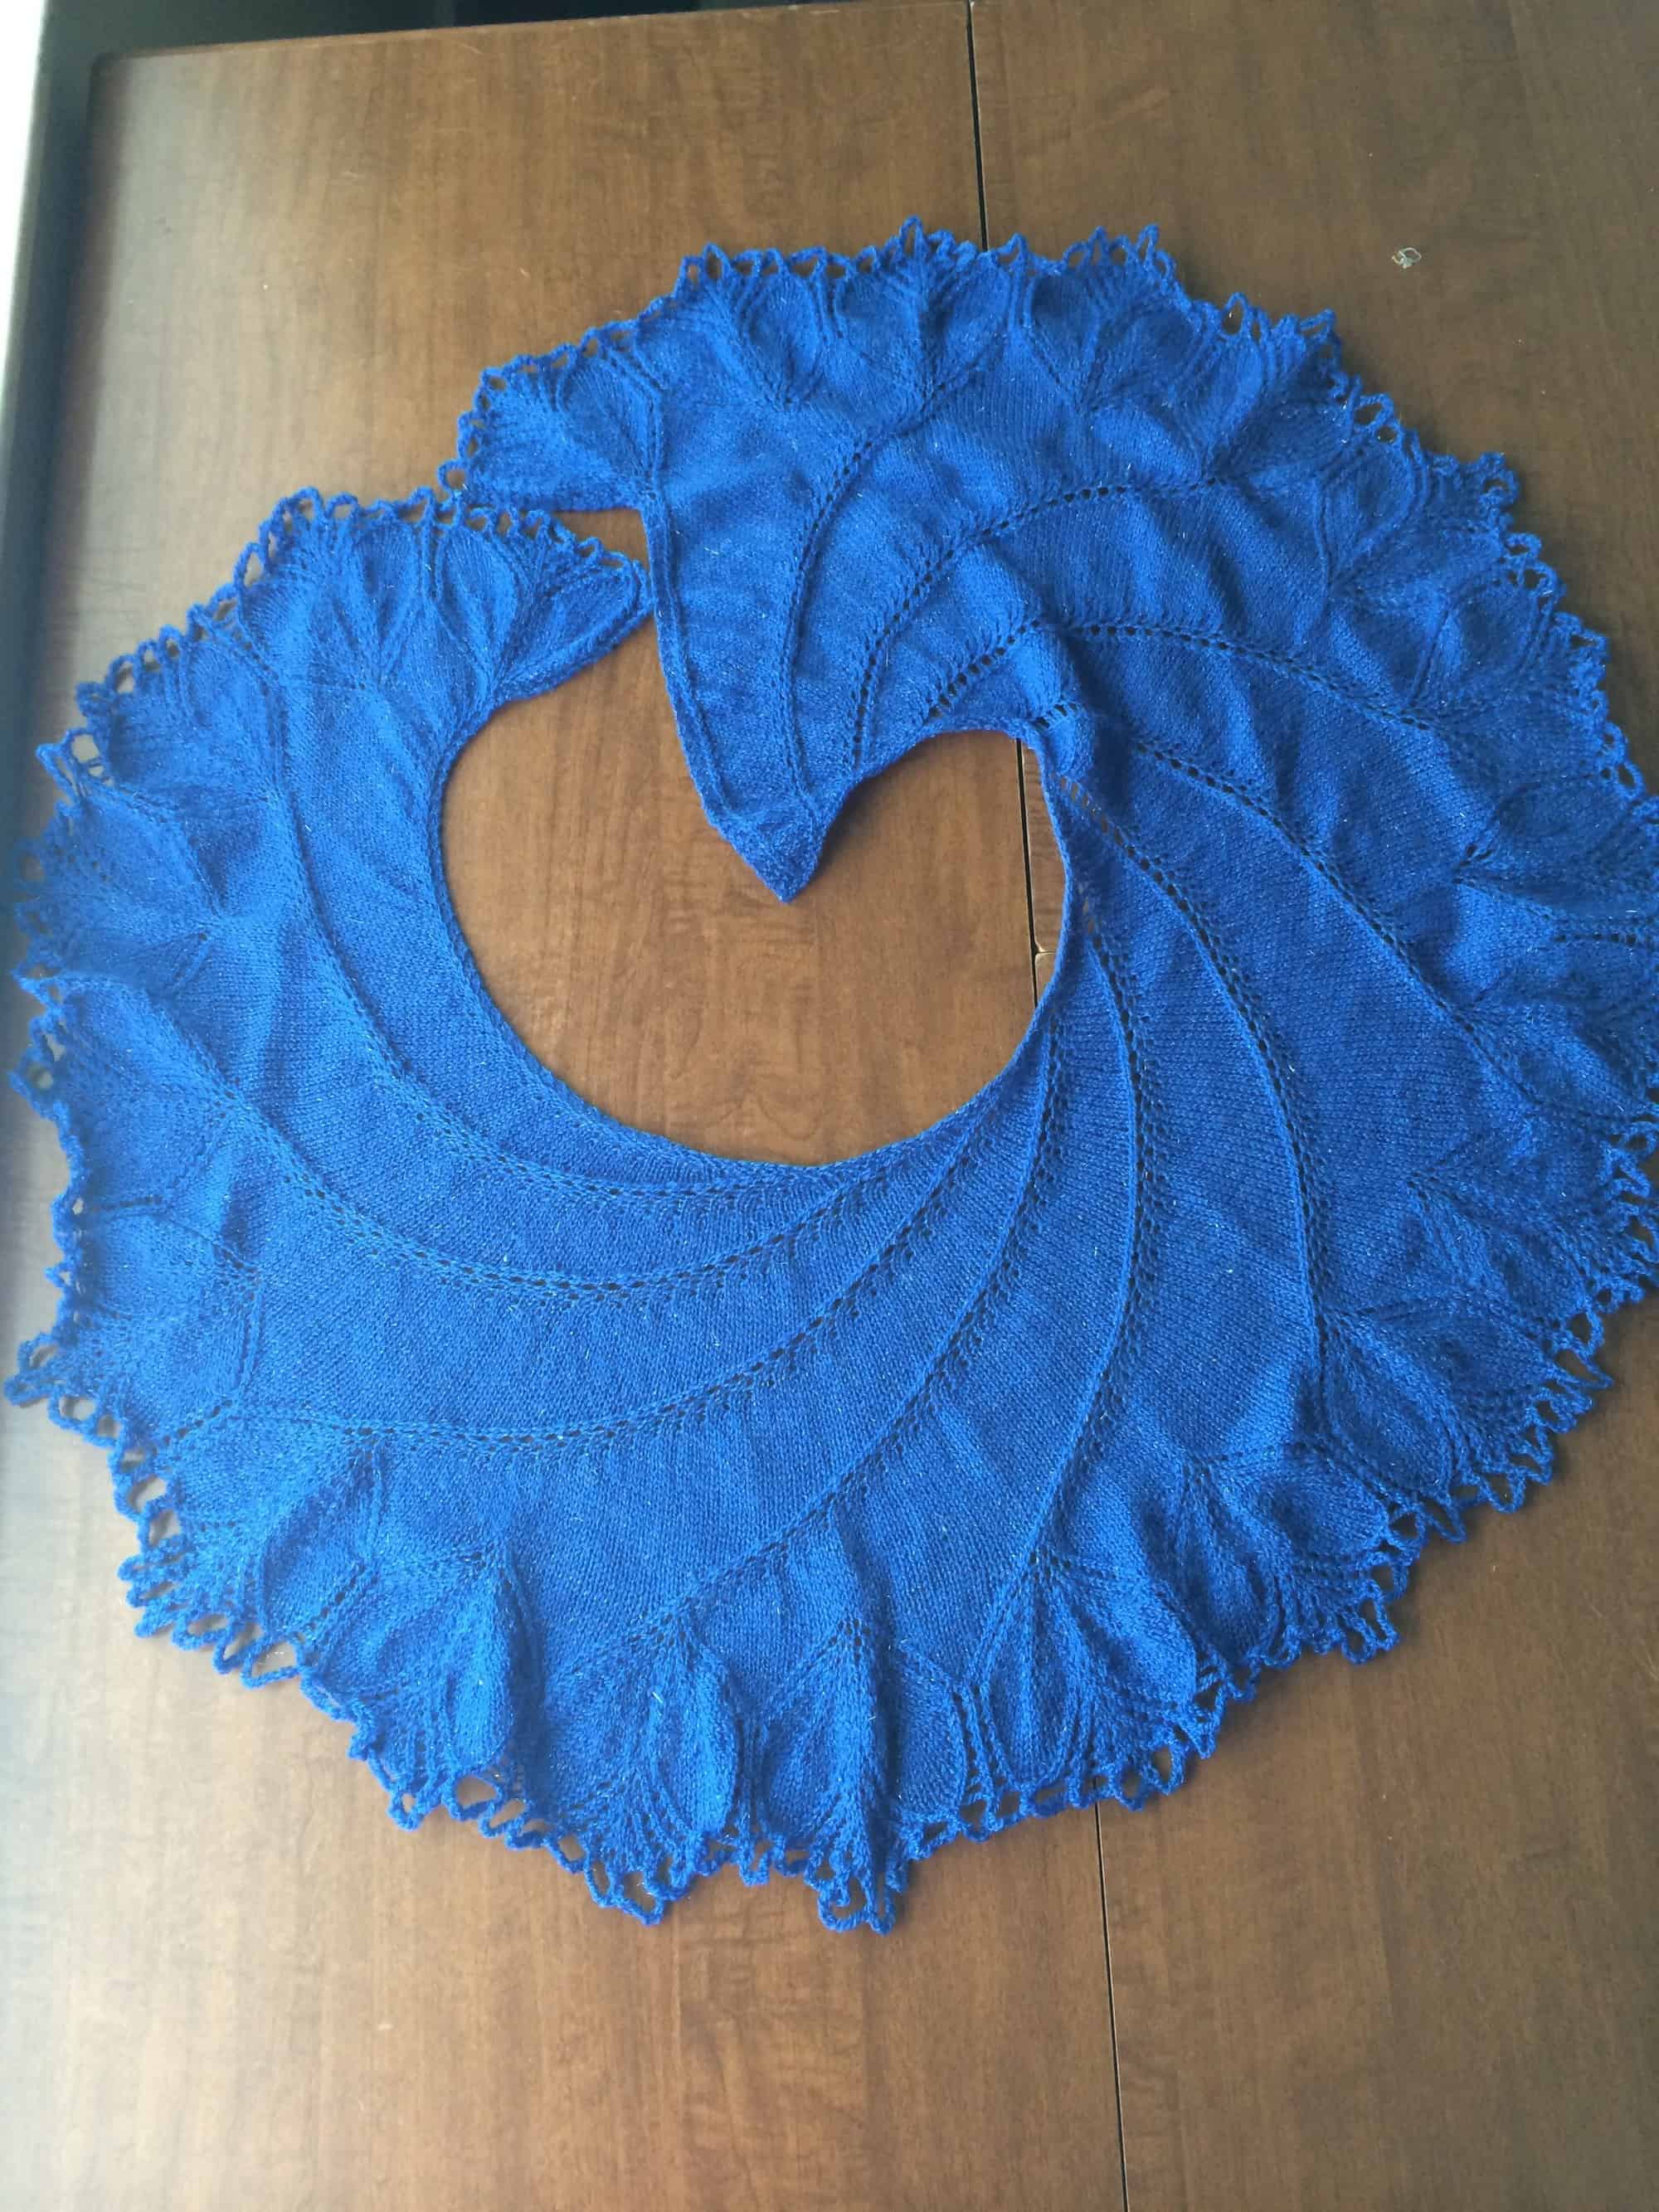
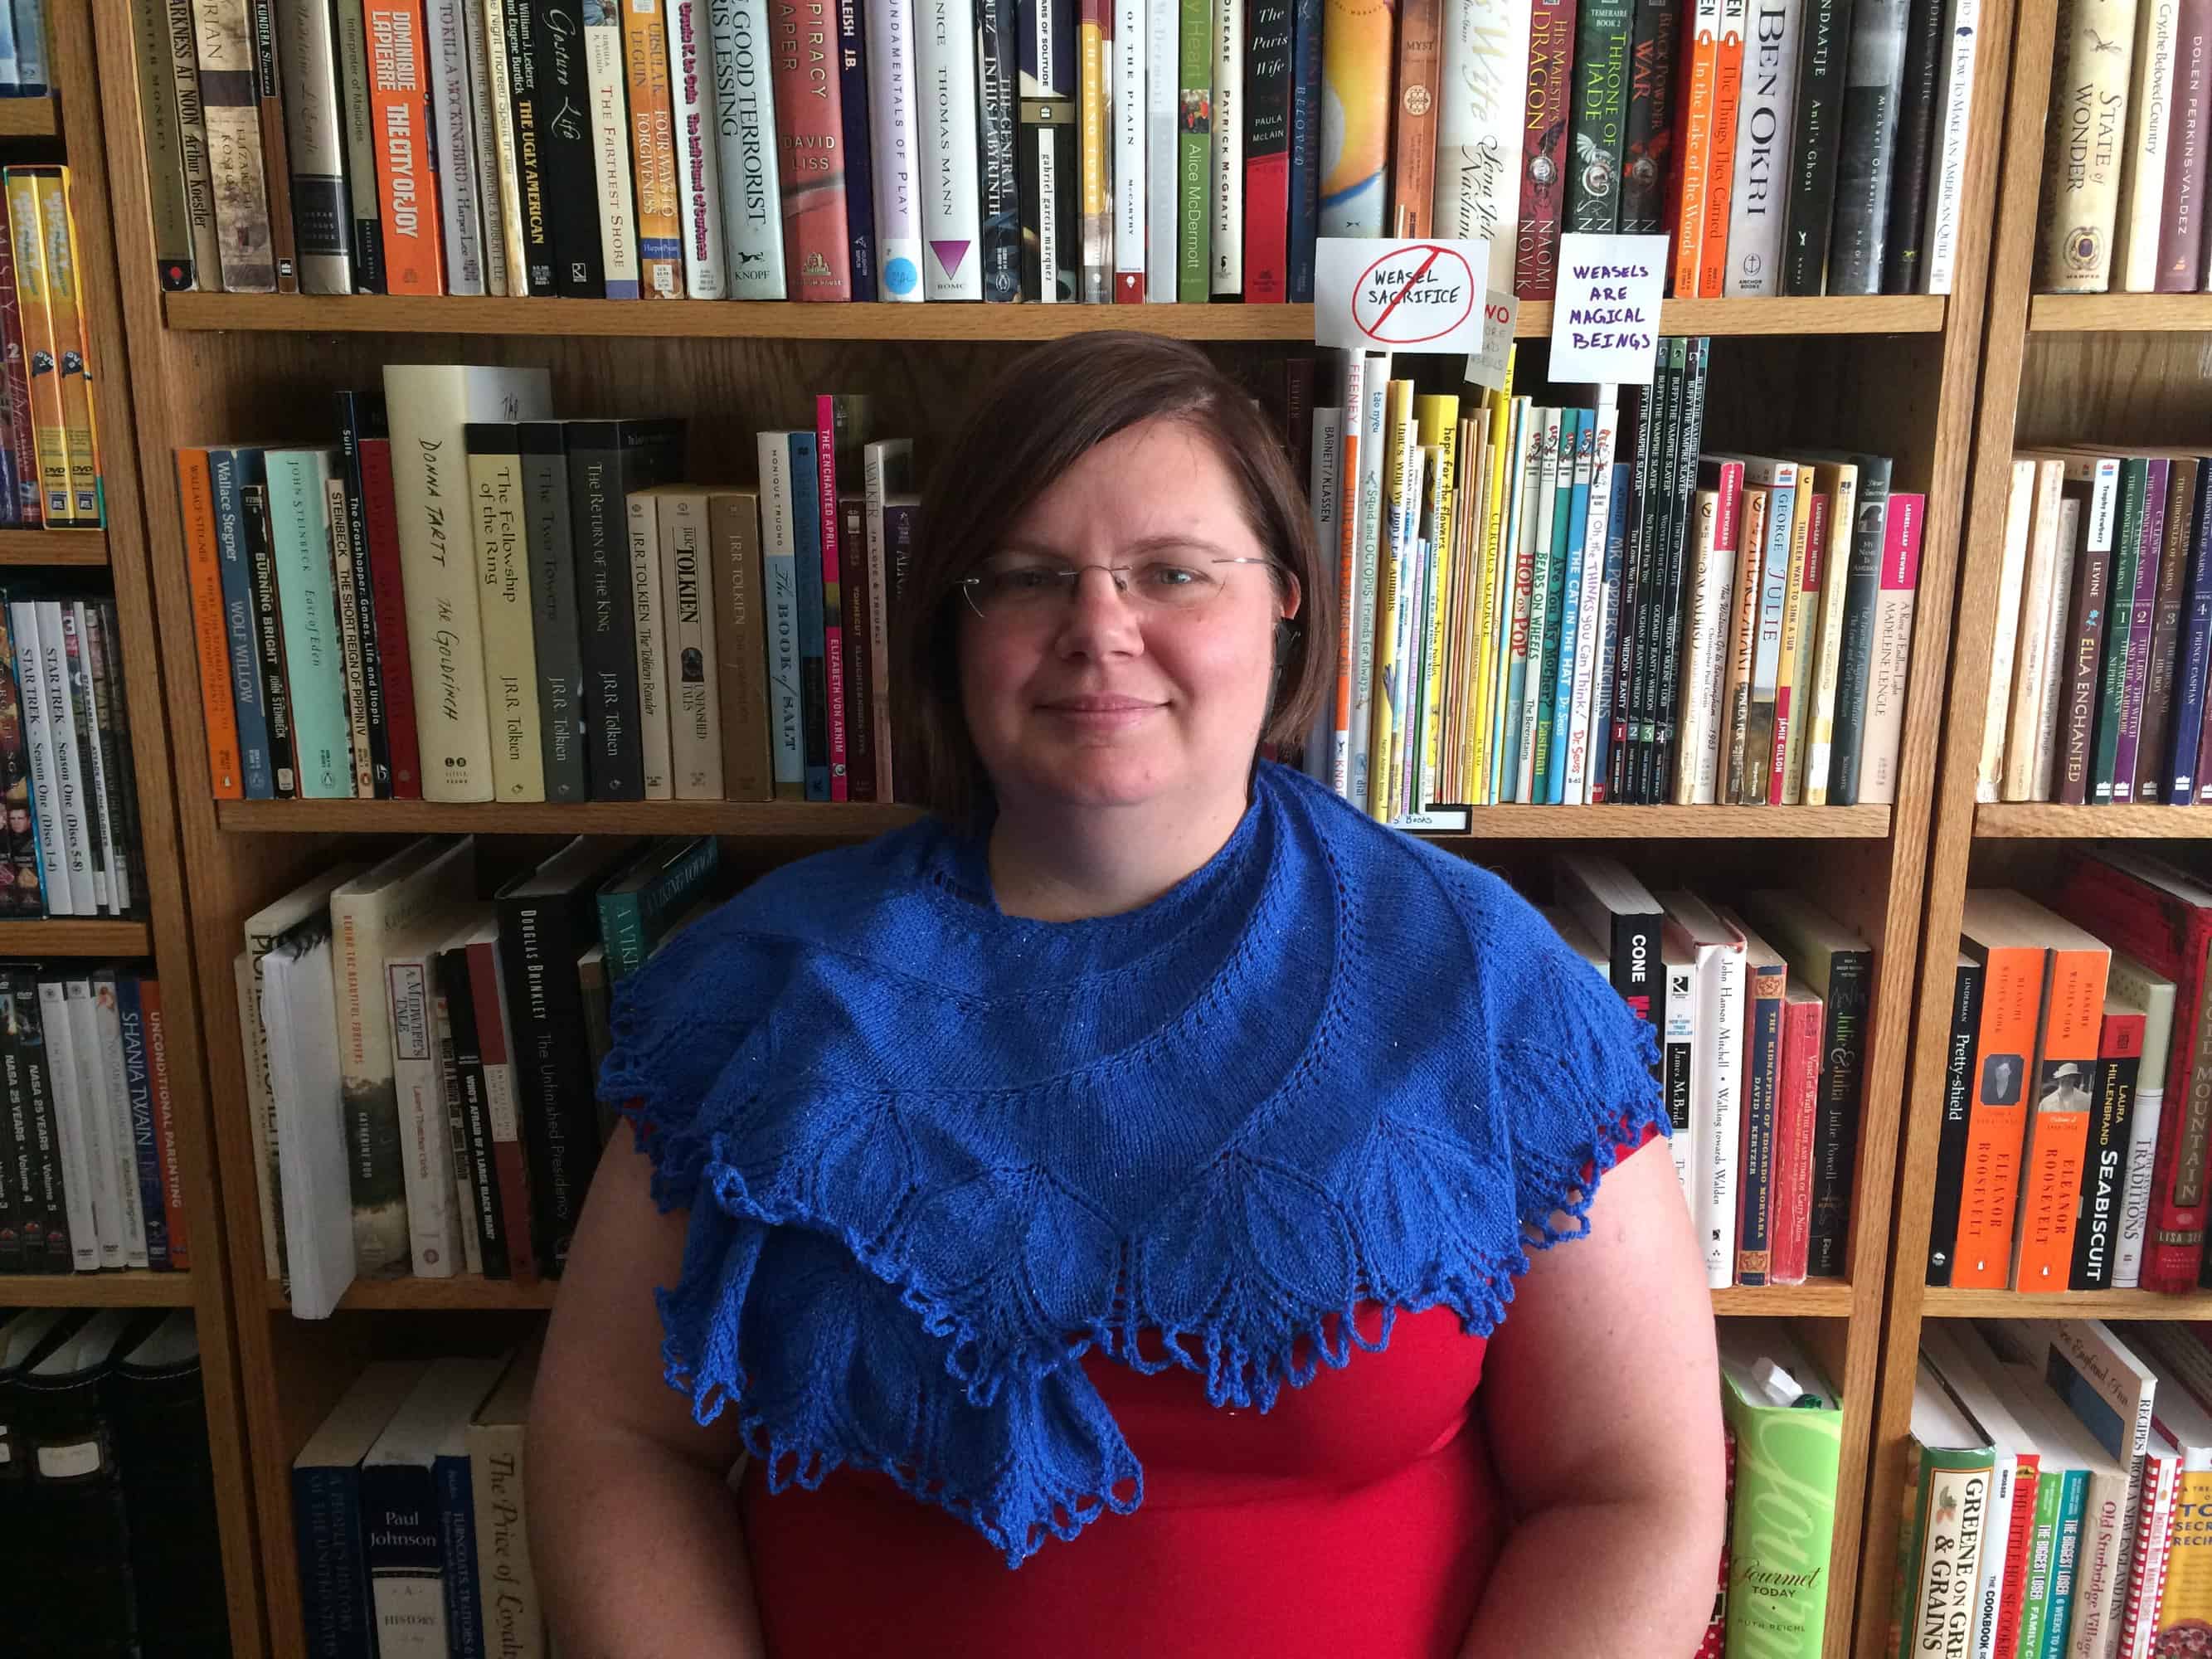
Remember the Begonia Swirl Shawl that I knit last year? Here’s what it looked like when I finished it.
I lent it to a friend to use as a head scarf, and she washed it before returning it to me. She’s not a knitter and didn’t know enough to ask about the fiber content before washing. She tossed it in the washer and dryer. The results were, for knitters, predictable.
I’m not sure that she intentionally put the shawl in the washer and dryer. It might have accidentally snuck into her laundry and she didn’t know until she was folding. We haven’t talked about it. I found the shawl in with some other things. I was heartbroken at first, and couldn’t bring myself to ask. I guess I don’t see the point of having this type of conversation. She didn’t do it on purpose. Hopefully, she’s learned to ask about fiber content before cleaning things. What else is there to say? Any time I start the conversation in my head, it sounds accusatory and guilt-inducing. I see no value coming from that. So I let it go.
My worse case scenario is that I get to knit this shawl again. I don’t have enough of the yarn left to knit it in the exact same yarn, but it’s not like I’m lacking yarn — I have a stash that is 63 miles long and contains many appropriate options for reknitting this shawl. The pattern was fun and not terribly difficult. It took me less than six weeks to knit, even though I had other projects going at the same time.
I’m not sure what I’m going to do with the felted shawl. For now, I’ve folded it and put it away in the drawer with my other shawls. When I took the pictures for this blog post, the shawl reminded me of a Colonial-era collar, though of course that would have been white and not this bright blue. I’m contemplating felting it a little bit more and drying it flatter or steaming to see if I can even out some of the wrinkles caused by the felting, then figuring out a way of using it as part of a costume. I’ve never made a historical costume, but I have at least two fiber events (a Spin In hosted by the Saint Augustine Spinner’s Guild and a Weavers Guild of Orlando demo as part of a Shakespeare festival at a local high school) coming up where costumes are appropriate or expected. Perhaps I’ll be able to find a way to use this shawl in its felted state!