
I finally finished my first ever socks. Well, first ever adult-sized socks. I made 4 minisocks a few years ago, but I have never made adult-sized socks or even a Christmas stocking before. I started these socks in October 2013, and they have been sitting in my UFO (unfinished object) pile since November 2013, awaiting a new bind-off and afterthought heels.
Official Stats
- Pattern: Two at Once, Toe-Up Socks by Kelly Petkun
- Yarn: 305 yards KnitPicks Felici in Sugared Violets
- Needles: US 1 / 2.50 mm
- Made for: Me, originally
- Ravelry Project Page
Originally…
I tend to write blog posts in my head while I am working on other things. When I sit down to type posts, they flow quickly because I’ve mostly written them in my head and just need to get them out of my head and onto the screen. After I type them up, I reread and edit. As I was thinking through this blog post before sitting down to type, I caught myself repeatedly thinking, “Originally, I planned…” Since these were my first ever socks, they didn’t come out exactly as I anticipated. This is not a bad thing. I think they came out extremely well and I learned a lot from them that I will put to use as I make socks in the future!
I proposed these socks for my Order of the Phoenix Mission in the Fall 2013 HPKCHC term. A single pair of plain vanilla socks are not usually enough for an Order Mission. However, the first ever socks is a powerful spell and sufficient for a Mission since learning takes time. My Mission was approved. Although my B.R.O.O.M. did not lay out the specific details, I did have a specific plan. That plan was to use Silver’s Sock tutorial for toe-up two-at-a-time socks. I had several colors of KnitPicks Felici, which is a self-striping yarn. I picked my favorite color out of my stash for my first socks. I planned to use up all the yarn on the socks. I would knit them until I ran out of yarn, reserving just enough to do the afterthought heels. I did not want to have any yarn leftover!
Sock Options
Most of my readers are fiber crafters, but friends and family also read this blog because I write it and not because they are fiber crafters. For those readers, and for those who are fiber crafters but have never knitted socks, I am going to give a quick overview of the options for knitting socks and discuss which options I selected and why.
Cuff-down or Toe-up
You can start knitting socks from the toe and working up to the cuff or from the cuff working down to the toe. Sock knitters seem to have a preference for one or the other. Most of the knitting for a sock is a stockinette tube so the direction of knitting does not matter. There are three parts of the sock where the direction of knitting does matter: the toe, the heel, and the top of the cuff.
Heels are constructed a little differently when knitting cuff-down than when knitting toe-up. In either case, you have multiple options for constructing the heel. The heel construction and fit seems to account for knitterly preference in knitting one direction versus the other. Feet are individual and the heel that fits my foot best won’t necessarily fit your heel best.
Toes and the top of the cuff are different in the two methods because of which of the two is the cast on edge versus the bind off edge. The biggest issue here is how pointy the toe is and how stretchy the cuff is. The cuff needs to be stretchy enough to get over your ankle, but not so loose that the sock falls down to bunch around your ankle. If the toe is too pointy, it may not fit properly over your toes, leaving a strange and uncomfortable pooch at the end of the toe. Again, multiple cast ons and bind offs exist so that knitters can find a construction method that best fits each person’s foot.
I chose to knit toe-up socks. My primary reason for choosing the toe-up socks was so I could try the sock on as I knit, giving me the best possibility of fitting my foot without having to do gauge swatches and math to calculate out a personalized sock pattern. It is also easier to use up all your yarn when knitting from the toe up since you can make your cuff as long as you want.
One vs. Two
Socks come in pairs. You aren’t done with the knitting until both socks are done. You can choose to knit one sock at a time or two socks at a time. Some people choose to knit two socks at a time because they are afraid of “second sock syndrome” in which the second sock never gets knit because once the first sock is done, it feels like the project should be complete. This is not something I that worried me. I’m certain you have noticed that I tend to knit the same item over and over and over, ad nauseum. Another reason to knit socks two at a time is so that any changes (intentional or otherwise) you make to a pattern are replicated exactly and immediately in the other sock. I chose to knit my first pair of socks two at a time because I am the kind of person who needs my stripes to match exactly. Knitting two socks at a time meant that I could see if the stripes were matching and more easily fix it if they were not.
Needle Options
When knitting any small round object, you have three options for needles: double-pointed needles, magic looping with a long circular needle, or two circular needles.
- Double-pointed needles. As the name of the needle type says, these are individual needles (not connected to each other) that have points on both ends. The needles used for socks are between 4″ and 6″ long. You need either 4 or 5 needles for knitting a single sock. Stitches are distributed evenly between all but one of the needles. The remaining needle is your working needle. You use your working needle to knit the stitches off the first of your holding needles. When all stitches are transferred from the first holding needle to your working needle, the newly naked needle becomes your working needle and you knit the stitches off the next needle. You can make two socks simultaneously, but you would need two sets of needles. First you work one sock, then put it down and work on the other sock, switching back and forth between the two until both are finished.
- Magic Loop. This method requires a cable needle. The tips of cable needles are metal or wood or plastic of the size you need for your project and the tips are connected to each other with a plastic cable. For this method, you need a really long cable needle, 47″ or 60″ from tip to tip. You have one tip in each half of the stitches, the extra cable folded into a loop between the halves. You knit using the tips normally, and slide the loop around as you go. It is possible to knit two socks at a time with the magic loop method. Both socks are on the same needle at the same time and you work them simultaneously, each from its own ball of yarn.
- Two Circular Needles. This method requires two cable needles. Each cable needle should have the same size tips and be either 16″ or 24″ long from tip-to-tip. Half the stitches are on one cable needle and half are on the other. You knit using the two tips on the half of the stitches you are on, then switch over to the other needle and knit the other half with the two tips on that half. You can do two socks at a time with this method. Both socks are on the needles at the same time and you work them simultaneously, each from its own ball of yarn.
Whenever you have multiple needles, you can end ups with “ladders.” Ladders are a loose column of stitches, that look like a run in your nylons. This is a problem regardless of which of the three needle options you choose for making socks. You avoid ladders by pulling your stitches particularly tight before and after the separation between the needles. I have used all three of these options on other projects. I find it easiest to avoid ladders when using two circular needles, so that is what I did for the socks. I used one 16″ needle and one 24″ needle. I liked having needles in two different lengths as it helped me differentiate the beginning of a new round without using a stitch marker. The 16″ needle was perhaps a little short for doing two socks at a time, but I was able to manage it without ever dropping stitches.
A Learning Experience
Before I cast on, I found the pattern listed in the stats above and switched to using that rather than Silver’s Sock tutorial because it was an easier pattern for me to read. It is a free pattern that was available on KnitPicks’ website. Fortunately, I printed the pattern out because it is no longer available. KnitPicks took it down a few months ago. It is a shame because I found the pattern to be succinct, but descriptive enough that I did not have to refer to another source while knitting.
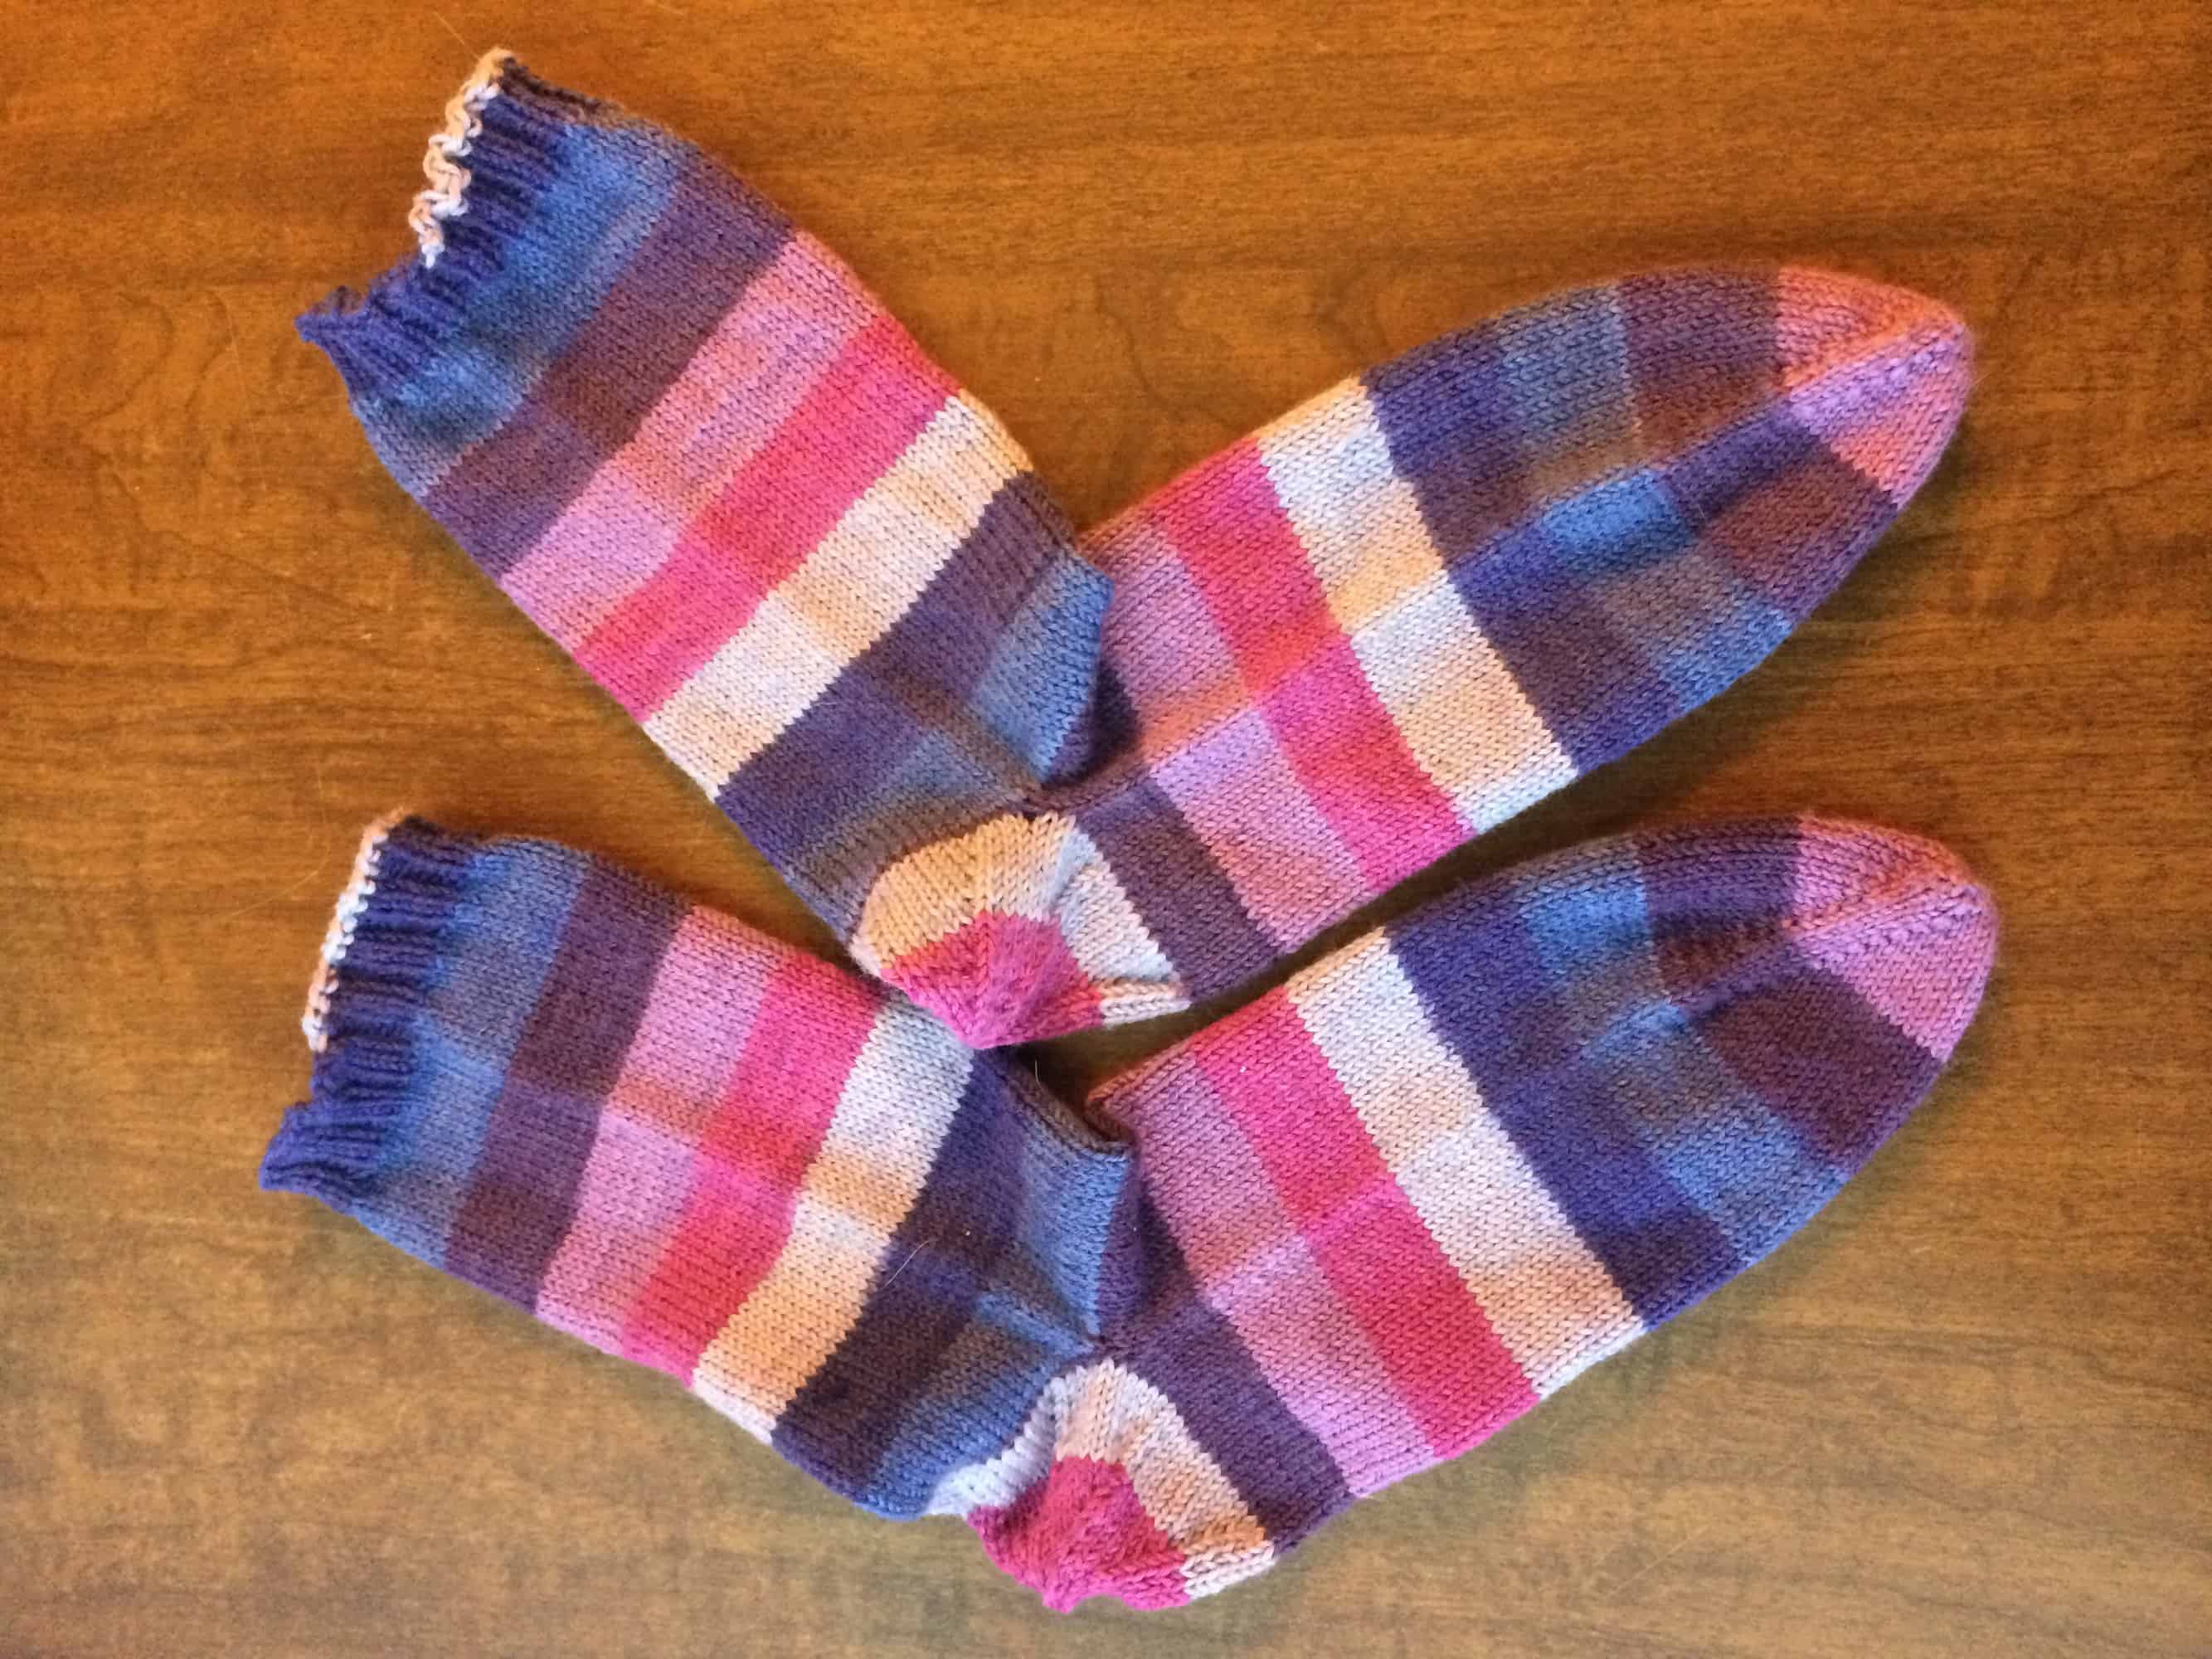
Last October, I cast on and started knitting. I knit to the point where I thought I needed to put the heel and added the waste yarn so I could come back and make the heel later. (The reason for doing heels this way is so you do not disrupt the striping order). I kept knitting and bound off! And then I discovered that the bind off was too tight and therefore I could not get the socks over my ankle. At this point (November 2013), the socks went into time out. They have been sitting in time out since then. One of my goals for 2014 was to knit myself 12 pairs of socks. So far, I have completed zero pairs of socks. These socks came out of time out so I could finish them and decide what to do for my next pair! At the beginning of August, this is what they looked like:
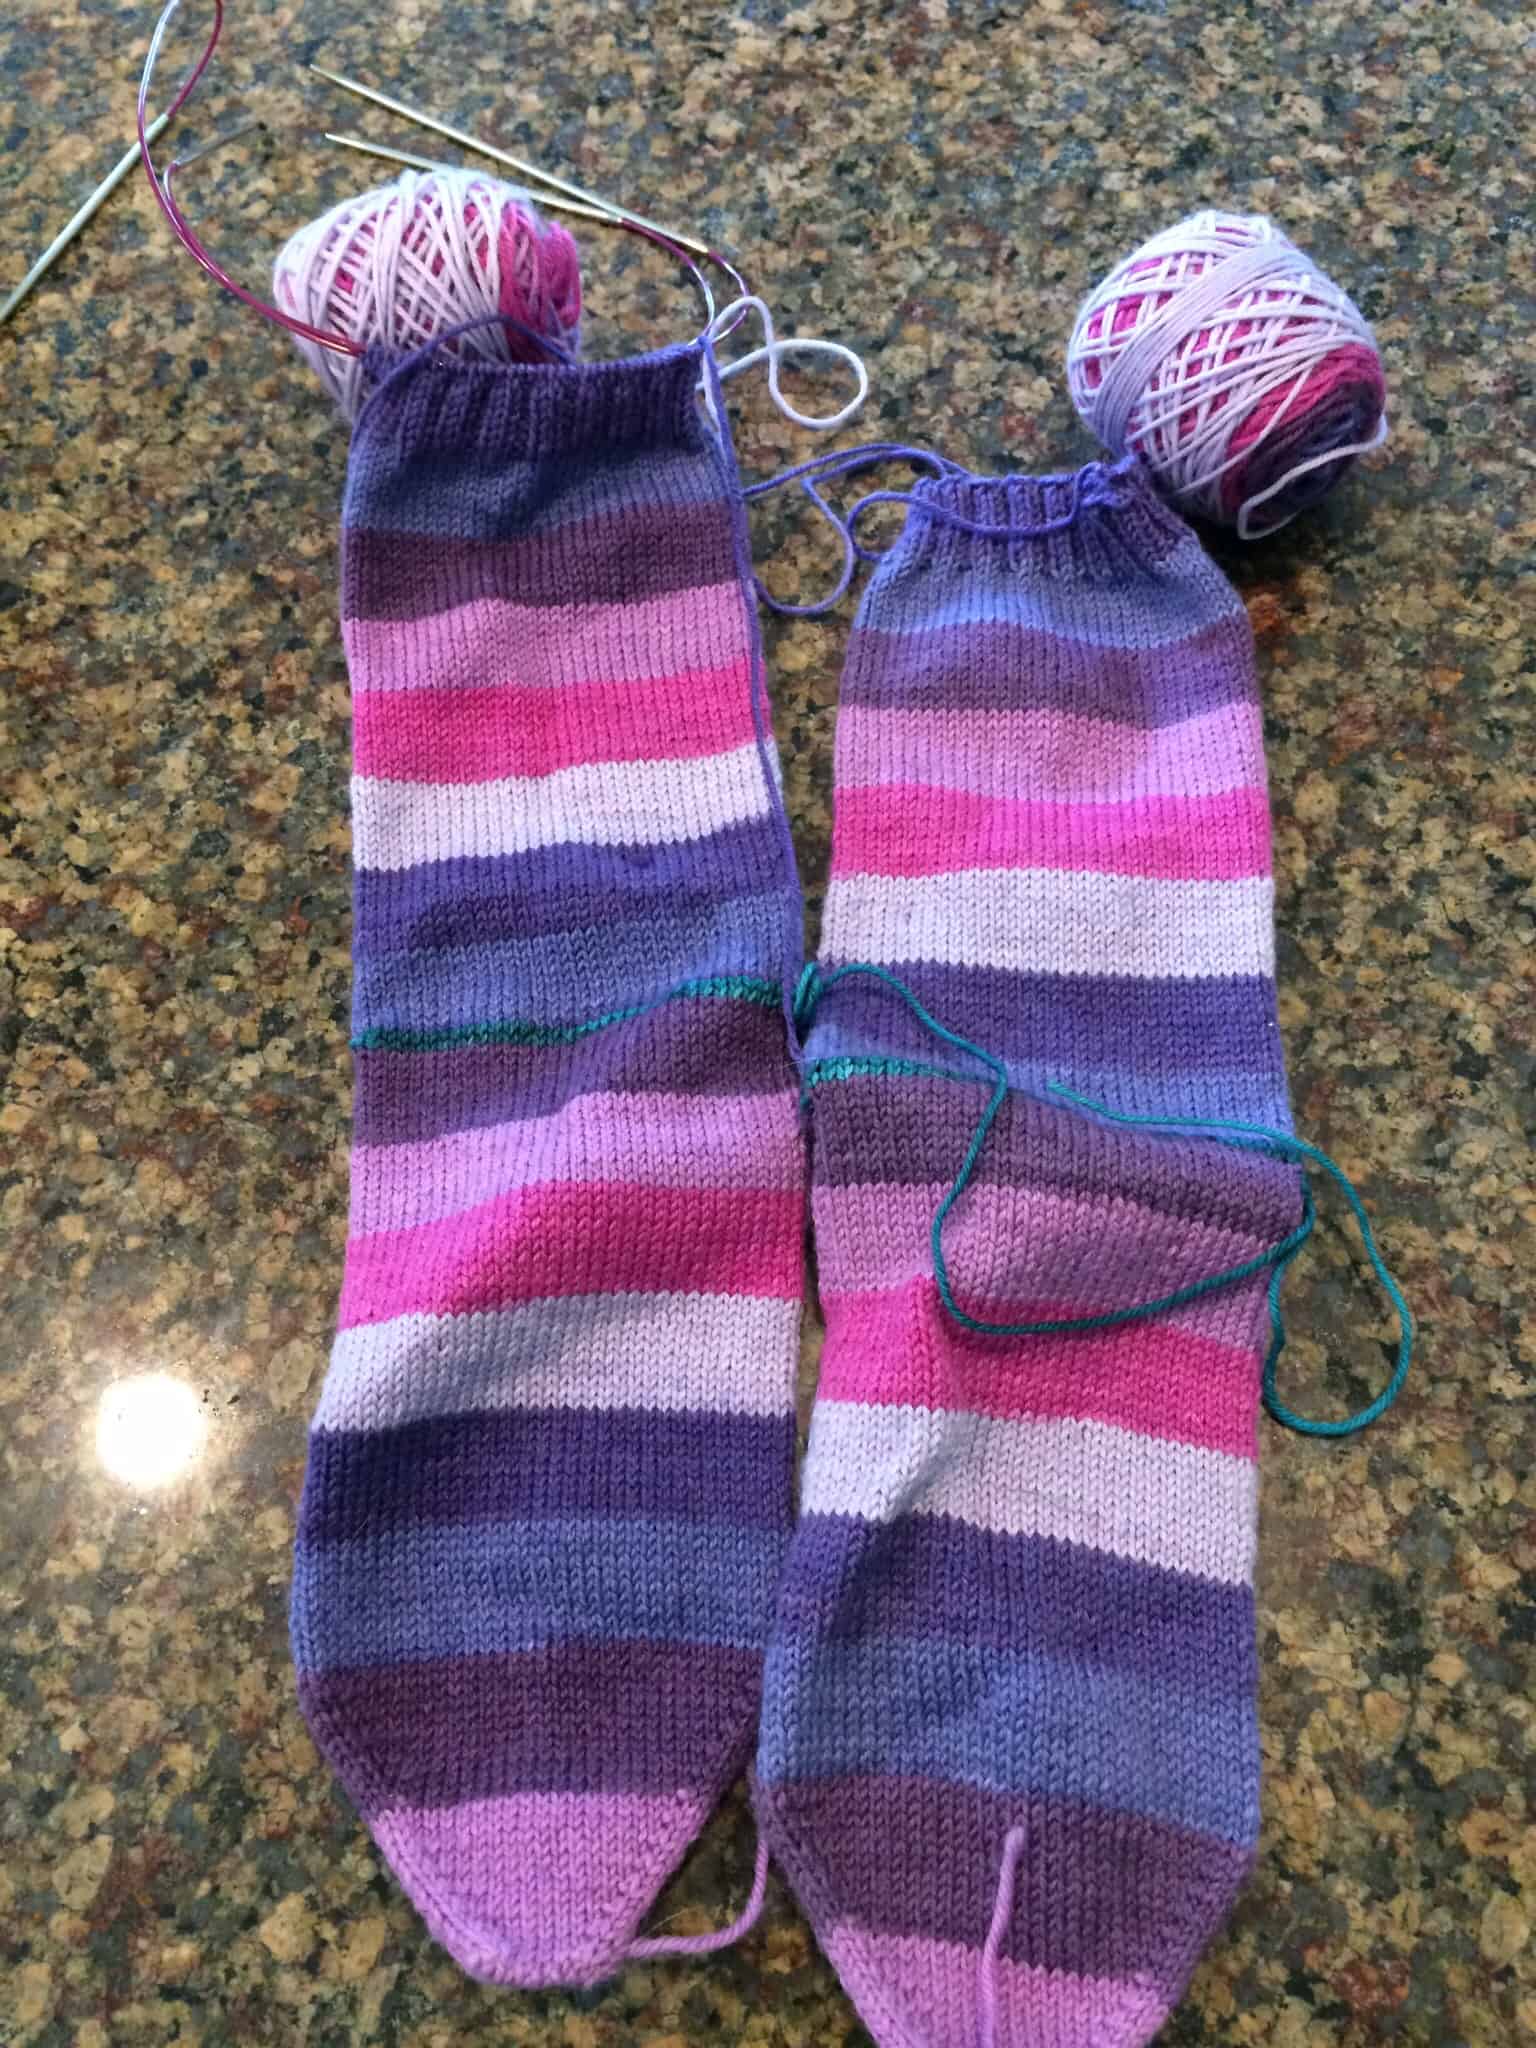
The green yarn marks the spot where the heel would be added One sock was back on the needles as I had unpicked that bind off in preparation for binding off more loosely. The other sock still had the too tight bind off. Picking out the bind offs, removing the waste yarn, and picking up the heel stitches took twice as long as the actual knitting for the new bind offs and heels. Still, it took maybe 6-8 hours to finish off the socks.
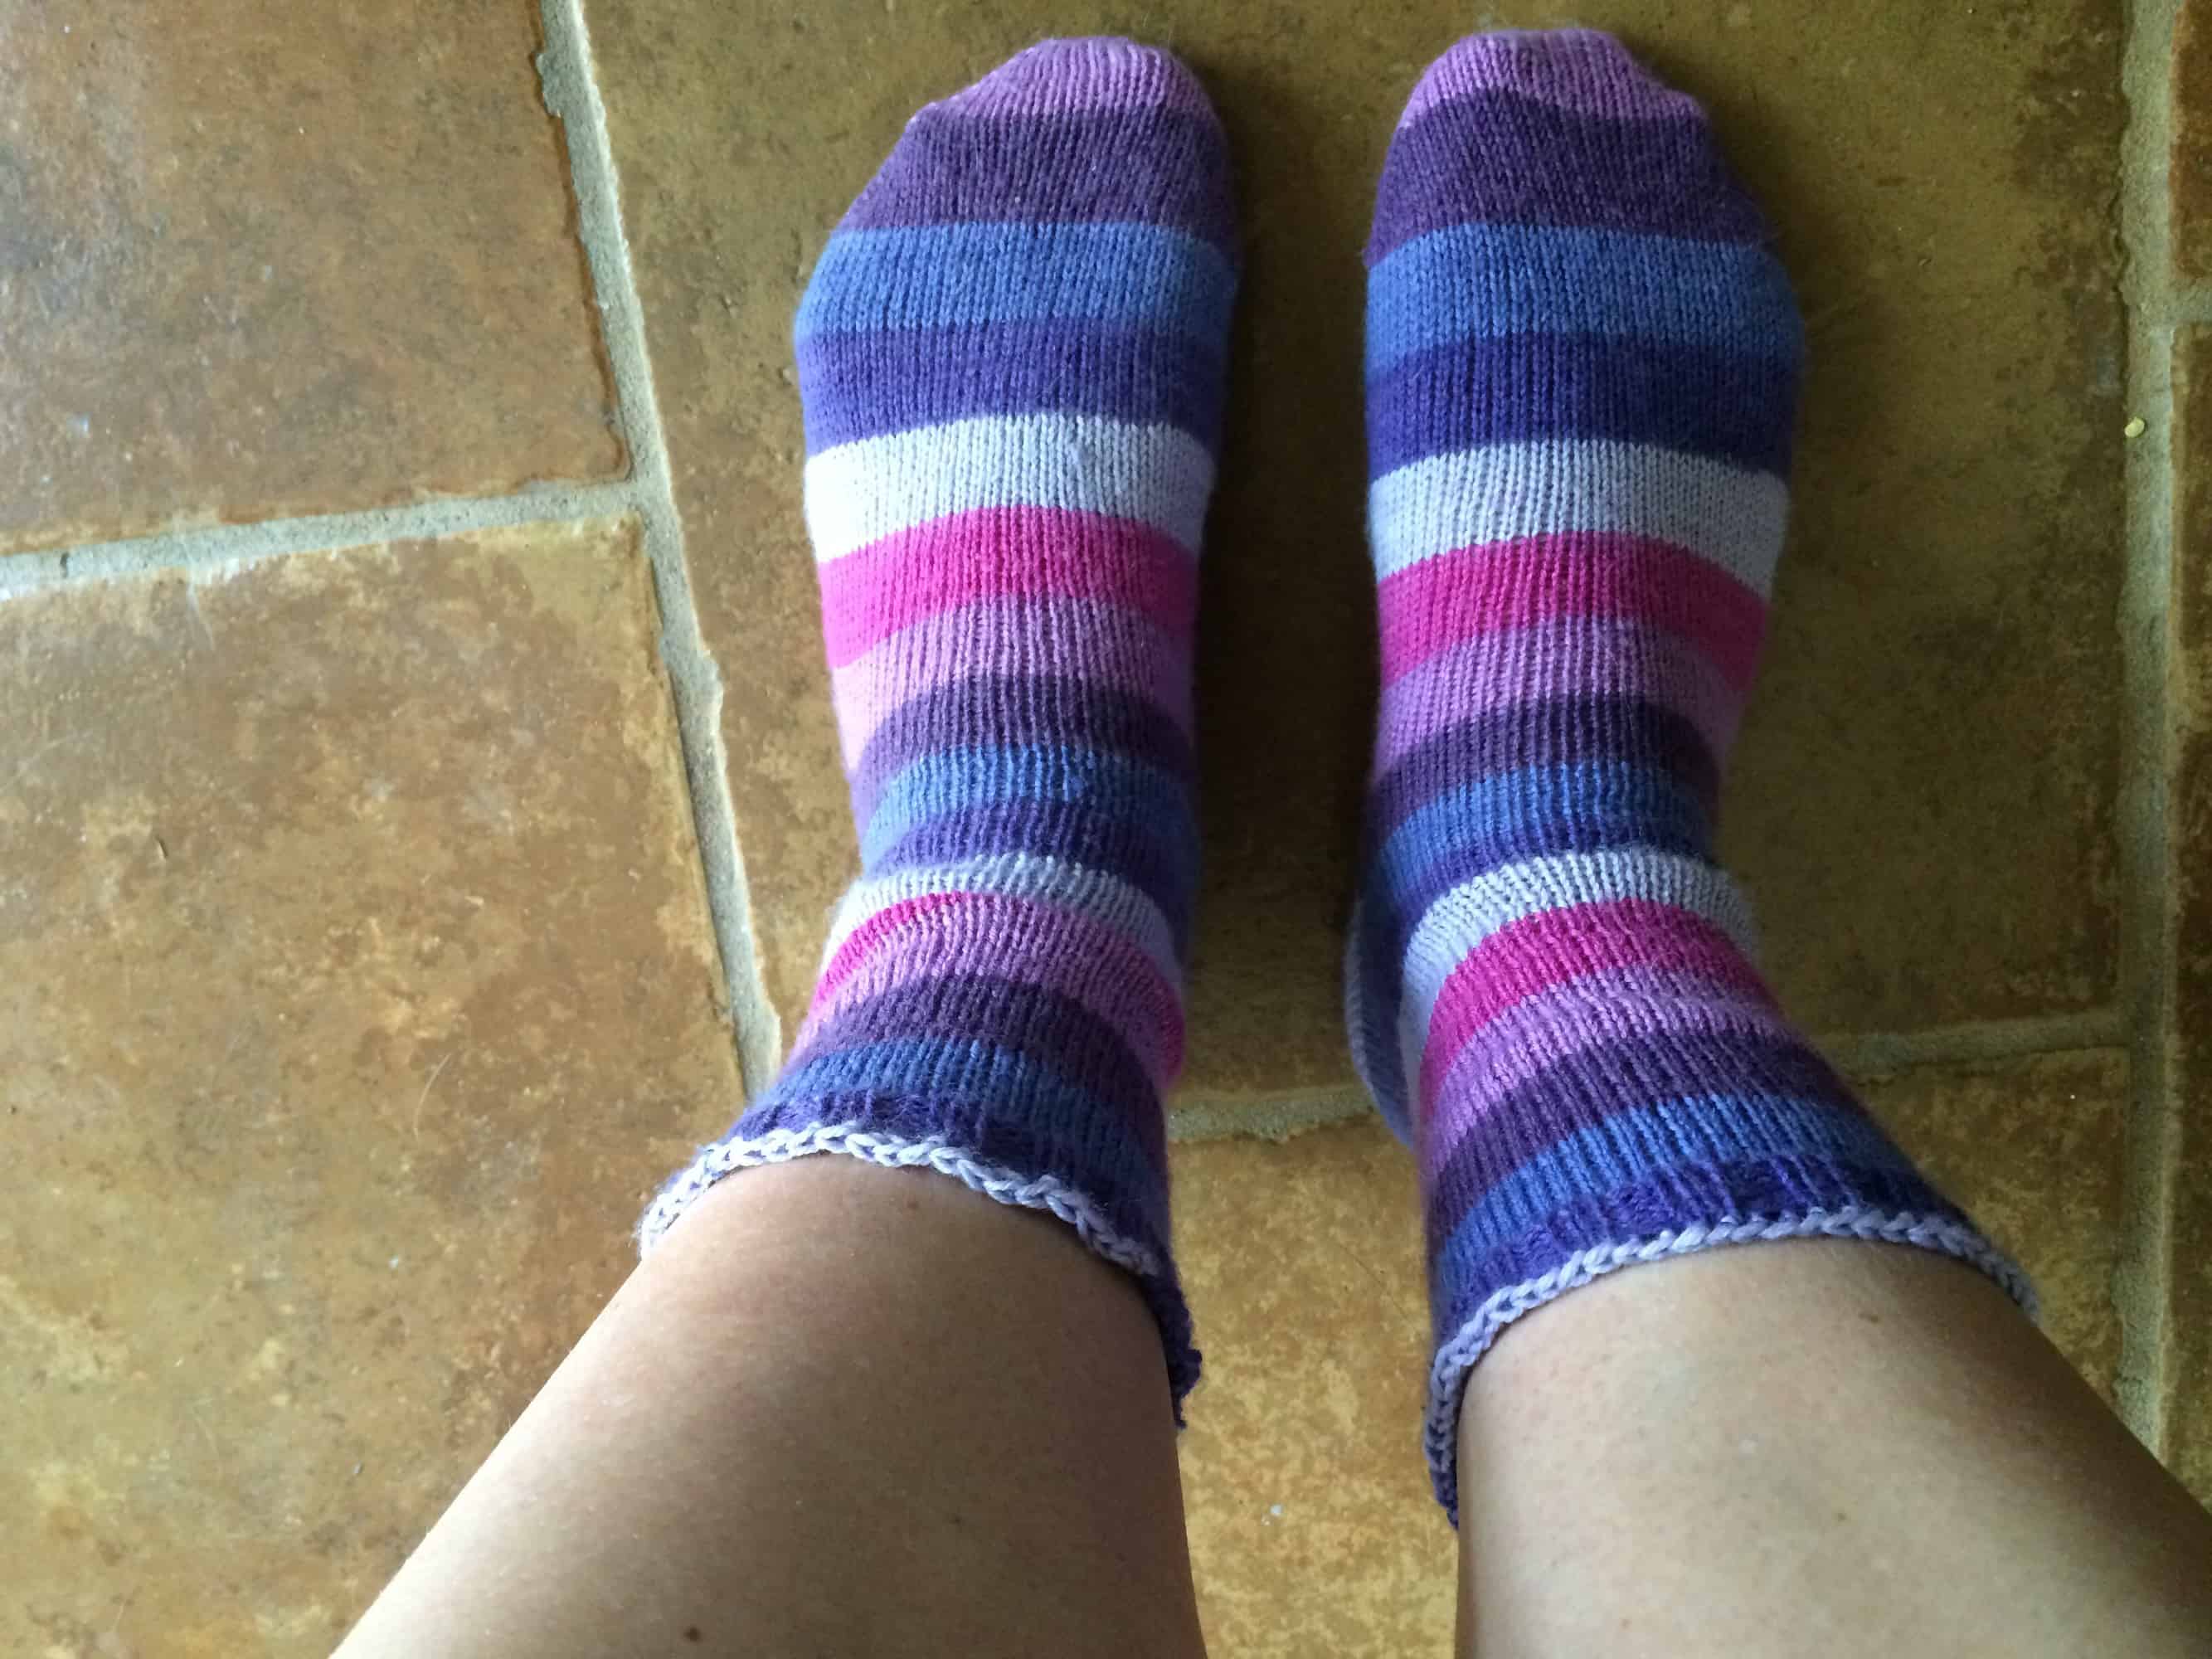
And then I discovered that they do not properly fit my foot. It is difficult to take pictures of socks on your own feet, but here’s three so you can see the problem.
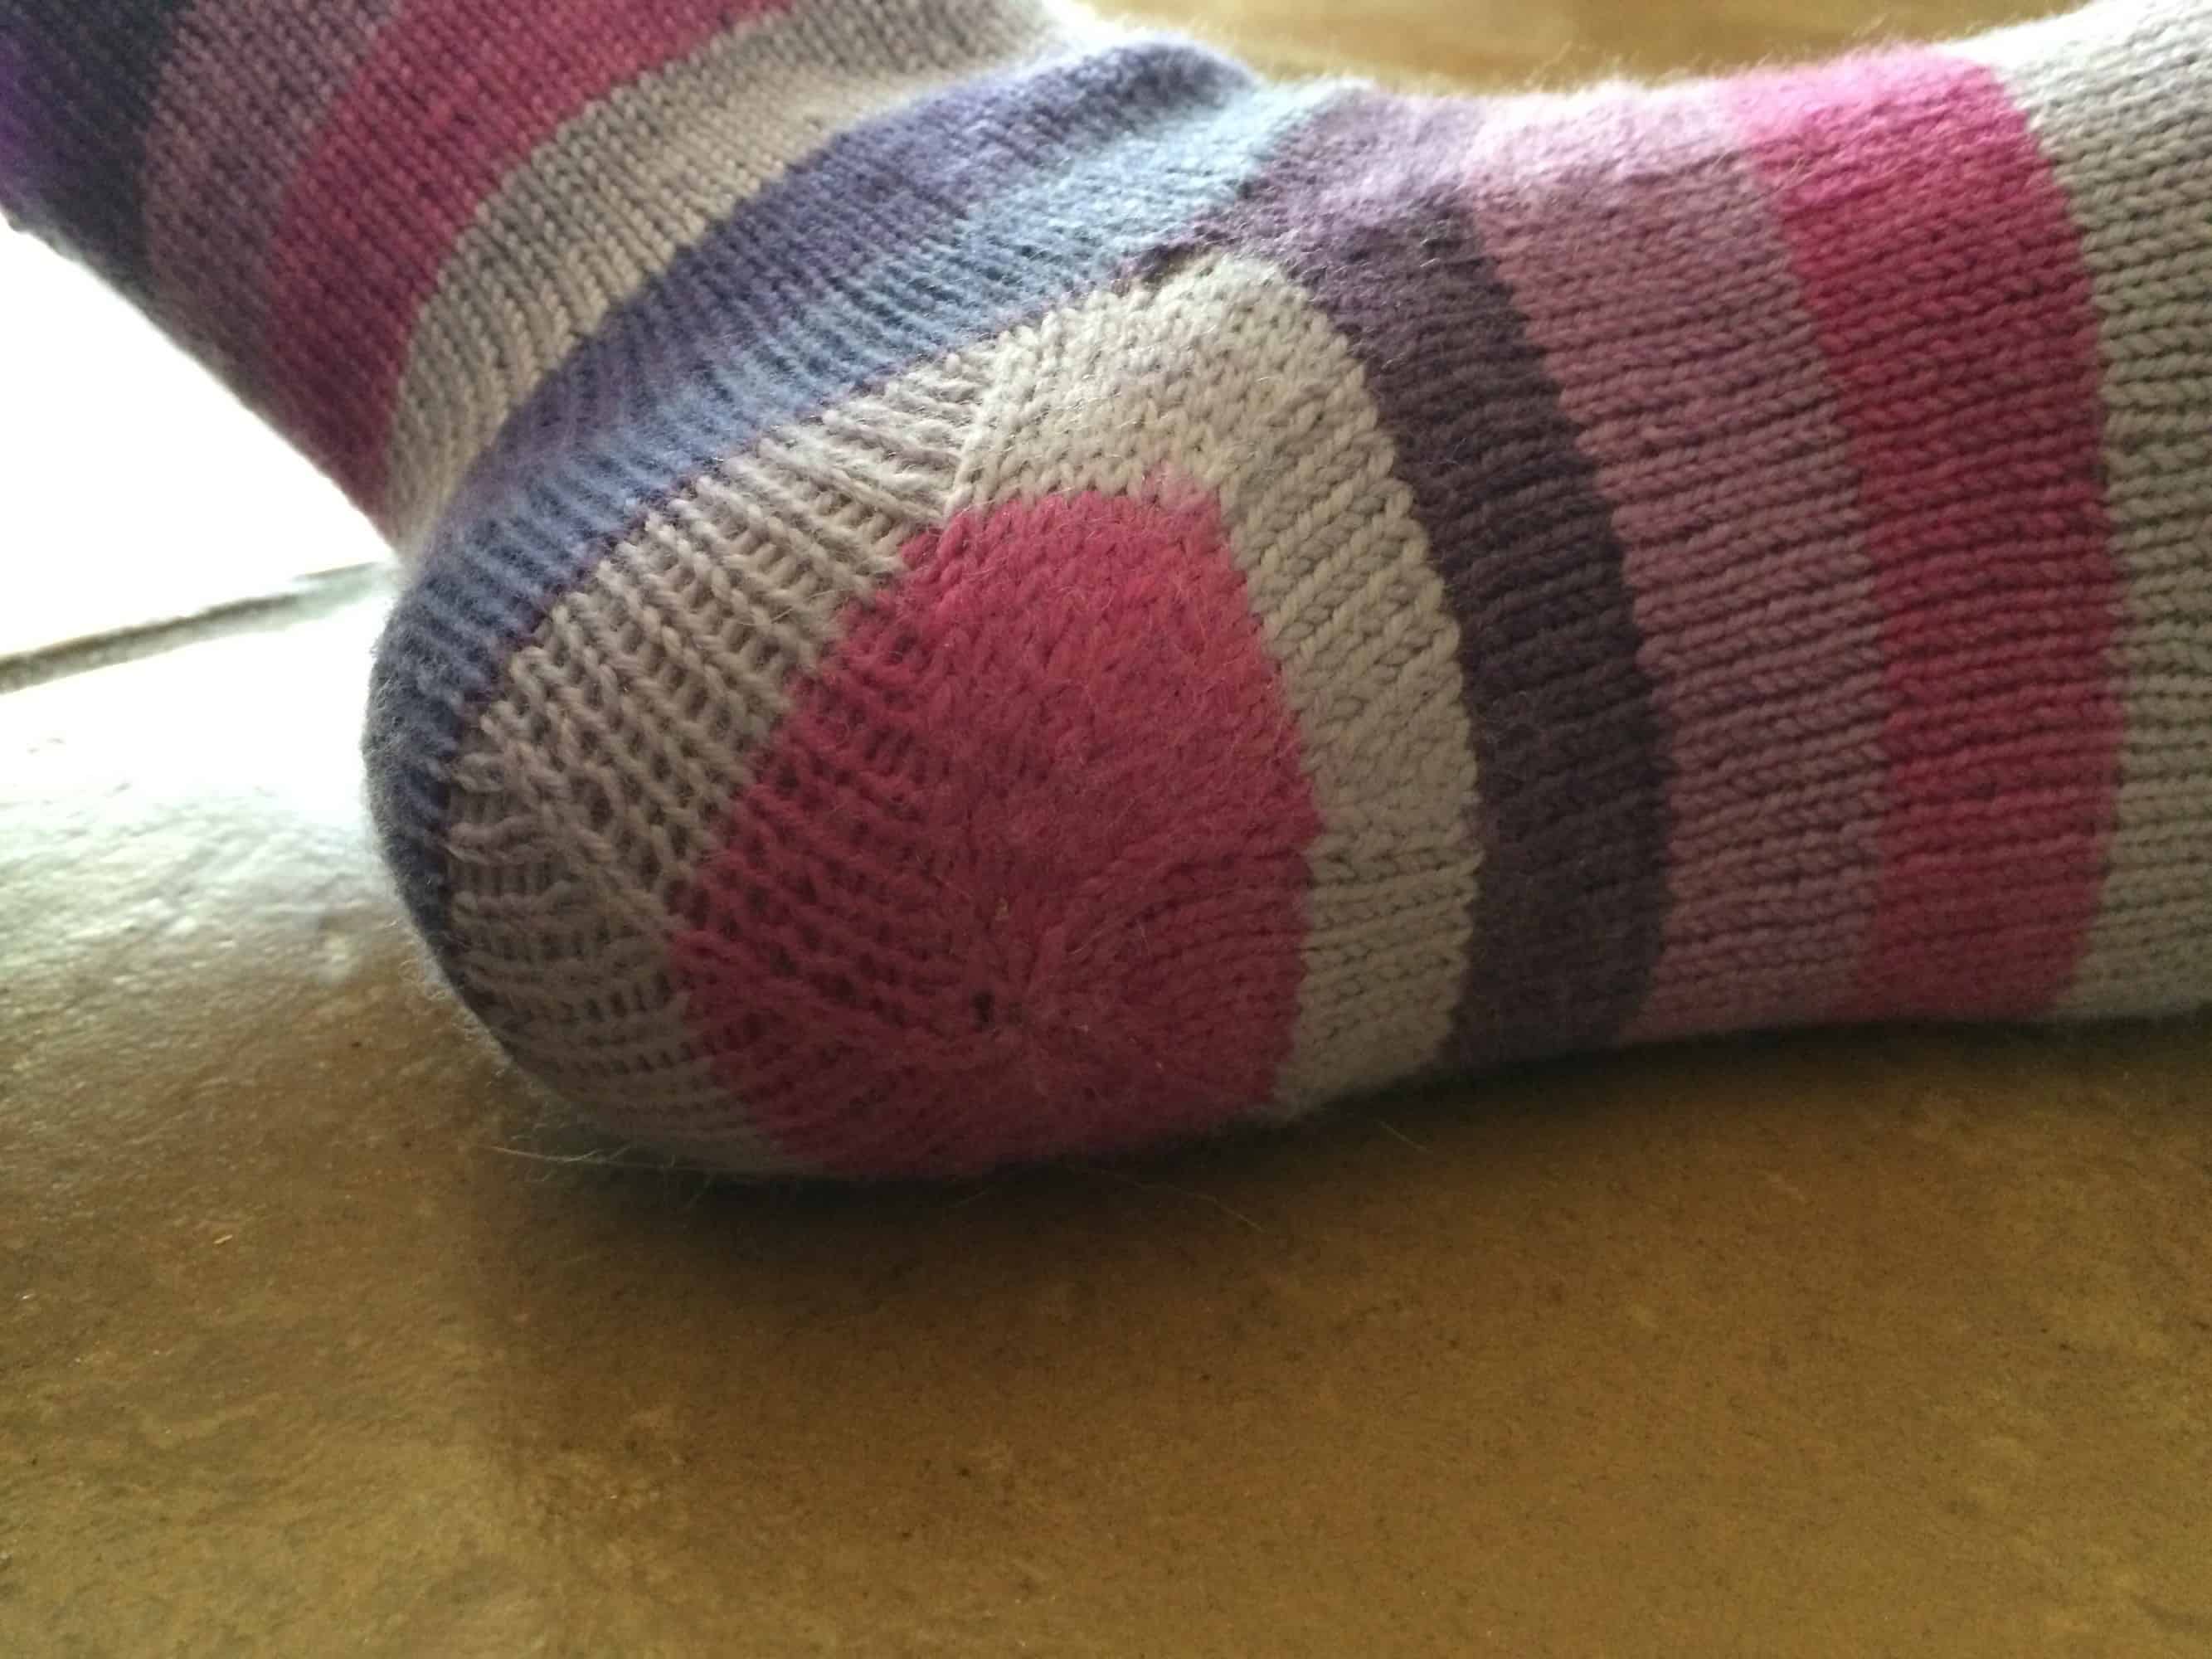
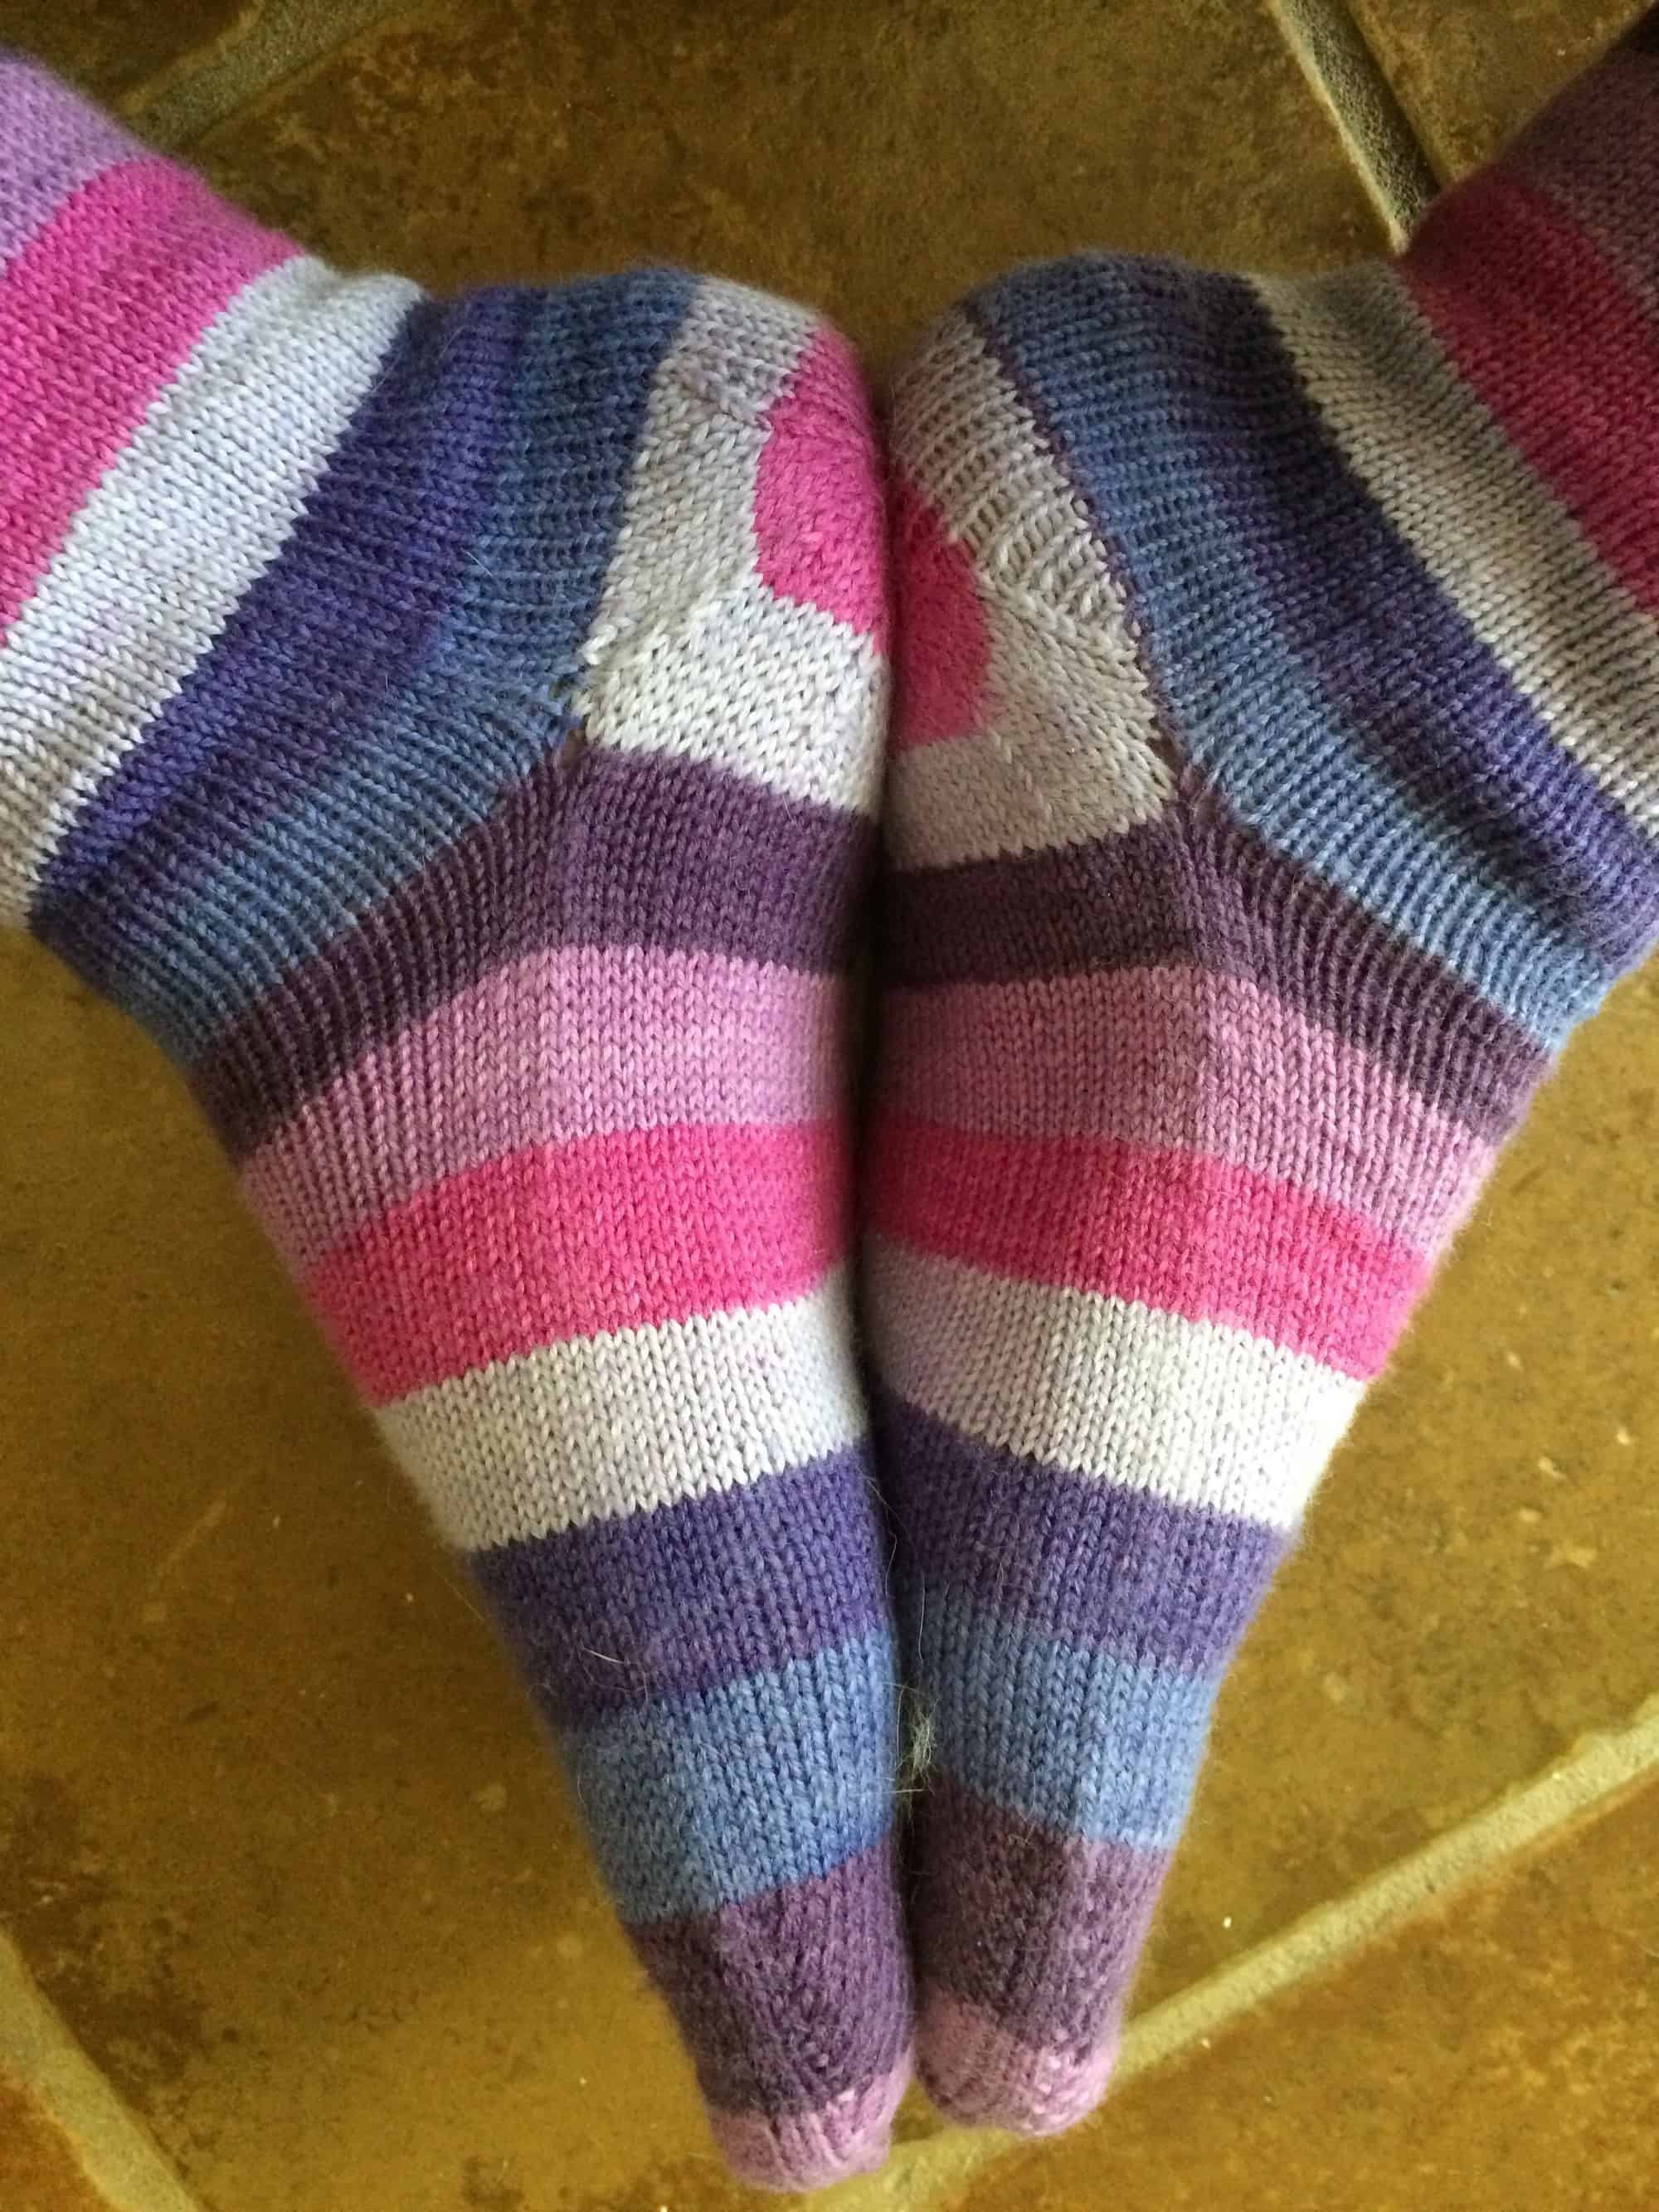
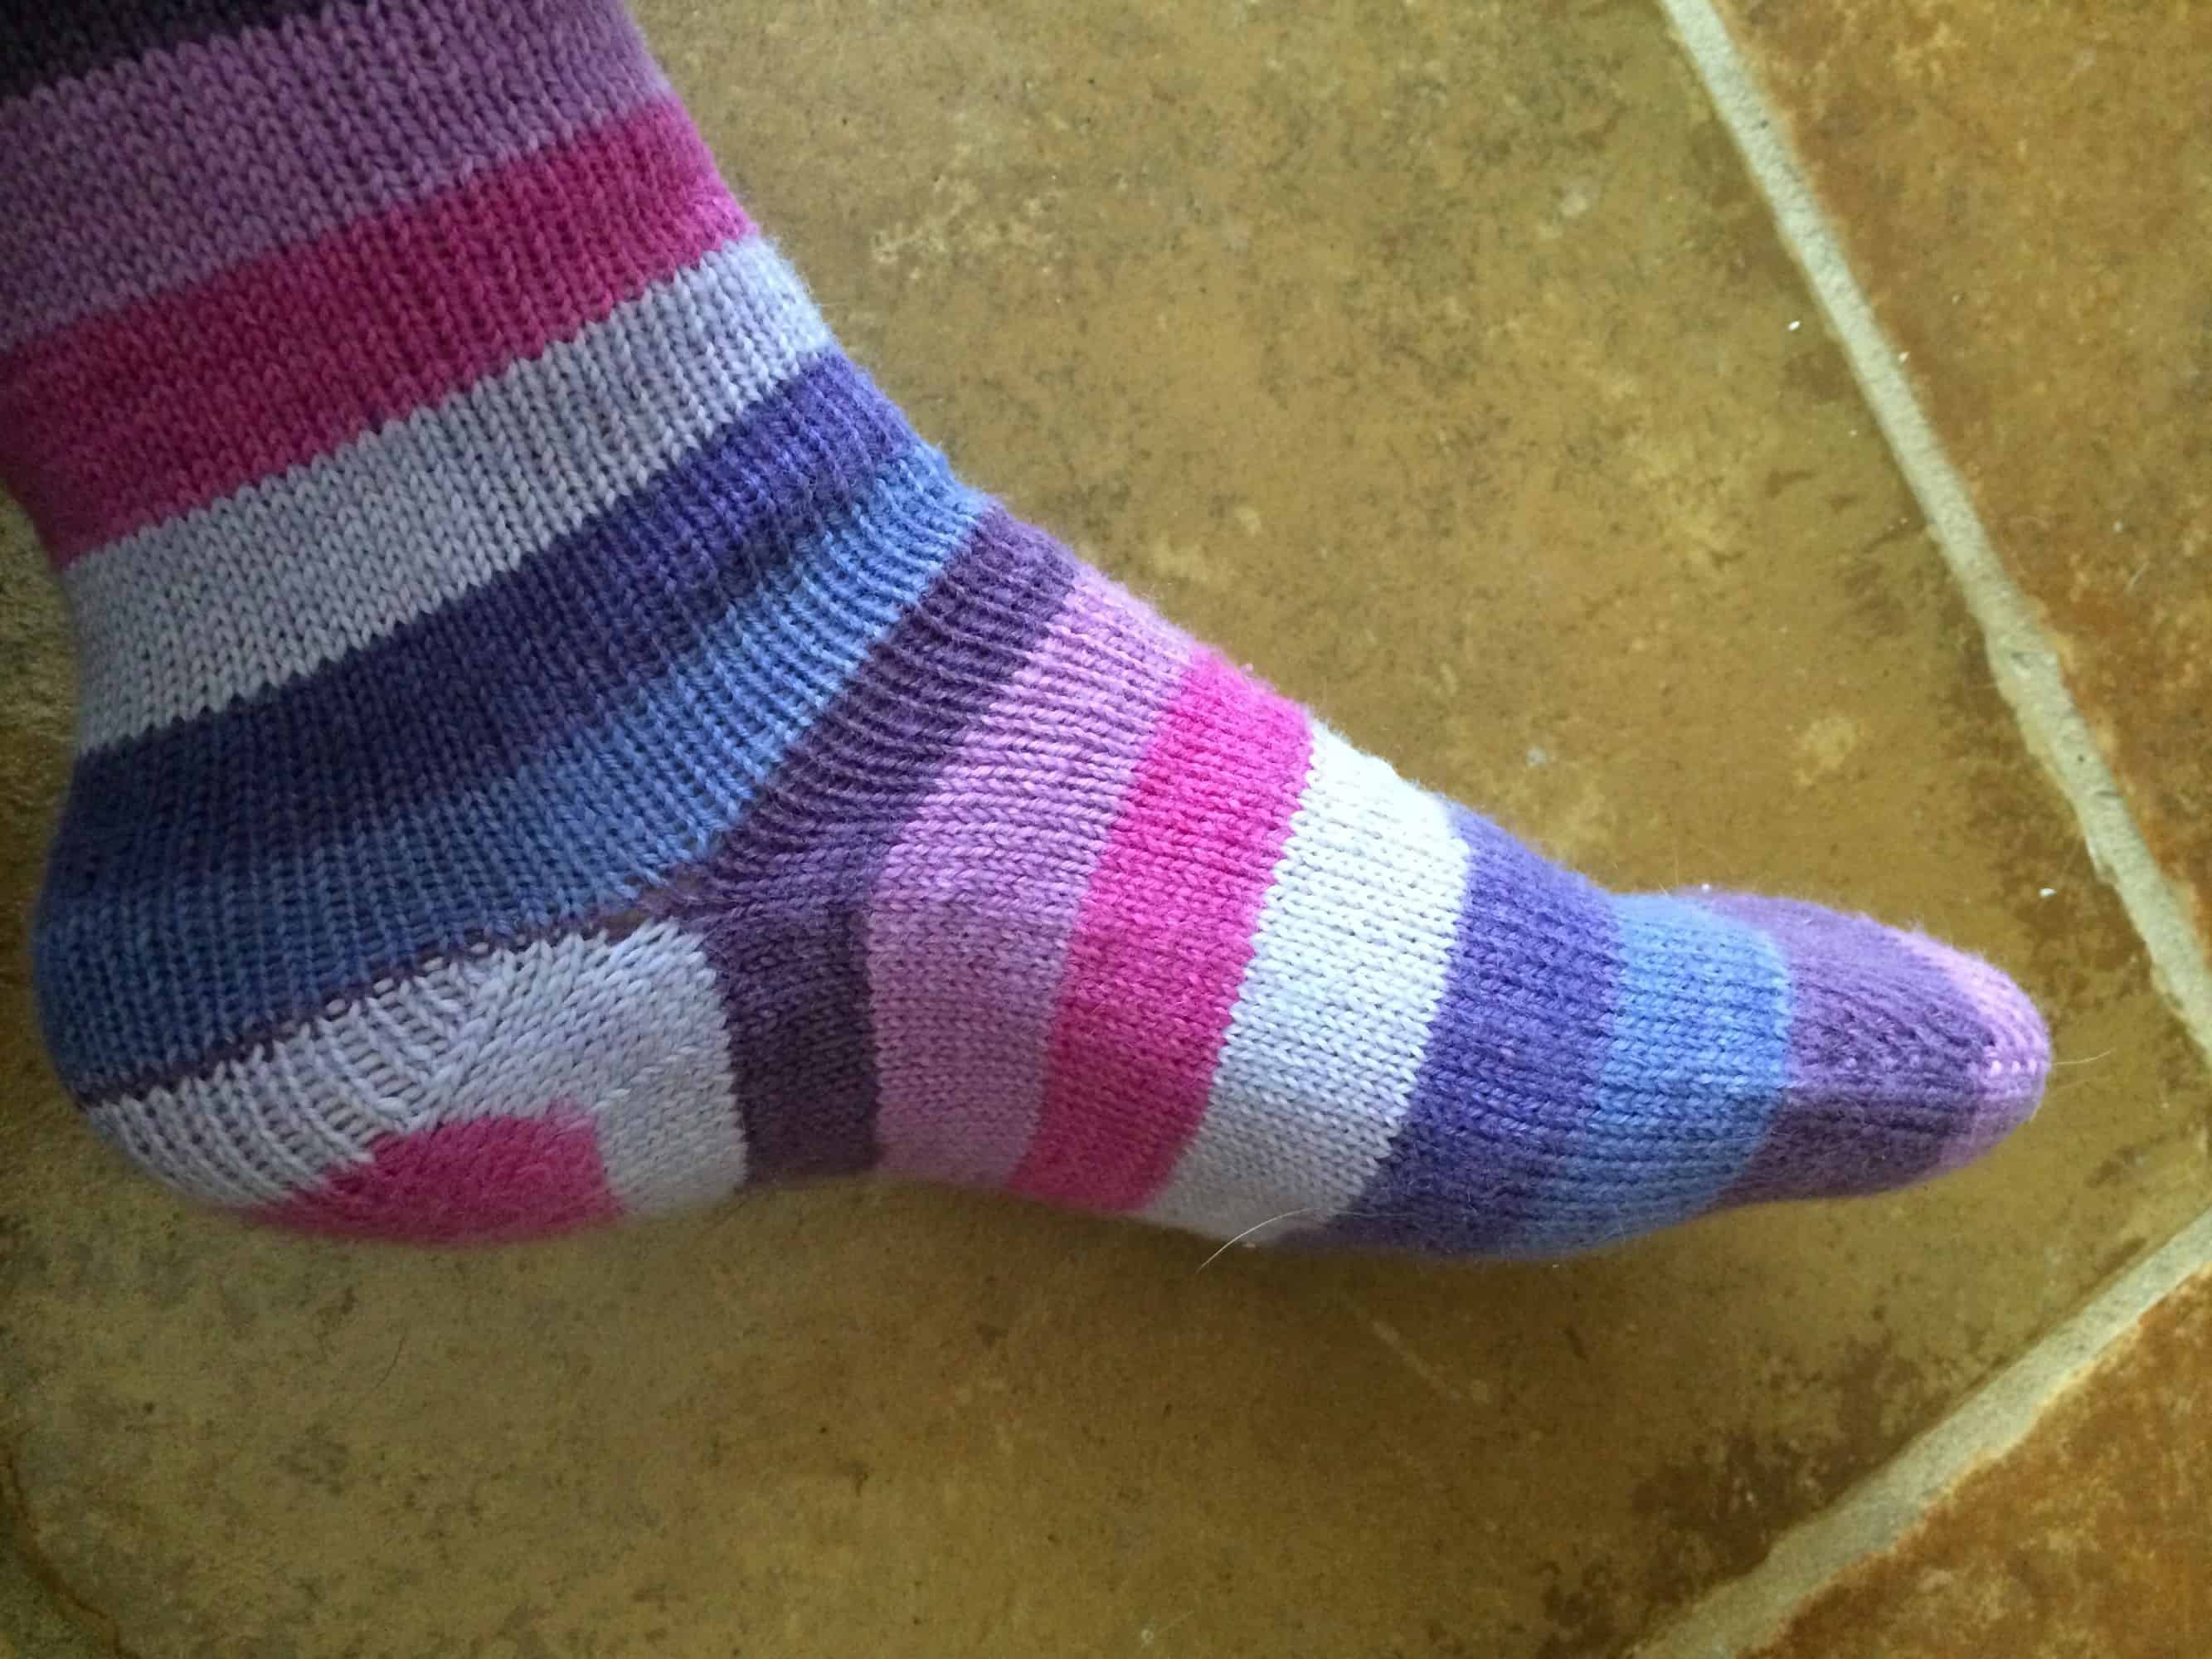
The heel is on the bottom of my foot, rather than on my heel. The heel is fairly shallow and used a lot less yarn than I thought it would. The finished length of the sock from heel to toe is approximately 8.5 inches:
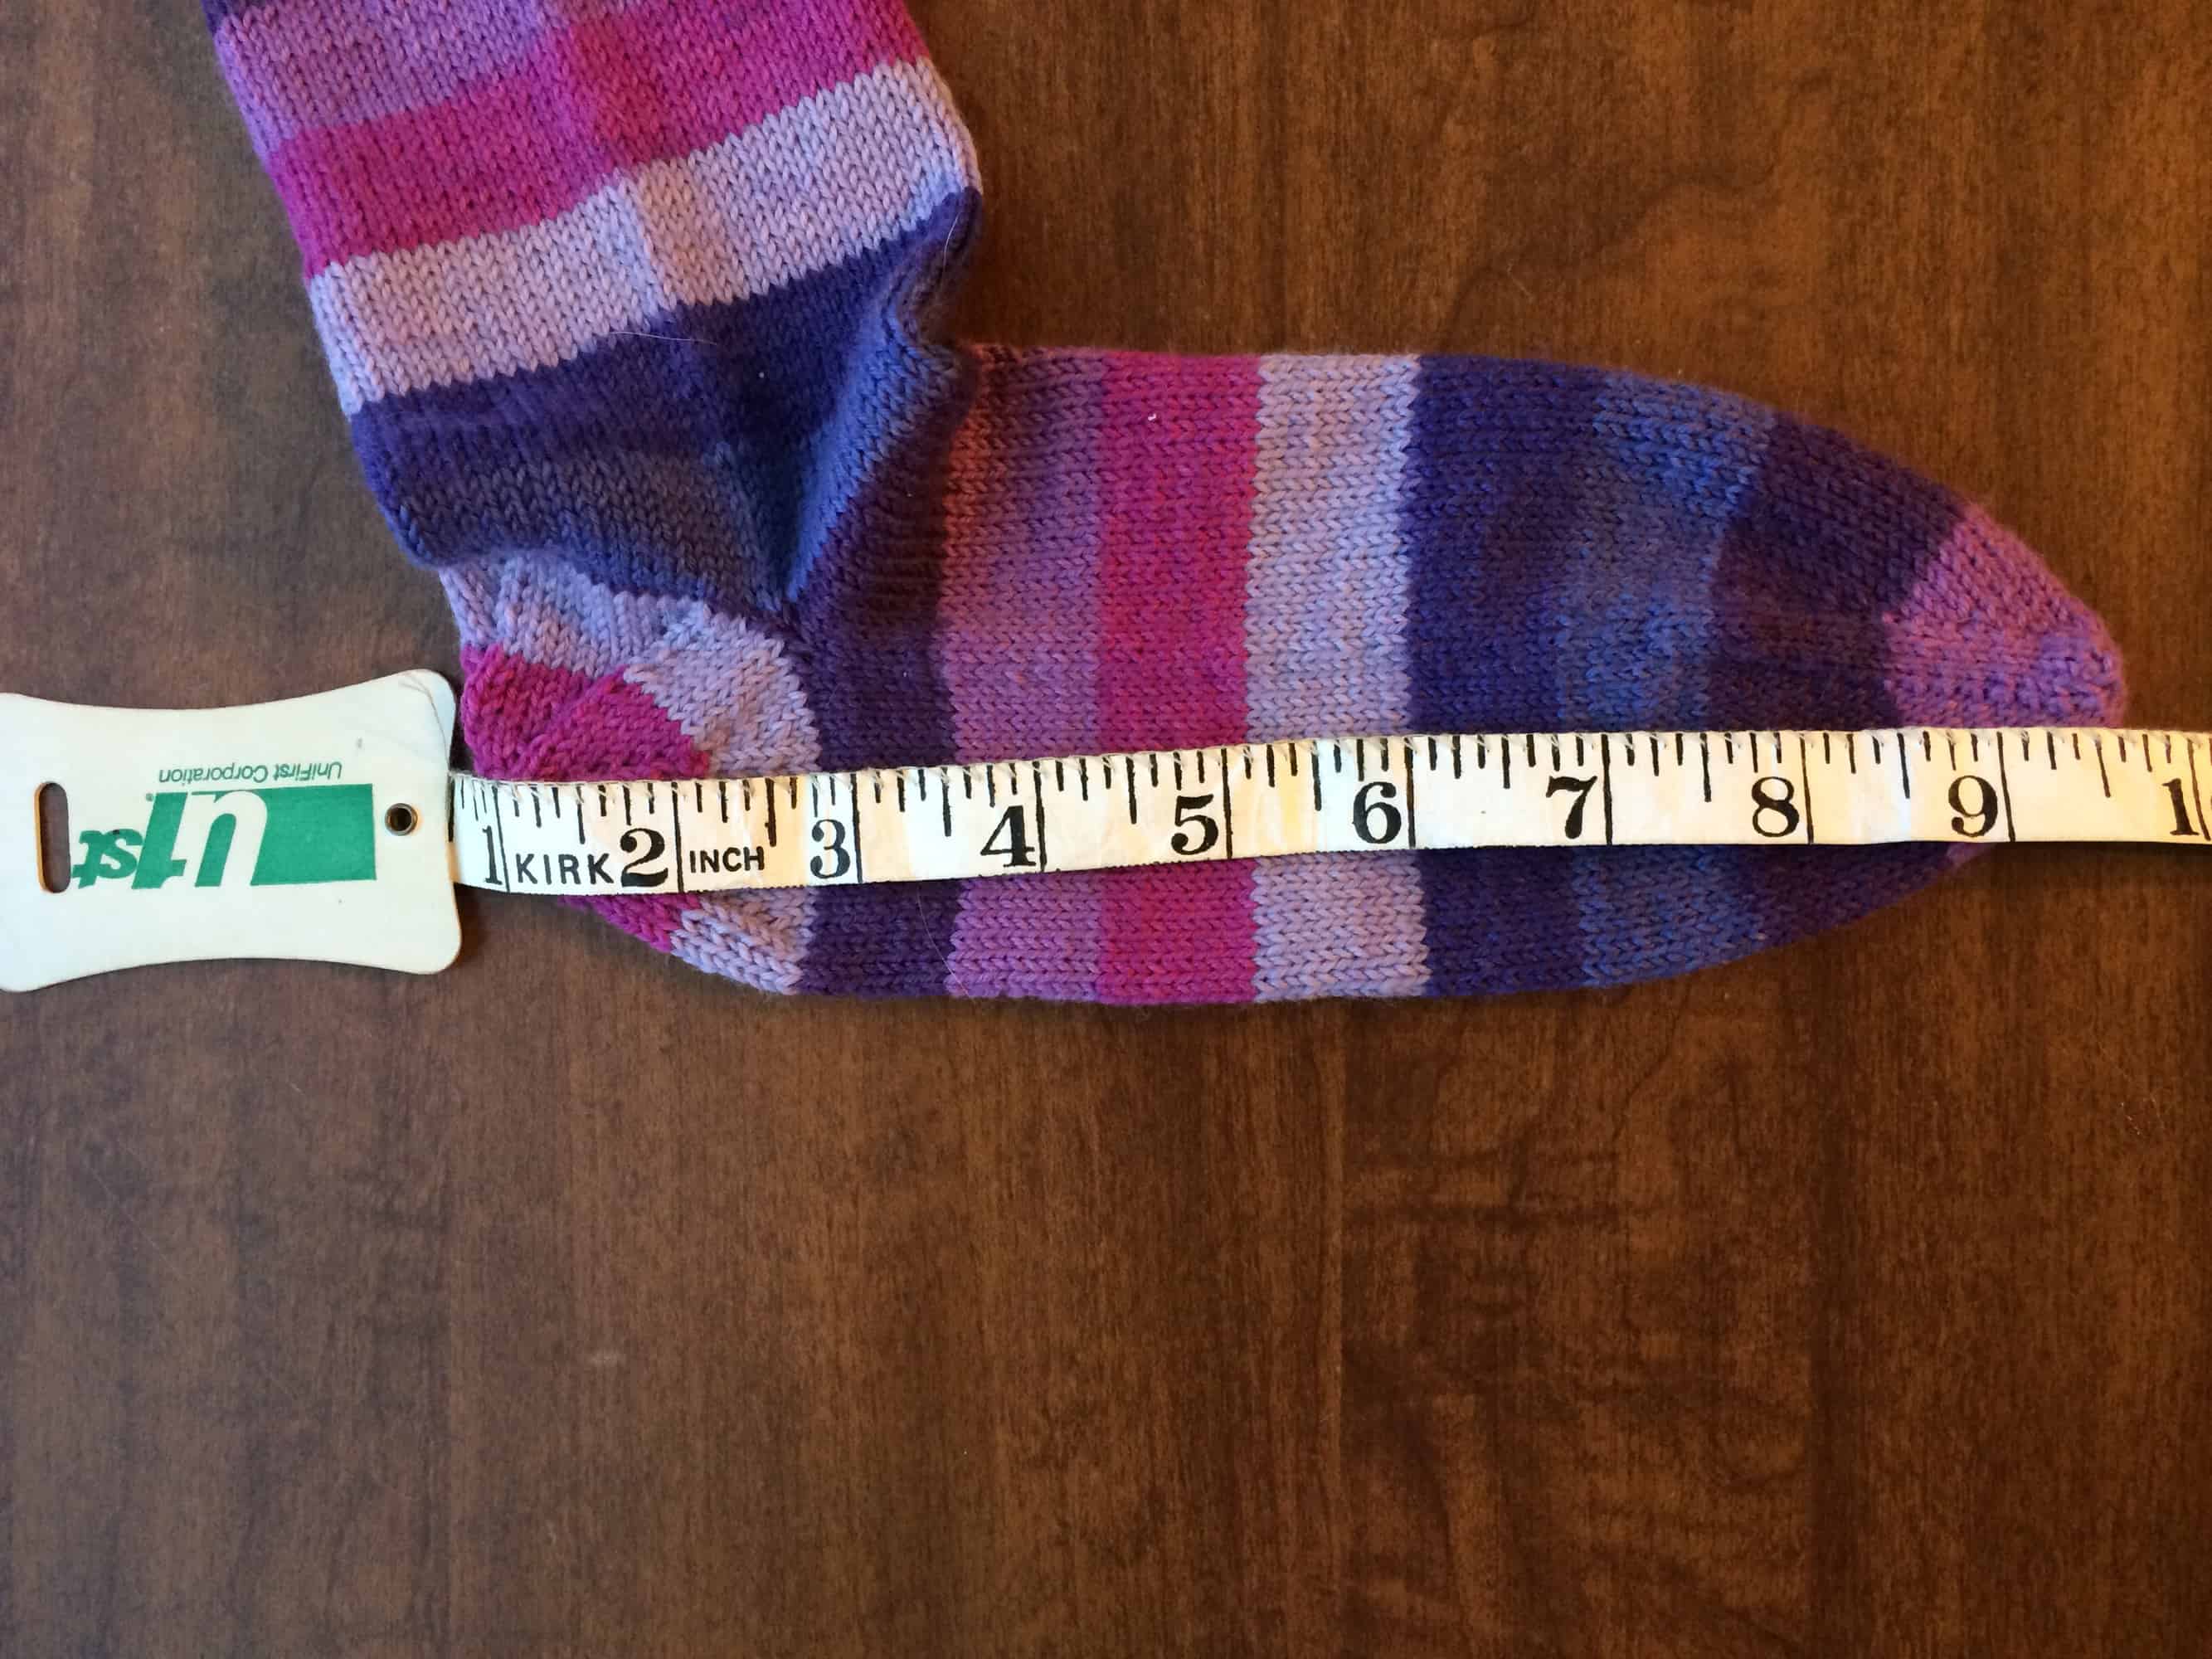
My foot is more like 9.5 inches long. Each stripe is 3/4 of an inch long, so 1 – 1.5 stripes more would have done it. I only used 1.4 skeins (these are 50 gram skeins) rather than 2 full skeins, so I had plenty of yarn left to make the foot longer if I wanted. I also could have made a longer cuff. I saved much more yarn for the heel than I really needed!
I liked the toe when I first cast on the socks, even after trying on the socks in progress. Now that they are finished, I find the toe a bit too pointy. The socks started with 7 stitches cast on. I am going to cast on more stitches next time, somewhere between 10 and 15. I need to look more closely at the way the toes fit my foot and decide what will get me the fit I want.
Finally, although I managed a loose bind off that allows the sock to get over my ankle, the bind off is so loose that the socks do not stay up as well as I would like. I used Jenny’s Surprisingly Stretchy Bind off. On my next sock, I’m going to look for a different, but still stretchy, bind off.
Conclusion
Although these socks do not fit me, I am very happy with how they came out. They are appropriately sock-shaped, pretty looking, and not terribly difficult to knit. I plan to cast on another pair of the plain vanilla socks using one of my other Felici colorways (I may have gone a wee bit crazy when KnitPicks discontinued this yarn and purchased 13 colorways). I would like to finish these new socks this month so they can serve as a swatch for next term’s OWL. I’m planning to propose and Arithmancy OWL, knitting at least 4 pairs of plain vanilla socks. Knitting a pair this month will help me apply the lessons of the first ever socks to create a sock more fitted to my foot and serve as a template for the OWL socks.

Hooray for socks!